
This post and photos may contain Amazon or other affiliate links. If you purchase something through any link I may receive a small commission at no extra charge to you.
I have been crocheting a lot. And by a lot I mean I made 8 hats in one week and then 2 hats and an afghan the next. Which hasn’t been the norm for me for a couple of years because of hand pain. After an injury I had been given some kind of an injection to help with the inflammation and suddenly my hands felt great!
My hands feel less great in recent days but I’ve been bitten by the crochet bug again. And I will often find myself stopping on my way out of my office for the evening to peruse the colors in my yarn shelf. I’ll stand there and come up with a color scheme and then often take off with the yarn to get started then and there. But I started to realize that selecting my yarn (and crocheting in the evening) by the light of soft white bulbs means things look very different in the light of day.
And so I decided to mobilize my yarn stash by making these pretty darn nifty, if I do say so myself, yarn cards. I can take these babies anywhere in the house (or outside!) and make good decisions about what colors to use. It’s a heck of a lot easier than carrying 7 different skeins of green yarn outside :)
This Portable Yarn Stash Color Library is Perfectly Customizable
Now my yarn cards are mostly 20 colors apiece. It’s a good size to get out of a sheet of basswood without getting too cumbersome. Most of my yarn is Loops and Thread Impeccable by Michael’s. So on my cards every color that is NOT Impeccable I put an asterisk just to remind myself that it’s a different brand. But if I had a lot of different brands I might make a color card just for each brand of yarn in my stash.
And if you want a different size, you can always create a new the design over the top as mine as a template to create one smaller or larger. In fact, I did just that to make one 18 color card to perfectly hold the full like of the Lion Brand Color Theory colors that I am currently IN LOVE with. Quick Note * If you download the SVG file I also included that 18 slot card as well as the 20.
Want to also organize your unwieldy rainbow of a craft stash? Let’s get to it, then…
Free Files Are Available to Our Newsletter Subscribers
Newsletter subscribers get this and other files at Dream a Little Bigger for free. (Yay!) Not a member? Signing up is easy and costs nothing. Enter your information in the form below below to join our growing community of makers. You’ll get this freebie emailed to you. As a member you’ll also get post updates, tips and tricks, craft & DIY inspiration, and more sent right to your email a few times a week. Questions or download issues?

Wooden Yarn Organizer Cut Files
Sign up for our newsletter and you’ll get an email to download your free file.
Supplies You Need to Make These Yarn Cards:
Wood Sheets
For most of my yarn cards I used the Cricut Brand basswood sheets. Unfortunately I can’t find those available to purchase anywhere right now. Good news, though, I did manage to find an alternative. These 1.5mm basswood sheets from Amazon are the perfect size to cut one full card from each sheet. Unfortunately I had to order them twice as the first delivery was incredibly warped. For the price and the convenience I’ll still purchase them in the future even if I do occasionally have to return a warped order.
Cutting Machine & Vinyl
While making these cards I also busted out my Cricut Joy. It’s such a lovely little machine and I love it so much :) The wooden cards can only be cut with a full size Cricut. But these tiny names can be whipped up easy as you please with a Joy and a roll of Smart Permanent Vinyl.
How to Cut Basswood to Make These DIY Yarn Card Organizers
For each yarn card you will need 2 wood card cut outs.

On a StrongGrip Cutting Mat lay down a sheet of basswood. If you have a brayer roll it over the wood to push it into the adhesive on the mat for better hold during cutting. Apply masking tape around all of the edges to hold the sheet down. Be sure NOT to wrap the tape around to the backside of the mat.
Using the knife blade in your Cricut Maker, use the Basswood 1/16″ setting. This will take a while to cut. I believe it took about 2 hours when I would run 3 cards on a sheet of basswood. So be sure to check before removing the mat from the machine if you’d like to have it run another pass.

Gently pop your cards out of the basswood sheets. With the natural woodgrain some parts of the basswood sheets might be much harder than others. In these areas it might be necessary to manually finish the cut using a craft knife. Be sure to use a sharp blade and it’s not a bad idea to also wear a cut resistant glove if you’re clumsy like me.

Remember, they don’t call it StrongGrip for nothing. If you find that your card is really embedded in the adhesive, gently pry it up rather than trying to peel the card away to avoid breakage and waste. A vinyl spatula tool works really well for this.
Gluing 2 Cut Outs Together for Sturdy DIY Yarn Cards.

Gluing the cards together is really easy. You’ll need some kind of a clip to hold the 2 cards firmly together as the glue dries. I like using binder clips. You can buy them inexpensively in bulk and they can also be used to hold papers together or chip bags closed. To prevent the clips from digging into the wood you’ll need scraps of fabric or felt.
Apply a thin line of glue around the edge of the card and a squiggle of glue down the center. Be careful not to get globs of glue near the squares to run your yarn through. Sandwich 2 cards together lining up the cut outs.
Wrap a scrap piece of felt or fabric around both pieces. Making sure the cards don’t shift, clip the wood together over the scrap as near the edge of the card as possible. Repeat all around the card. Allow several hours to dry.

Remove the clips from your card and make sure the glue has dried. If there is any dry glue that squeezed out of the sides use a sharp craft knife to trim it away. Run a sanding sponge around the 4 sides and corner until smooth. Go around with your finger to make sure that the edges are smooth and yarn won’t easily catch. If you’d like, you can use sanding twigs to smooth the inside of the squares.
Cutting the Yarn Color Names from Permanent Vinyl
Using permanent vinyl, cut out the names of your yarn colors in whatever way you’d like to organize them.
The bulk of my yarn I keep in the yarn shelf I built in my office. I organized those yarn cards in the order my shelves run from top to bottom, mostly in alphabetical order. I left spaces to easily add new colors for when I inevitably bring something home from the craft store.

Using the Cricut Design Space File, swap out the “Yarn Color” line for the name of your yarn. If using the SVG cut files you can still head over to the design space file to get the proper spacing. If you’re using another cutting program, or if you just prefer to do it yourself, type up the names and play with the line spacing until the names will sit next to the boxes on your cards.
Weed away the excess vinyl making sure to get the little bits inside of letters like B. Apply a piece of transfer tape on top of all of the vinyl names. Use a scraper to burnish the vinyl onto the transfer tape. Slowly peel the tape upward. Lay the tape back down and apply more pressure to any letters that do not come away with the tape.
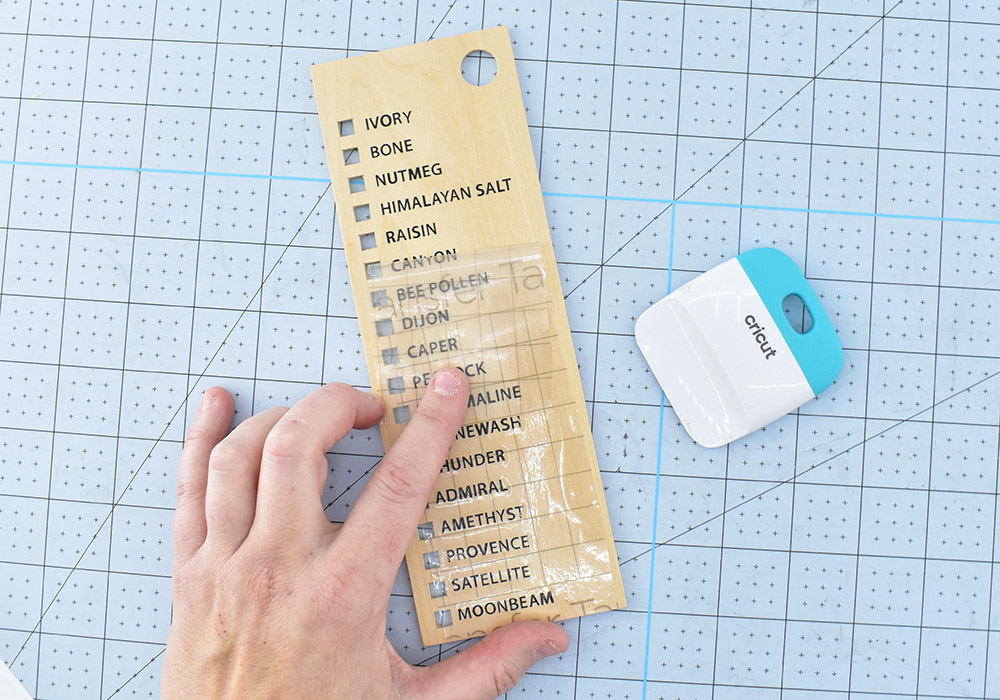
Carefully place the names next to each of the squares like you see above. Use your scraper to rub pressure over the transfer tape, transferring the vinyl onto the wood. Slowly peel away the transfer tape, laying it back down to apply more pressure to any letters that aren’t sticking.
Adding That Yarn to Your Wooden Yarn Cards!

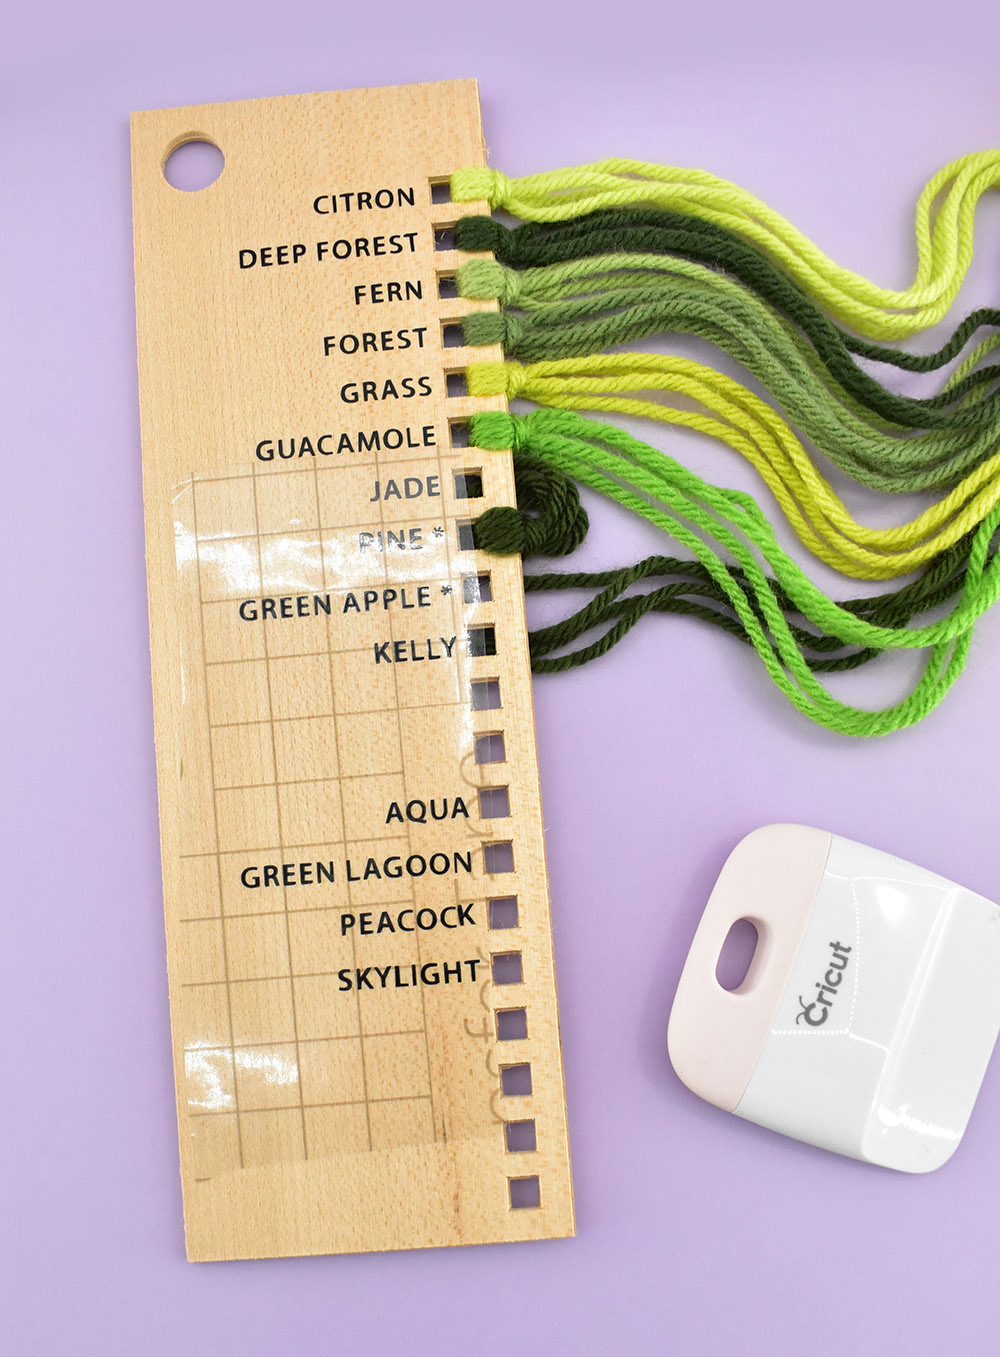
Use scraps or cut a length of about 18 inches of yarn. Cut into two 9″ pieces. Gather the ends and find the middle of both pieces of yarn.

Pull the yarn up through the slot next to the color using a crochet hook or something similar. Pull the tails of the yarn through the loop to form a tassel.

Use a sharp pair of scissors and a straight edge (another yarn card works well) to trim the excess yarn away for a nice and neat row of yarn!
Adding Colors to Your Yarn Cards
If your yarn stash grows or if you just forgot to add all of your color names the first time (like I did!) no worries… Adding colors to the card is super easy. Cut out the name(s) you need to add out of permanent vinyl (this is seriously one of those times the Cricut Joy was really made for!). Use transfer tape just like you did in the beginning to add the colors to the card.

Removing colors is also really easy. Whether you want to shift the colors around on the card, or if you just don’t plan on keeping a color in your stash, use a craft knife will pluck away the letters. Unless your vinyl has been on the card for years, you should be able to manage removal fairly easily.
Keep Your Yarn Cards Together with a Loose Life Binder Ring!

These cards are great as is but I’ve got the most perfect way to keep them all together.

Grab a 3″ loose leaf binder ring and run it through the corner hole in all of your cards. Click shut and all your yarn colors are in one place and easy to flip through. Pop open the ring to remove a card, if necessary for color planning. The ring also is perfect for hanging the cards… I keep mine on my pegboard!
DIY Wooden Yarn Card Organizers

Equipment
Ingredients
Instructions
- Affix your basswood sheet onto a purple StrongGrip cutting mat using a brayer to press deep into the adhesive. Tape down the edges of the wood onto the mat using masking tape.
- Use the free SVG file or Cricut Design Space file to cut out 2 wood yarn cards. Before removing the mat from the machine check the cut. Add an additional cut if necessary. For any areas that don't cut through, carefully use a craft knife.
- Glue the yarn cards together clamping together using binder clips and fabric or felt to prevent damage to the wood. Allow to dry for several hours.
- Remove clamps, trim away dried glue and sand down the cards until smooth.
- Cut the names of your yarn colors out of black permanent vinyl. Weed away the excess vinyl, apply transfer tape, then transfer the design onto the wood cards.
- Cut an 18" piece of yarn for each color then cut in half. Loop the 2 pieces of yarn, run the center through a slot. Pull the tails through the loop to create a tassel. Trim excess.
- Run a loose leaf binder clip through the hole in the corner of the yarn cards to keep together and easily hang for storage.

You Might Also Like

Free Customizable Washing Care Tags

How to Make a Crochet Gift Bow

Easy Crochet Hearts Beanie Pattern
Filed Under:
- Crafts
- ·
- Cricut
- ·
- Cricut Crafts
- ·
- Crochet
- ·
- Home DIY
- ·
- Organization
