
This post and photos may contain Amazon or other affiliate links. If you purchase something through any link I may receive a small commission at no extra charge to you.
Have you seen the really cute crochet curly gift bows I shared 2 weeks ago? Those bows were created because I really, REALLY wanted to add gift bows to my crochet hats for the Christmas season. But darn if it wasn’t a real beast figuring out a good way to make the kind of bow I’m sharing today.
I first came up with this idea in October. Yep, OCTOBER. Having a shoebox full of leftover scrap yarn, gift bows seemed like the perfect crochet project with Christmas just around the corner. The first bow I made basically just like you would a paper bow. But that thing was bulky as all heck and heavy to the point it made my hats a little droopy/saggy. It was sad.
But I kept going. I broke my shapes down into small pieces rather than strips and that worked really well! But when put together these things looked like flowers and NOT gift bows. For the LIFE OF ME I couldn’t figure out why this wasn’t working. And I made about half a dozen trying to figure it out. Womp-womp.

But Later It Finally Clicked
There was nothing wrong with the shape of my pieces or the way they were put together. It is just that yarn doesn’t hold stiff shapes like paper does. So you can’t make a crochet gift bow the same way you would a paper gift bow.
But luckily it’s super easy to get yarn to hold shapes like a champ with fabric stiffener. Ordering a spray bottle of the good stuff I could hardly wait to see if this worked. I mean, I was pretty sure it would, but since nothing on this project was working out quickly I held my breath! I didn’t need to, though, because it totally did work!
So today I am able to finally share with you how to turn those little scrappy balls of yarn we all have left behind in our craft stash into the cutest crochet gift bows!


What Can You Do With a Crochet Gift Bow?
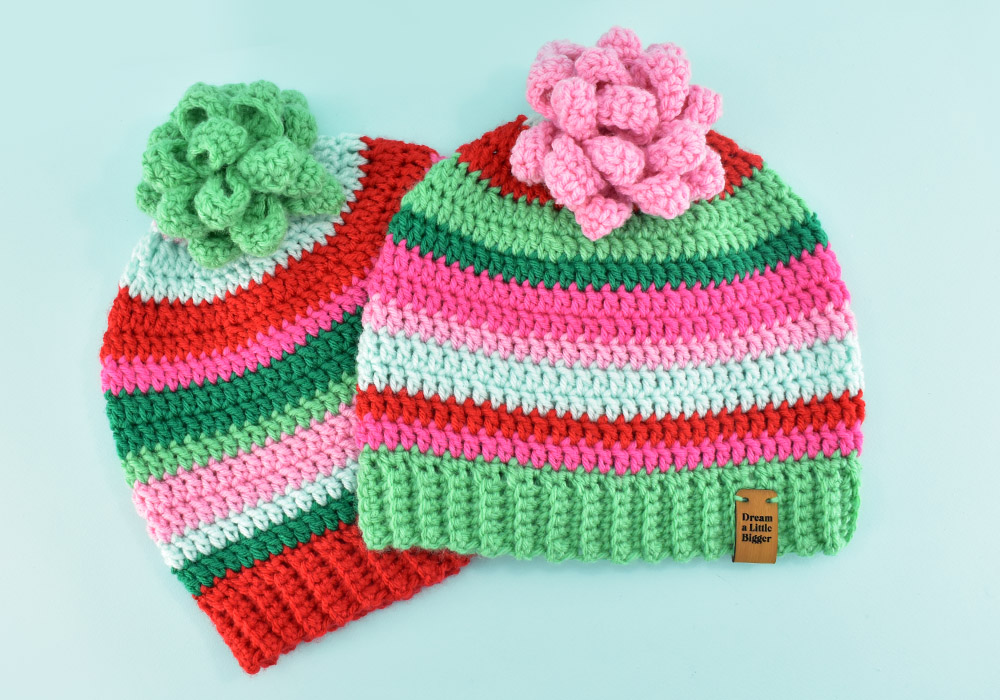
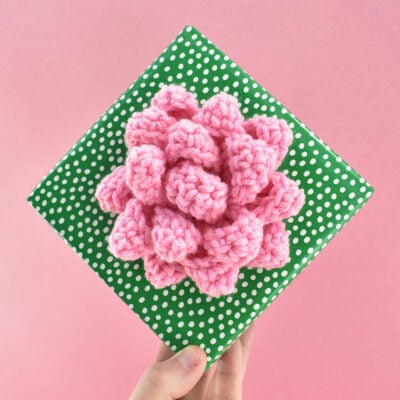
These little crochet gift bows are really fun looking on a hat or a gift. Use one at the top of a hat for the cutest beanie pompom, maybe ever. Or add to the bottom edge for an adorable girly hat embellishment. Stick some mounting foam or other adhesive to the back and you’ve got a fun embellishment for a bespoke wrapped gift!
Love This Hat? Get the Free Pattern!
If you love the hat underneath these crochet bows, you’re not alone! This design is one of my absolute favorites! In fact, I’ve made over a dozen of this exact design in different colors. I’m working on making as many hats as I can (19 so far!) to donate with a deadline later this week.
The striped design is great because I can stash-bust AND make warm hats for people in need. Win-win, right? And it’s just darn cute, too! Crocheted from the bottom up, this fitted hat also has a stretchy ribbed brim for a really nice fit. Check out the Bottom Up Fitted Crochet Hat Pattern now!

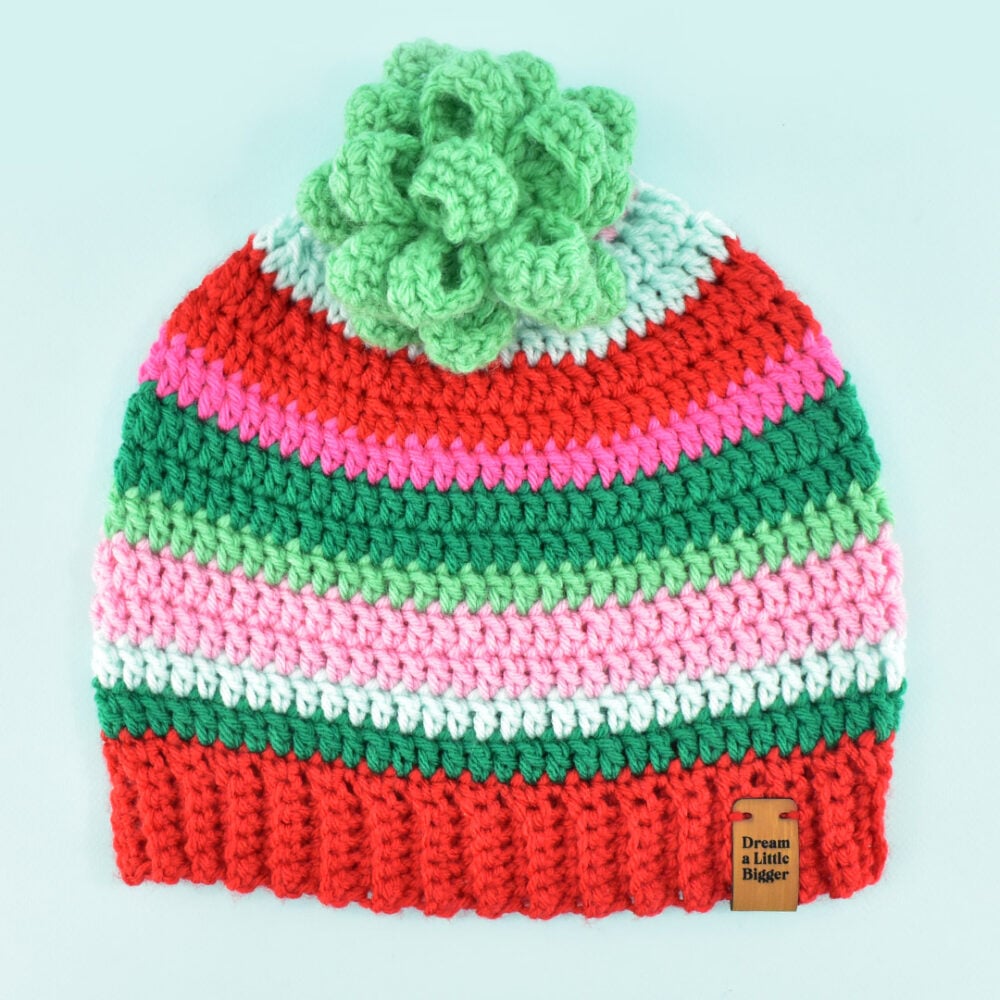
Hat colors used: Loops and Threads Impeccable (Michael’s) in Jade, Skylight, Lippy, Kelly, Red Hot. I Love This Yarn (Hobby Lobby) in Pink. p.s. I think my yarn color game is getting stronger thanks to these DIY Wood Yarn Cards I made with my Cricut Maker that really help me pick the best color combos!
What You Need to Make Crochet Gift Bows
The Yarn
You can use any yarn you please to make your bows. I’ve used both Weight 3 and 4 for my test bows and I think they both work well. Bulkier yarns might need a lot of fabric stiffener to hold their shape, so I’d probably stay away from anything thicker than a 4 weight.
There are 3 bows shown in this post today all from weight 4. The lightest pink bow (on the gift) is made from Red Heart Super Saver in Baby Pink. The green beanie bow is made using Loops and Threads Impeccable in Jade (from Michael’s <– this is seriously my favorite green yarn right now.) The slightly darker pink bow on the other hat is made from I Love This Yarn (Hobby Lobby) in the color pink.
A word of warning before we get started… these crochet gift bows are NOT washable.
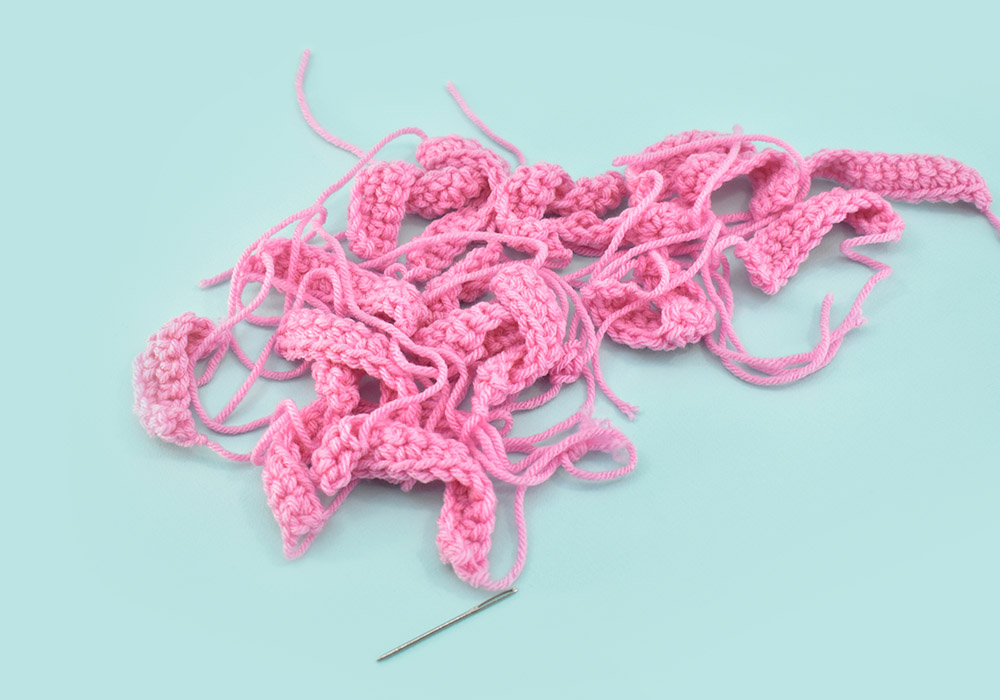
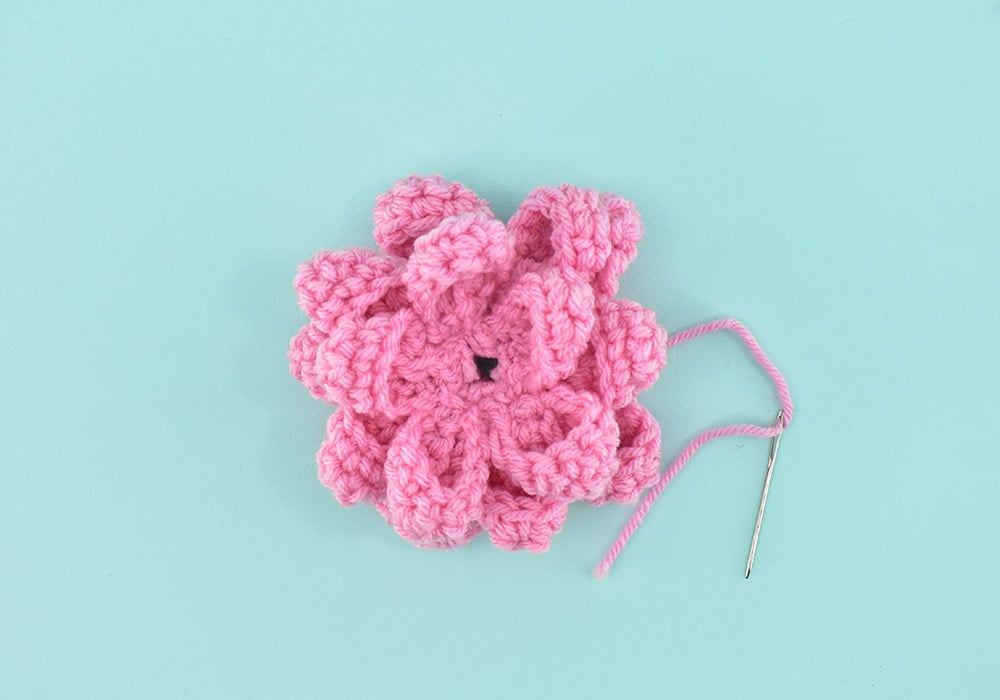
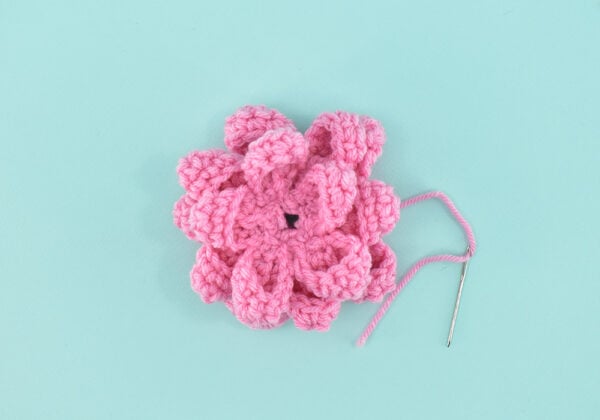
Straight off of the hook, this bow is distinctly floppy and looks more like a flower. (see below) A fabric stiffener is used to give each point that distinctive shape and keep it in that shape. If you wash your bow the stiffener will wash out.

I suggest if using these crochet gift bows for hats to sew a button onto the backside. Run yarn through the button holes and into the inside of the hat. Use a simple overhand knot to lock into place, leaving the tails slightly visible. If you need to wash the hat, snip the yarn tails to free the bow. Wash, dry, then reattach the bow using another scrap piece of yarn
If for some reason you do need to wash the bow, wash by hand and blot out the excess moisture with a towel. Reapply fabric stiffener to the slightly damp bow, shape, and allow to fully dry. A second round of stiffener may be necessary for the best shape.
The Anatomy of a Crochet Gift Bow
I quickly figured out while trying to write this post that I’d need to set up some terms since I’m not quite sure what hooker vernacular works here. And saying stitch the first thingie to the second thingie just isn’t going to cut the mustard now is it? :)
The bow we are making today had 4 sections to it. There are 3 rounds made of 5 points each which are created from 5 crochet strips. There is also a single a ring-shaped center loop used to fill it out placed in the center of the bow.

Make Your Crochet Gift Bow Strips
For each of the four layers of the bow make 5 strips for a total of 20 strips.
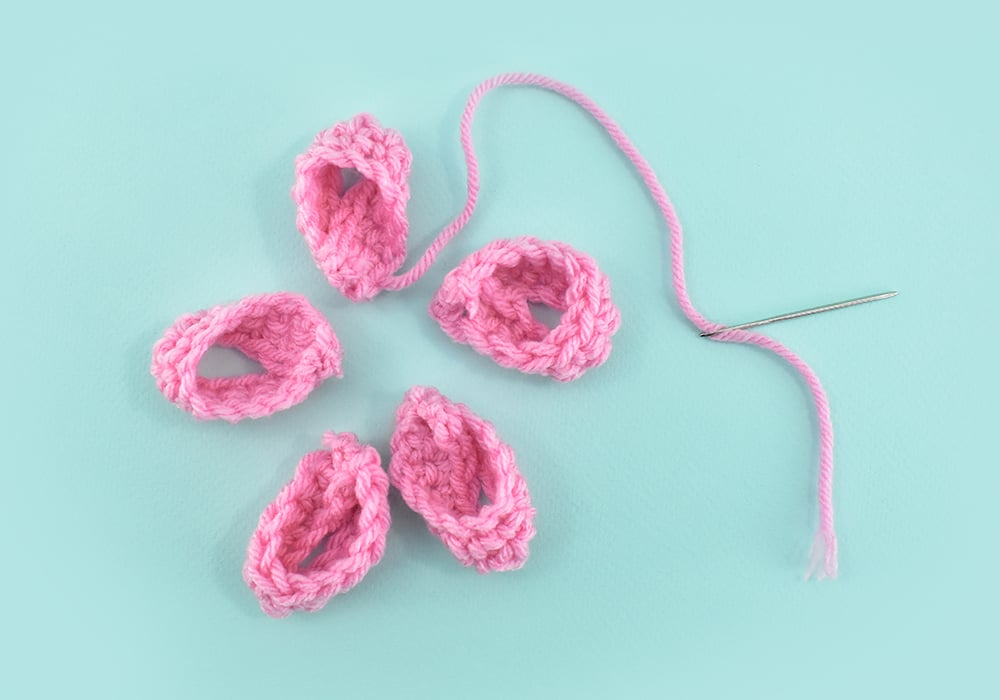
To turn each strip into a point of the bow, knot off end leaving a tail. Use tail and a yarn needle to sew the short ends of the strip into a round.
For help with making the points and assembling the bow, see photo tutorial below.
Center of the Bow (First Layer)
← Row 1:
CH 10. SC in second CH from the hook and to the end (9 ST). CH 1 and turn.
→ Row 2:
SC in every ST to the end. (9 ST)
Second Layer of the Bow
← Row 1:
CH 11. SC in second CH from the hook and to the end (10 ST). CH 1 and turn.
→ Row 2:
SC in every ST to the end. (10 ST)
Third Layer of the Bow
← Row 1:
CH 13. SC in second CH from the hook and to the end (12 ST). CH 1 and turn.
→ Row 2:
SC in every ST to the end. (12 ST)
Final Layer of the Bow
← Row 1:
CH 15. SC in second CH from the hook and to the end (14 ST). CH 1 and turn.
→ Row 2:
SC in every ST to the end. (14 ST)
Stitch Abbreviations Used:
How to Piece Together Your Crochet Gift Bow

Separate out your different sized strips and work with one size at a time.
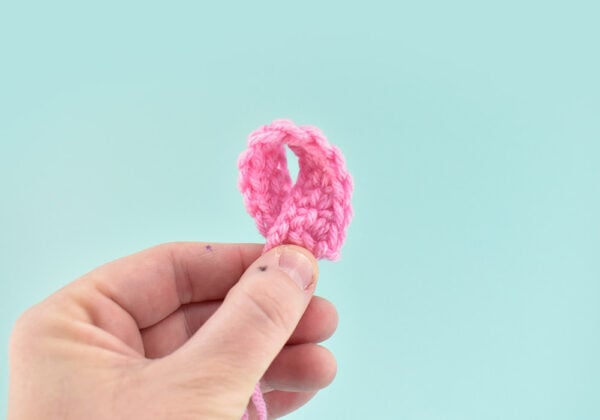
Taking a crochet strip fold the top toward the bottom in a clock-wise sweeping motion. Match up the bottom edges. This will form a loop that looks kind of like a cause ribbon.

Using one of the tails stitch the 2 ends together, making sure you don’t lose that loop shape as you go. You don’t need a lot of stitches, just run from one side to the other so that both tails are on the same side.

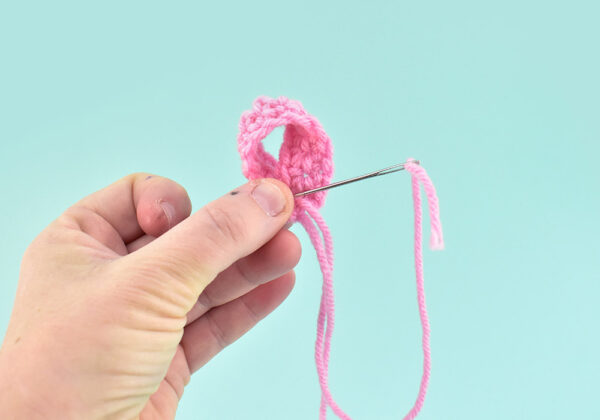
Once your tails are on the same side make 2 simple overhand knots to lock together. Use a dab of clear drying glue to lock the knot into place. Allow the glue time to completely dry.
A Quick Word About Why We Aren’t Weaving In the Tails…
These crochet gift bows are already bulky just because of their shape. Weaving in the tails makes for even more bulk in a really noticeable way, which I was kind of surprised about. Feel free to weave in your tails, for a more secure crochet piece, if you prefer.
Trim all but the longest tail from your 5 points of the bottom-most (largest) bow layer. Run a steel yarn needle onto that tail to sew your 5 points together into one layer.

Hold the corner of the bottom stitched sections of two points together like shown above. Make 3 little stitches to join those 2 corners where the points meet together.

Run the needle through the second point and bring the third next to it. Stitch the second and third together, continuing around in a clock-wise motion until all 5 pieces form one round.

Repeat stitching together your points until you have 3 rounds that are gradually smaller.
Piecing Together Your Rounds
Thread 14″ of yarn onto your steel needle. Hold your largest round and place the middle round on top of it. Center it so that the points alternate and don’t overlap one another. Use the thread to tack the 2 pieces together in the center. Add the smallest layer and tack it through the bottom 2 pieces so that all 3 pieces hold firmly together. Tie off the tail and trim away the excess.

Take your center loop piece and fold it into a round ring-shape. Use a tail to stitch the ring-shape together. Next run the needle through the center of the pieced together bow. Pull the loop into the center of the bow and finagle as necessary to center. Stitch the tail into the back of the bow to hold the loop into place.
How to Shape Your Crochet Gift Bow

Protect your work surface and place your bow bottom-side down. Spray a healthy amount of Beacon Stiffen Stuff (or other fabric stiffener) onto the points of the bow. Use your fingers to shape each point into a round toward the center and a point toward the outside. Once shaped, push each round up and around the center loop. Finagle as necessary for a symmetrical shape.

Allow the stiffener time to dry, overnight is best. If you find that the shape isn’t quite as you’d like it, reapply the stiffener and continue shaping as needed.
Pop Your Too Cute Crochet Gift Bow on Gifts or Hats and Enjoy!

Crochet Gift Bow
Equipment
Ingredients
- Yarn
- Fabric Stiffener
Instructions
Crochet Pieces
- Center Loop – Row 1: Chain 10. Single crochet in second chain from the hook and to the end (9 ST). Chain 1 and turn. Row 2: Single crochet in every stitch to the end. (10 ST) Knot off end leaving a tail. Use tail and a yarn needle to sew the short ends of the strip into a round (like a ring).
- Round 1Row 1: Chain 11. Single crochet in second chain from the hook and to the end (10 ST). Chain 1 and turn.Row 2: Single crochet in every stitch to the end. (10 ST) Knot off end leaving a tail. Repeat 4 times to crochet 5 strips.
- Round 2Row 1: Chain 13. Single crochet in second chain from the hook and to the end (12 ST). Chain 1 and turn.Row 2: Single crochet in every stitch to the end. (12 ST) Knot off end leaving a tail.Repeat 4 times to crochet 5 strips.
- Round 3Row 1: Chain 15. Single crochet in second chain from the hook and to the end (12 ST). Chain 1 and turn.Row 2: Single crochet in every stitch to the end. (12 ST) Knot off end leaving a tail.Repeat 4 times to crochet 5 strips.
Making Bow Points – Working One Size at a Time
- Fold the top toward the bottom of one crochet strip in a clock-wise sweeping motion. Match up the bottom edges. This will form a loop that looks kind of like a cause ribbon.

- Using one strip at a time, stitch the 2 ends together, making sure you don't lose that loop shape as you go. Tie the tails into a knot and apply a dab of glue. Allow to fully dry then trim tails.
- Hold the corner of the bottom stitched sections of two points together like shown above. Make 3 little stitches to join those 2 corners where the points meet together.
- Run the needle through the second point and bring the third next to it. Stitch the second and third together, continuing around in a clock-wise motion until all 5 pieces form one round.
- Repeat stitching together your points until you have 3 rounds that are gradually smaller.


Piecing Your Gift Bow
- Thread 14" of yarn onto your steel needle. Hold your largest round and place the middle round on top of it. Center it so that the points alternate and don't overlap one another. Use the thread to tack the 2 pieces together in the center. Add the smallest layer and tack it through the bottom 2 pieces so that all 3 pieces hold firmly together. Tie off the tail and trim away the excess.
- Take your center loop piece and fold it into a round ring-shape. Use a tail to stitch the ring-shape together. Next run the needle through the center of the pieced together bow. Pull the loop into the center of the bow and finagle as necessary to center. Stitch the tail into the back of the bow to hold the loop into place.

Shaping Your Crochet Gift Bow
- Protect your work surface and place your bow bottom-side down. Spray a healthy amount of Beacon Stiffen Stuff (or other fabric stiffener) onto the points of the bow. Use your fingers to shape each point into a round toward the center and a point toward the outside. Once shaped, push each round up and around the center loop. Finagle as necessary for a symmetrical shape.


