
This post and photos may contain Amazon or other affiliate links. If you purchase something through any link I may receive a small commission at no extra charge to you.
Spiderweb cookies, huh. I’m guessing you aren’t surprised So far this Halloween season I have been all about the spider crafts. This year I made a seriously too fun punch needle spiderweb half rug that looks amazing IN FRONT of doors. Then I made a creepy cute spiderweb wreath that looks amazing ON doors.
And in Halloweens past, I made a no carve spider pumpkin with giant furry legs that kids totally dig, super fast and too cute spiderweb cupcakes, and crochet spiderwebs that hang adorably in embroidery hoops.
Yes, I have a thing with spiders and it was only a matter of time before I turned them into Halloween cookies :) Want to get the nitty gritty on how to make them? Let’s get after it…

What You Need to Make These Fun Spider Cookies:
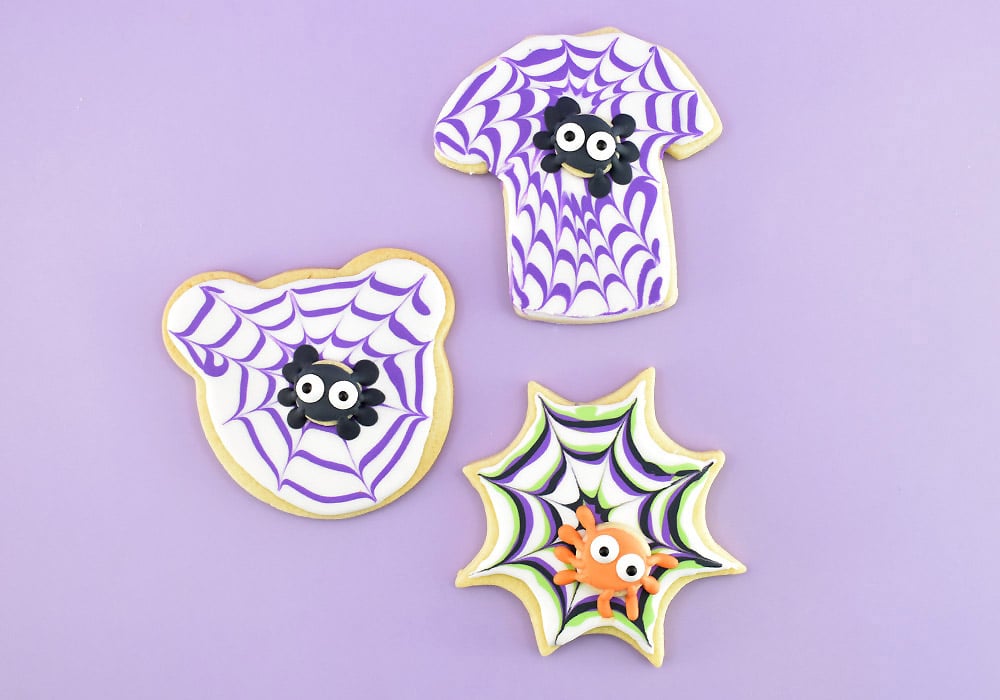
I have a tendency to buy things in my sleep like this Spiderweb Shaped Cookie Cutter. It’s cool, for sure, and I love the look of my spiderweb cookies I made with it BUT you can use any shape. In fact I happened to find cookies that I baked and lost in February, so I used iced 2 of the now definitely no longer edible cookies just to show you can use any shape you already have on hand.
And just in case you’re wondering, I have been a sleepwalker my whole life. Apparently you level up to sleep shopping after you’ve buried more sets of keys in your sleep than you can count. Seriously, I don’t know why, and if you bury and lose your dad’s expensive key fob once you will hear about it on the regular for the rest. of. your. life. Not only can keys be expensive, you also wake up with grossly muddy sheets. But let’s get back to these cookies…
Cookies to Bake:
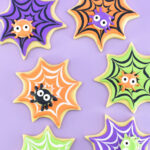
For each spiderweb cookie you will need one base cookie an one small circle for the spider. Again, I used this Spiderweb Shaped Cookie Cutter for the bottom cookies. For the spiders I used 0.8″ and 1″ circles though you can barely tell they are different sizes on the cookies. All of my cookies were cut from dough rolled 4mm thick.
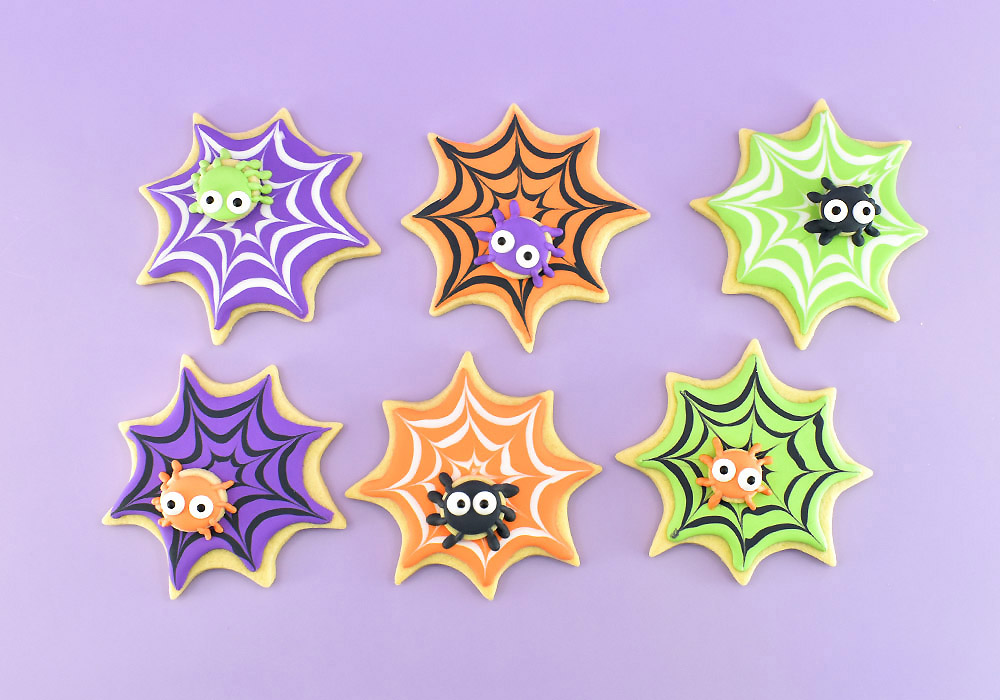
Color Palette, My Royal Icing Colors:
For each of the icing colors I tinted approximately 200 grams of icing. I use this kitchen scale for all things baking and weigh the icing in a bowl just before coloring it. Before tinting any of my royal icing I add 1 tablespoon of Water Based Gel Whitener to my batch that uses 2 pounds of powdered sugar. The whitener makes your white icing more opaque and creates a good base to get vibrant colors when adding gel.

For my lime green color I used 1 drop of Leaf Green, and 2 drops of Lemon Yellow. The purple color is 4 drops of Violet and 9 drops of Purple. The orange is 5 drops of Sunset Orange. The black is 20 drops of Coal Black. The white is just white.
Always tint your royal icing BEFORE thinning it down to the right consistency to pipe or flood. It takes so little moisture to really change things and it can go really wrong, really fast!

How to Get Darker Colors Without Lots of Food Coloring
The color of royal icing gets darker the longer it sits before you use it. So to keep from using tons of food color, which can give you the wrong consistency and a terrible flavor, make dark colors at least a day in advance and allow to rest covered at room temperature, away from sunlight and heat. Check with the meringue powder you use, but you can typically keep homemade royal icing on your counter for one week before you need to use it.
I both tint my royal icing colors and store the icing to darken (if necessary) in these handy dandy reusable deli containers. They wash up in the dishwasher (top rack) and I also use them to store leftovers, homemade dip, freeze single servings of a big batch of chili… you name it. It seems like such a silly thing to be in love with, but dang if I’m not super happy with this purchase :)
How to Make Cookie Spiderwebs
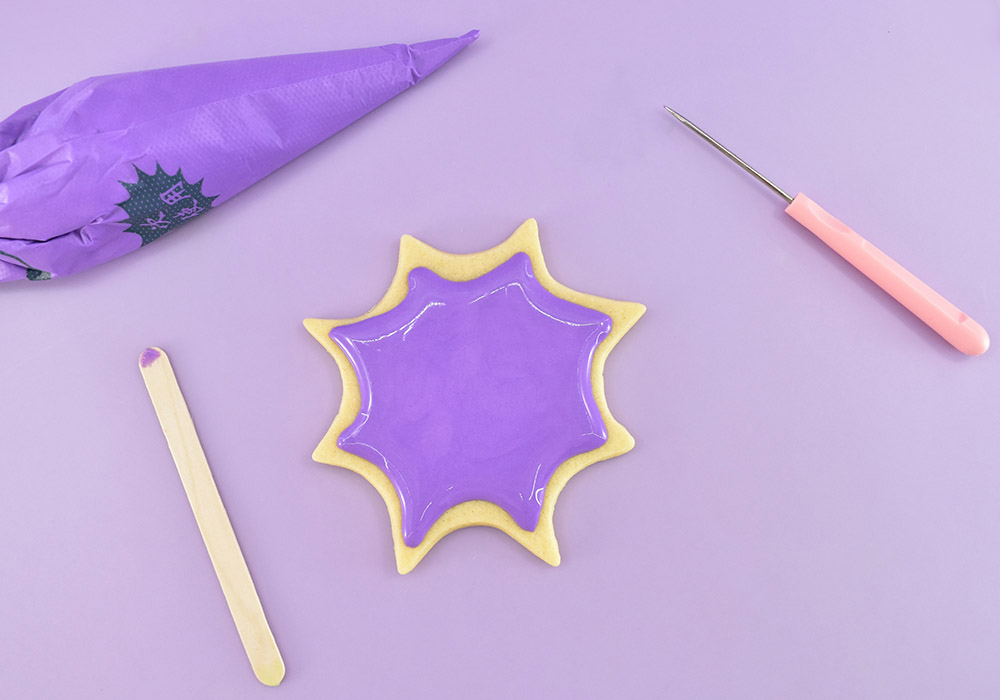
Using your background color of icing pipe following the shape of the base cookie making sure it doesn’t spill over the sides. Use a toothpick, popsicle stick, or scribe tool to smooth. If the icing is still slightly uneven, gently tap it on your worktop to help level it out.
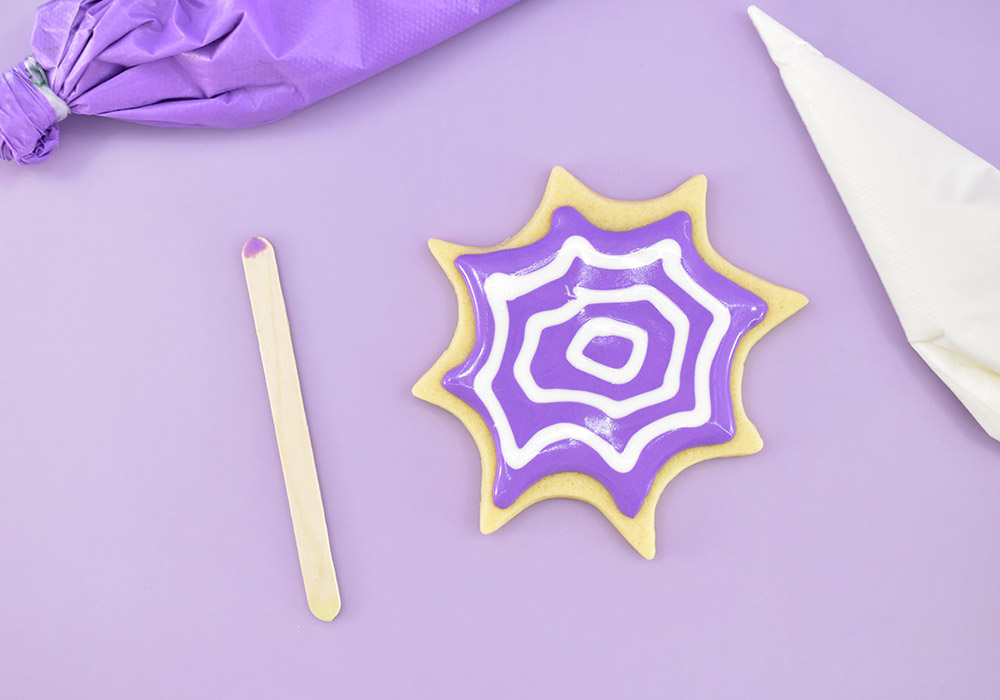
While the background icing is still wet, use your web color to create a series of graduated circles or match the shape of your cookie. Work quickly, you need your icing to remain wet and without crust forming in the icing for the next step.
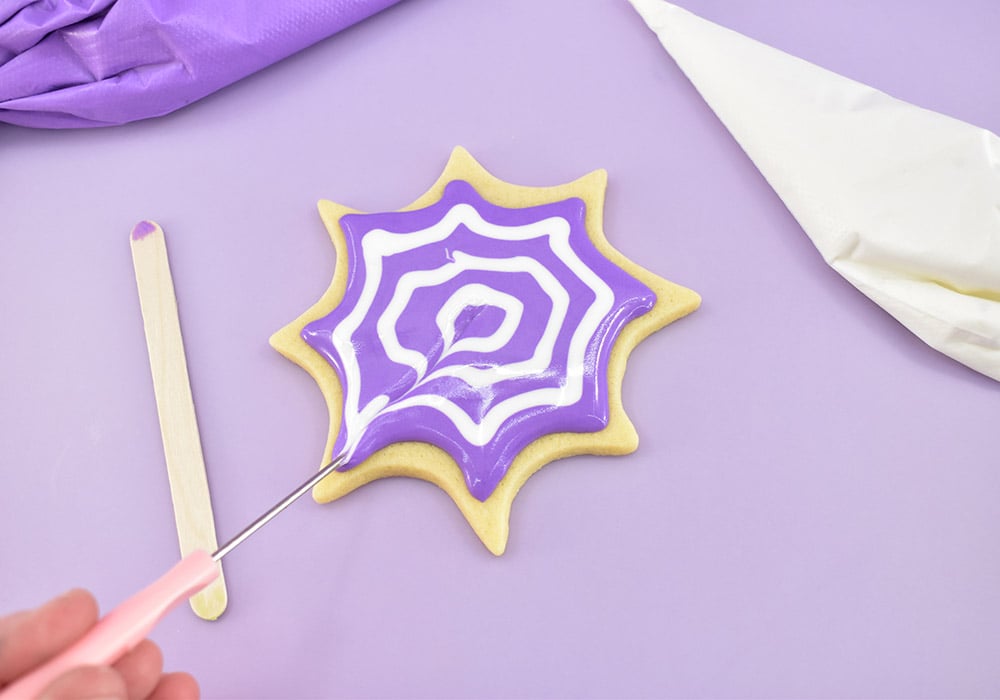
Drag a toothpick or scribe tool to feather the icing from the center to edge and create a spiderweb design.
With my spiderweb shape I feathered the royal icing from the center to the points. If you’re using a different shape simply try to somewhat evenly feather from the center to the edge all of the way around the cookie.

If you’d like to have a spiderweb made with multiple colors of icing simply pipe 1 or 2 background colors and then your dominant web color on top. Be sure to work quickly so that your icing doesn’t dry! If it starts to crust your lines to feather the web out will look jagged.

Transfer your wet cookie to a cookie cooling rack or cold cookie sheet to dry for at about an hour. Take care when transferring or you’ll have the PERFECT opportunity to taste your goods after you destroy one :)
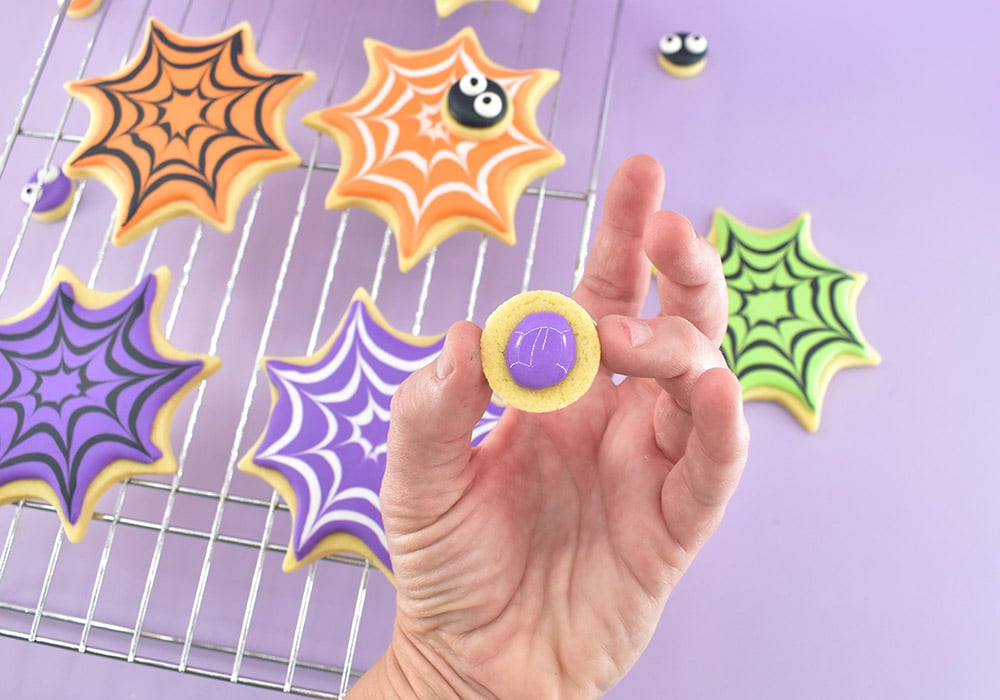
How to Make The Cookie Spiders

Create a circle of royal icing on the top of a small circle cookie. While the icing is still wet, place two small candy eyes side-by-side. Gently push into the icing enough for them to get stuck, but not enough to push the icing over the edge of the cookie. Use your scribe or a toothpick to reshape the edge of the icing if it goes a bit wonky.
Place your spider body cookie to the side and allow to dry, at least an hour.
Once both the cookies have been resting for about an hour and the surface icing has crusted, place a blob of icing onto the back of a spider body cookie. Use the color of royal icing that matches the background color of the spiderweb cookie it will go onto.
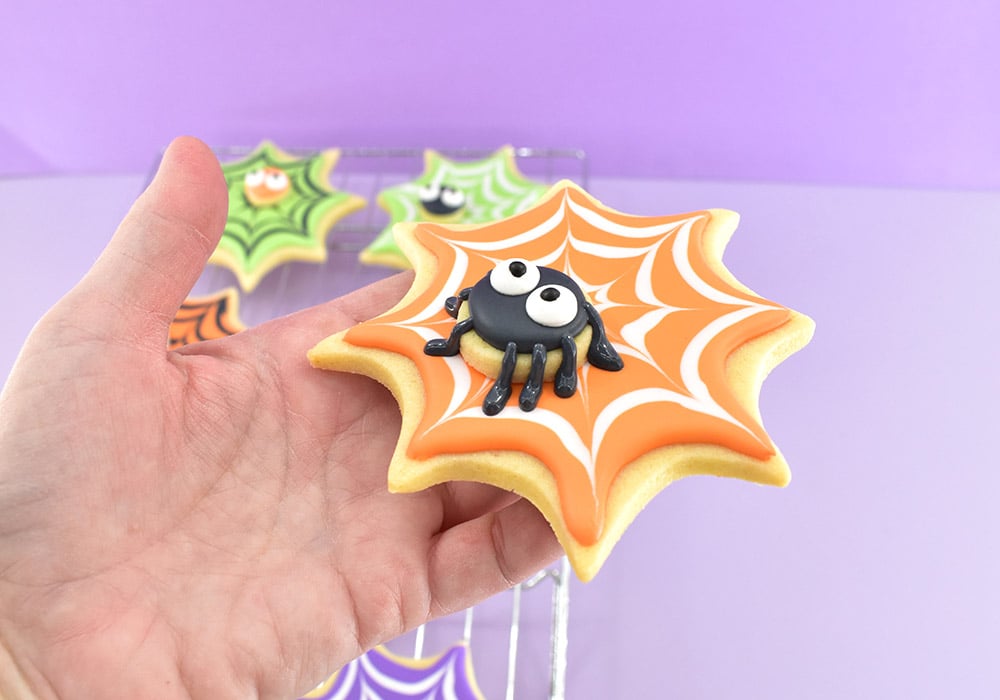
Gently place the spider body onto the spiderweb cookie. Take care not to push down which might crack the icing of the web.
Use the royal icing that matches the spider’s body and draw 4 legs on each side. Allow the icing to connect to the body, run down the side, and onto the top of the web.
Quick Tip – For the legs you’ll need to use a fairly stiff royal icing. You can reserve some icing in the beginning, before you thin it out but I always forget to set any aside. I just take a little bit of what is left and add some powdered sugar to it to thicken it up before using in a new piping bag. When you can pipe and it holds its shape without spreading it’s a good consistency for the spider legs. If the icing comes out very thick add a little more loose icing to soften it up just a bit.
How to Dry Your Decorated Spiderweb Cookies
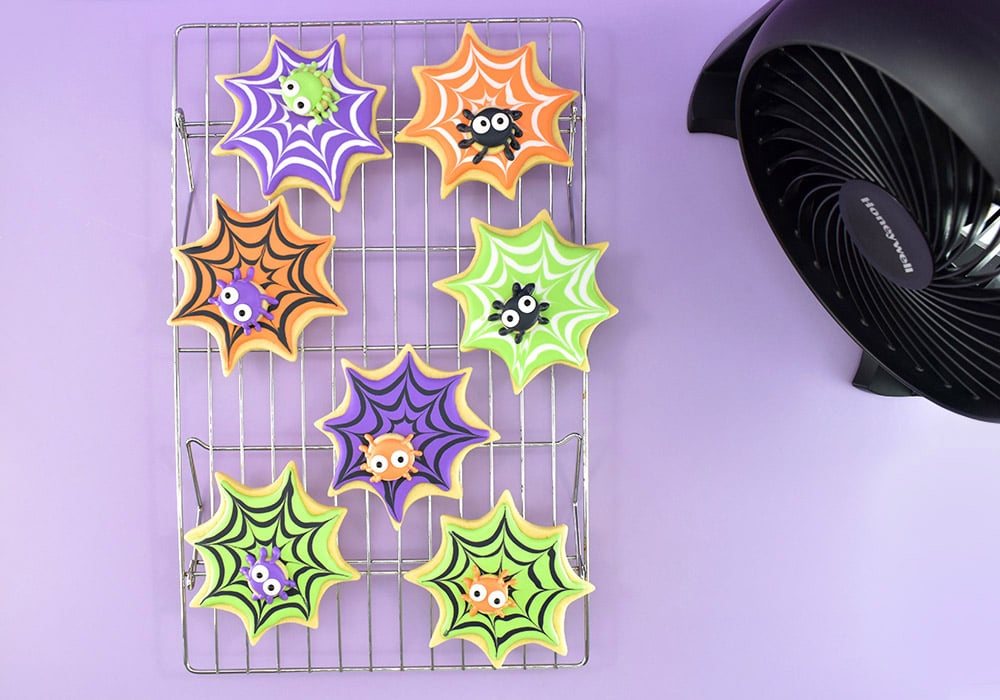
I live in the humid sub-tropical climate of Houston, TX and it can take AGES for paint, icing, anything, really, to dry. I have this super inexpensive tabletop fan that I use to dry my decorated sugar cookies. It’s kept bagged up to keep it from getting dusty and I only use it for my cookies so I don’t have to worry about it getting gunky.

Place your running fan near stacked cookie racks full of wet cookies. Let them run near the fan at least overnight. More often than not, even with the muggy Houston humidity, they will be dry enough to stack the next morning. Hurrah! Always sure to let your cookies dry fully before stacking and that is, well, that!

You Might Also Like

Googly Eye Shaker Cookies

DIY Spiderweb Halloween Wreath

Halloween Spiderweb Punch Needle Rug
Filed Under:
- Crafts
- ·
- Cute Food
- ·
- Decorated Cookies
- ·
- Fall
- ·
- Food Crafts
- ·
- Halloween
- ·
- Occasions