
This post and photos may contain Amazon or other affiliate links. If you purchase something through any link I may receive a small commission at no extra charge to you.
Here lately I have been doing a lot of crochet. Like a LOT. And it has a tendency to really give me some trouble with my hands.
In the sixth grade I ran into a cement block gym wall playing sock hockey, knocked myself unconscious, and broke my thumb. That thumb is a stubby guy, literally having not grown since I was in the sixth grade. It’s like 7/16″ shorter than the thumb on my other hand :) Before my teenage years later I had developed arthritis in that thumb that made it difficult to hold a pencil for long. Which, honestly, kind of sucks for a kid in school.
Then as an adult a dog bit my pinkie finger off. It was reattached but it doesn’t actually work anymore and all it does manage to do is ache. And that whole nonsense also damaged the palm of my hand. So hand pain is kind of an every day thing BUT with fall the temperature is dropping and raining and dang if my hand isn’t giving me absolute fits…

With super sore hands an an incompatibility with keeping them still, I found myself leaning into some fairly simple, but totally cute fall crafts. Last week I took wood beads and made some faux Indian corn that I’m super pleased with!
And after taking a walk around my parents’ backyard with my favorite Aussiepoo brother in the world, Frankie, collecting acorns to pass the time, I figured out a fun way to put them to use. Felt Acorns!
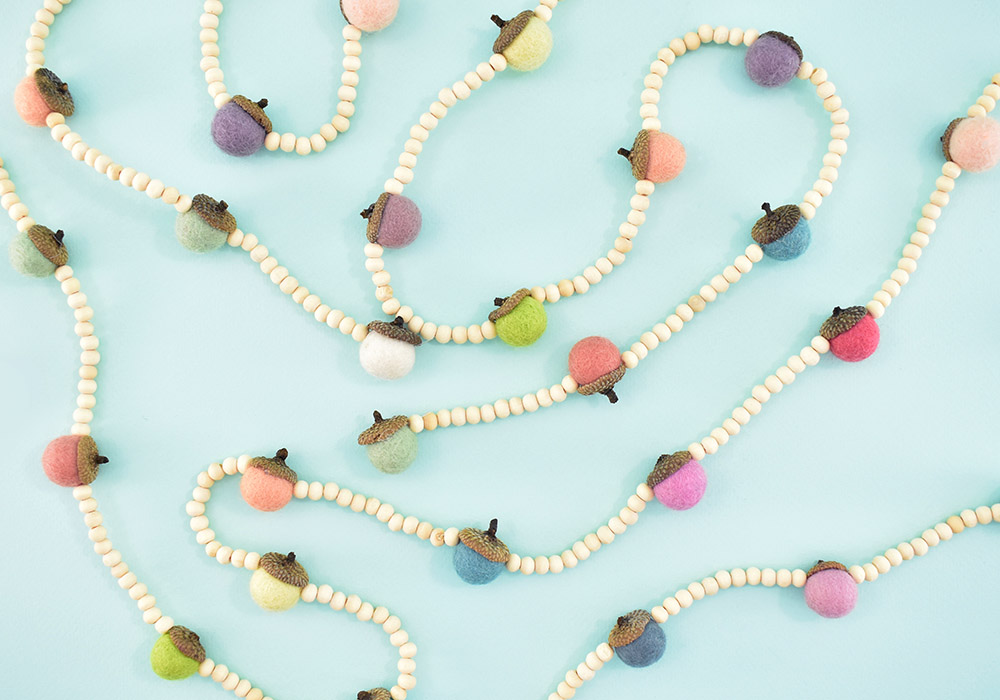
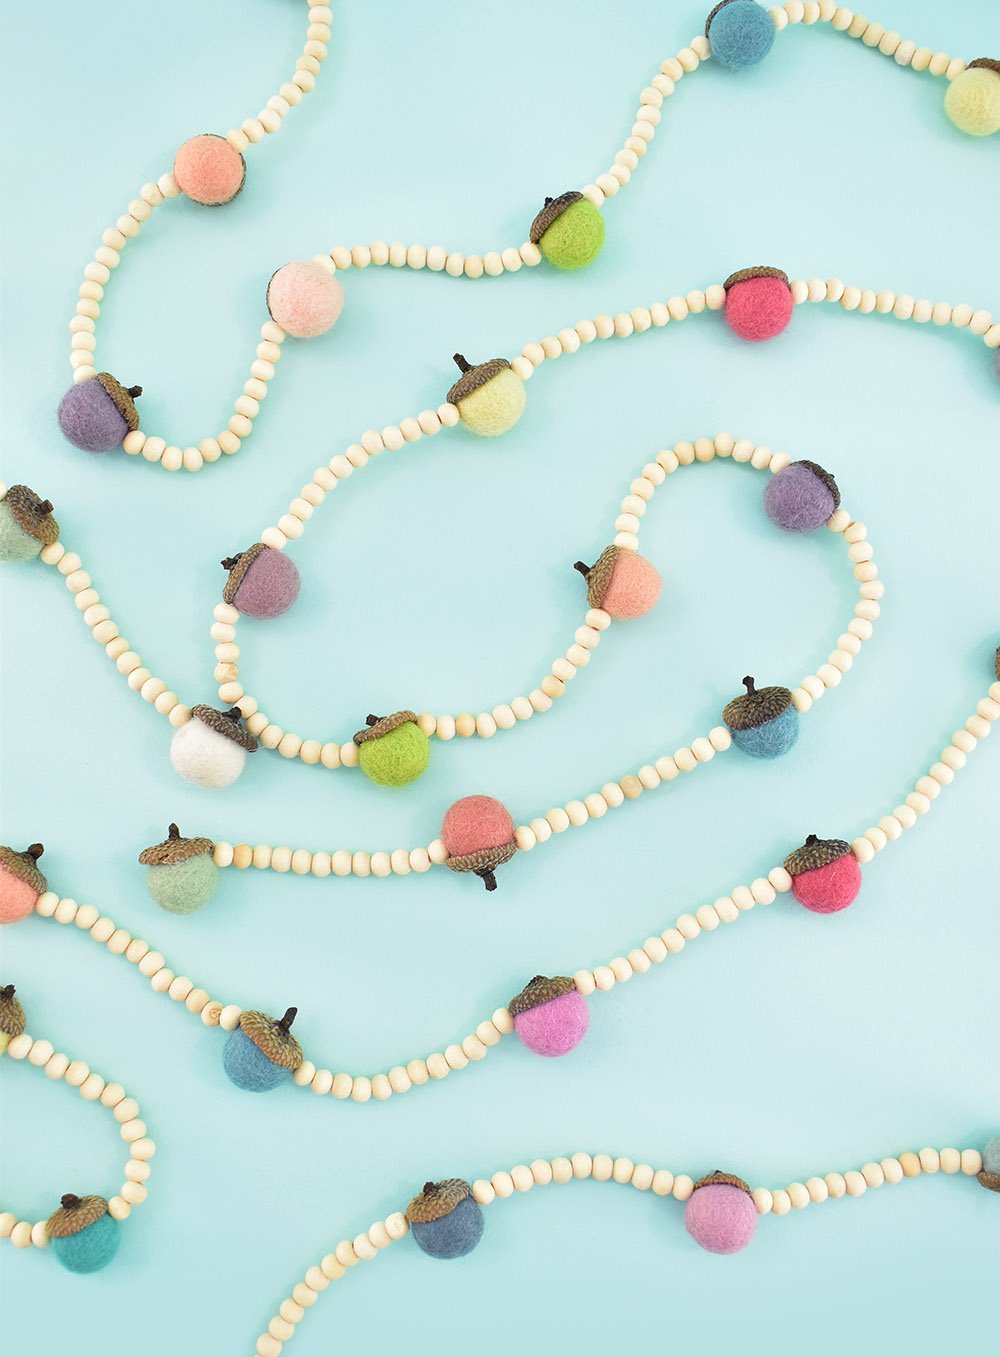
And absolutely loving wood beads for fall crafts, I took those homemade felt acorns and strung them with little wood beads to make the most darling felt acorn garland. Seriously… adorable. Want to see how to make your own acorns and garland? It’s super easy!!!
Supplies Needed to Make Fun Felt Acorns
Acorn Hats
The cheapest way to make acorn garland is definitely to scavenge the acorn tops off of the ground. Anywhere there are oak trees you’re going to find acorns. Around my house I only have palm trees so I initially purchased these fake acorns from Amazon. The benefits of fake tops is that as soon as you pull the tops off they are ready to use. It’s obviously cheaper to pick up acorns off of the ground. *Interesting fact – the tops of acorns have a name. They’re called cupules.
Adhesives
You can use any adhesive you already have on hand. For this project I used hot glue because it’s super fast. If you ask anybody at my doctors, veterinarian, or any place I have to wait they’ll tell you I’m a super patient person. I will literally wait an hour without any kind of complaint. But when it comes to glue drying I am NOT patient in the least.
My first choice, when possible, is pretty much always hot glue for speed. But if my hands are particularly shaky or if I’m just in a mood I know I’ll burn myself. Those days I reach for either Fast Grab or Quick Dry Tacky Glue.
Felt Balls
Different oaks will drop acorns that look really different. You can identify your acorns and oaks using this article, if you’d like. Different caps might need different size felt balls. I think my acorns came from live oak trees, but I’m definitely not an arborist or anything. For my caps I needed 0.6″ size felt balls to fit the caps well.
How to Clean Real Acorns for Crafts
Many years ago I had collected a lot of acorns and put them in an apothecary jar and it was super cute. Until it wasn’t. Acorns have grubs in them and eventually they’ll come out of the acorns. Though for this tutorial we are only using the caps, it’s still a good idea to give them a good clean.
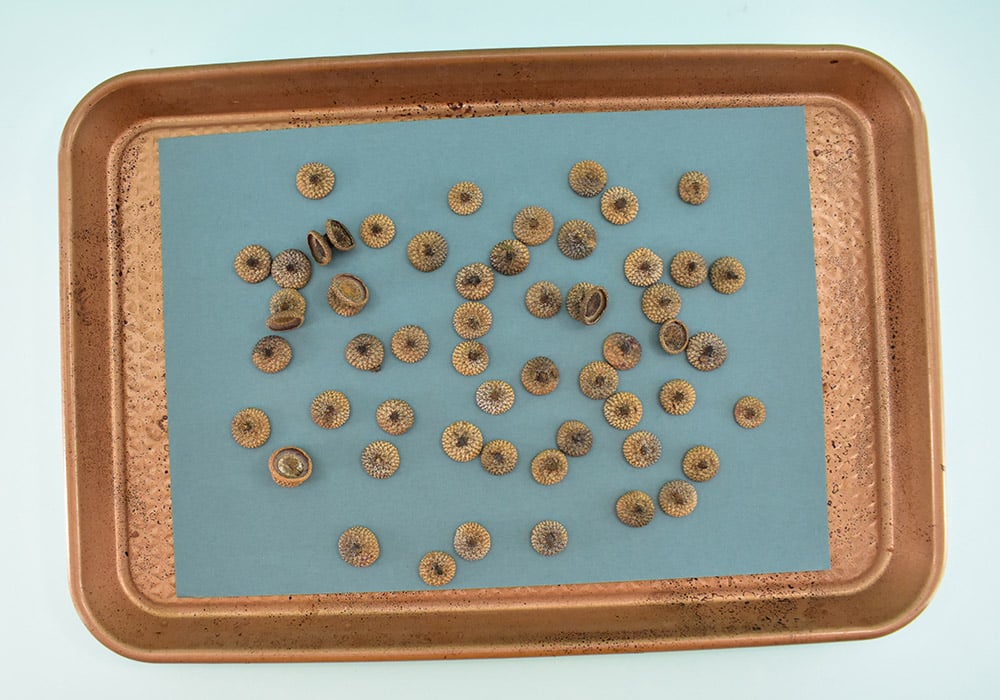
Collect your cupules and place in a zipper bag. Add a good splash of vinegar to the bag and roll the acorn tops around sort of agitating them and cleaning them. Fill the bag with water, agitate and carefully drain. Repeat a few times until the water is clear. Bake on a cookie sheet at 200℉ for about 20 minutes to dry.
If using full acorns for crafts crack the oven and bake for 1.5 to 2 hours to kill any worms inside. The acorns will brown with the heat, so keep an eye on them. It’s a good way of telling when they are ready to remove from the oven.
Supplies Needed to Make Fun Fall Acorn Garland
Since acorns are kind of small I think that little wood beads work best for this dainty acorn garland. I used some 6mm wood beads from my stash and I’m super happy with the results. Ten mm beads also looked pretty darn cute but I didn’t have enough for a full garland. I think any wood beads between 6mm and 12mm could work out really well.
You Can Use Just About Any String, Really…
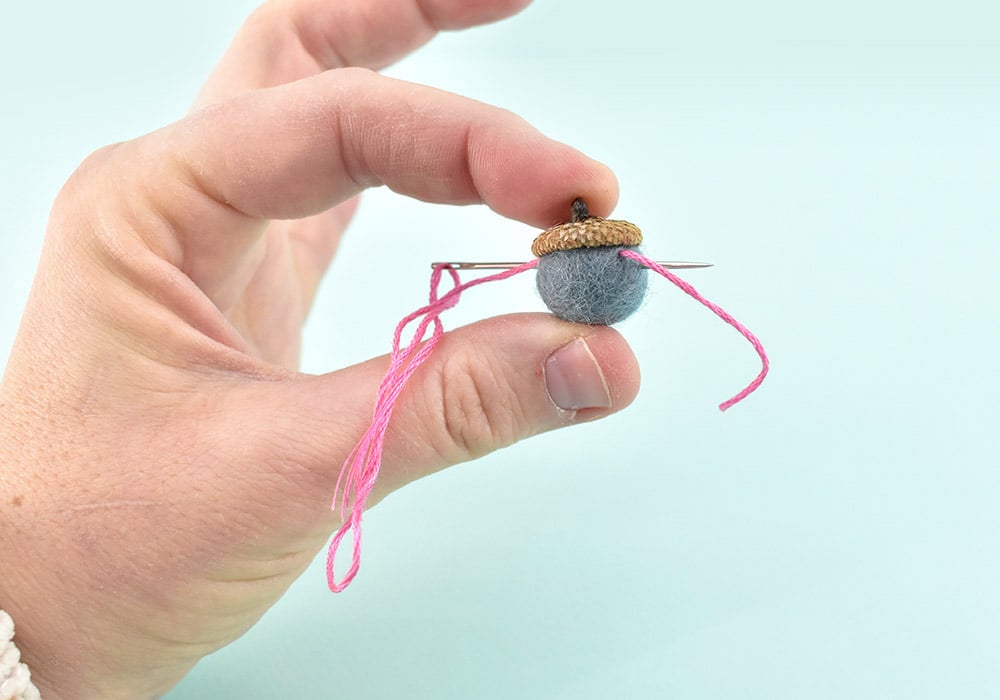
But fishing line is the PERFECT string for this DIY fall garland because it’s cheap, thin, and very sturdy. I used 10lb fishing line that I keep in the craft stash. Pick up a roll for $2-3 and you’ll have more than you’ll probably ever need for a long life of crafting :)
How to Make Felt Acorns
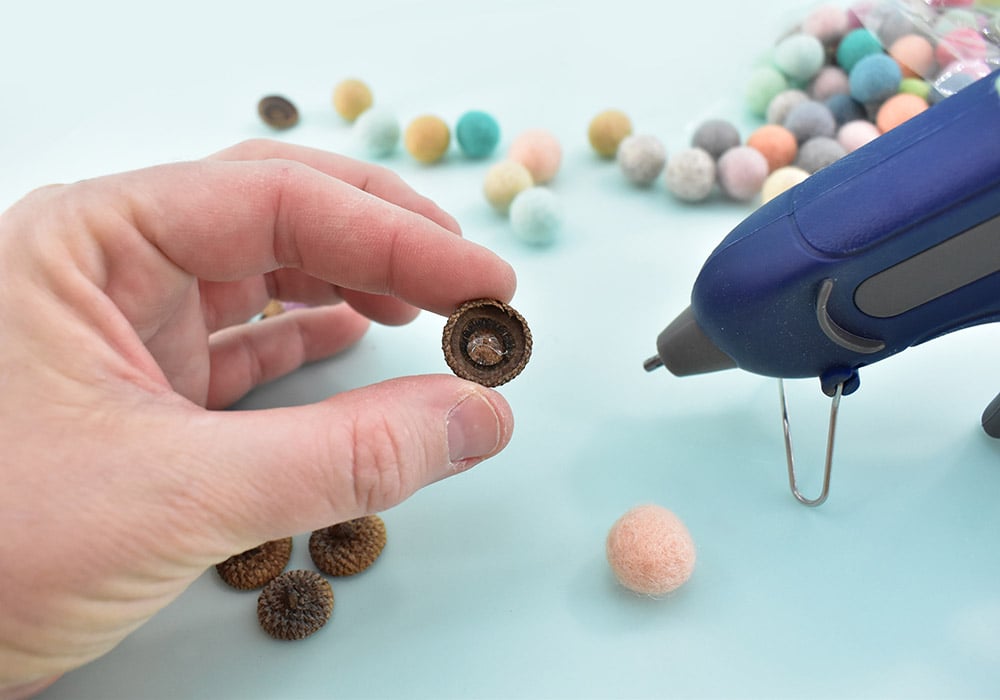
Not all of your felt balls will be exactly the same size and neither will your acorn hats. Before committing to anything with glue, test to find a ball and cap that fit together well. Apply a nice dab of glue inside of the acorn hat.
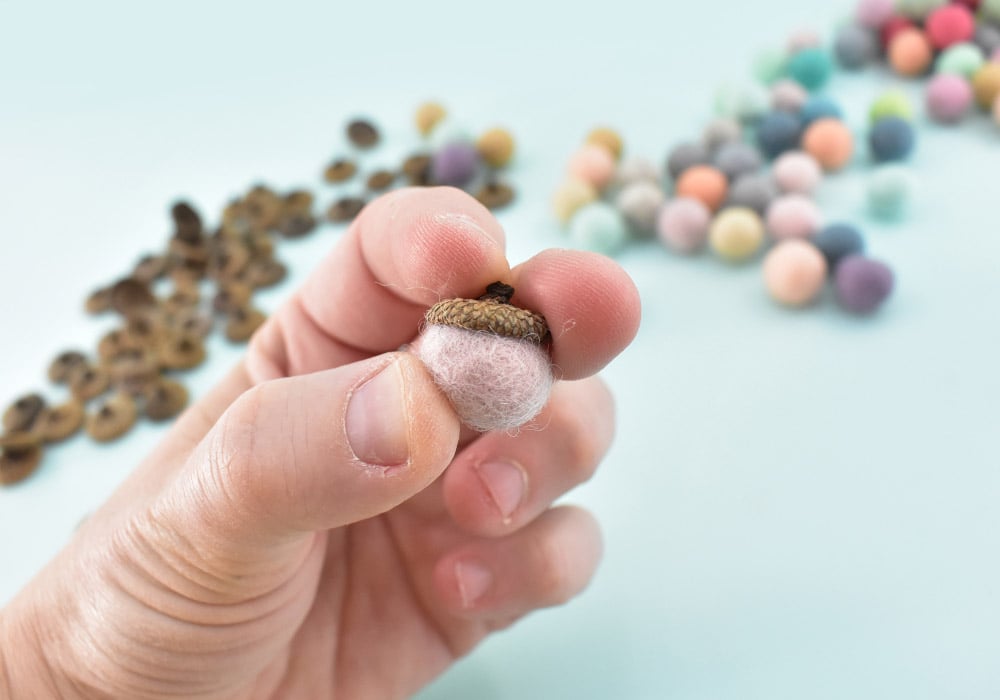
Push the felt ball into the cap and twist to spread around the glue. Push the felt ball into the cap until it can hold on its own. Tah-dah! You have a felt acorn!
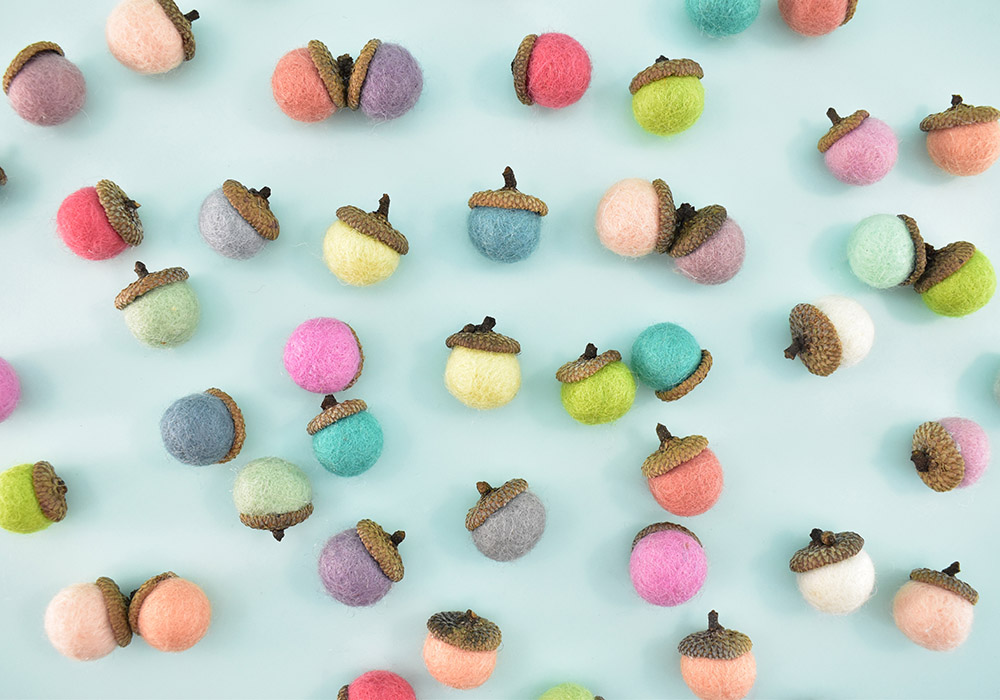
Continue gluing caps and felt balls together and toss them into a decorative bowl or continue reading to turn them into the dang cutest felt acorn garland!
How to Make a Felt Acorn Garland
To start your garland you’ll need to lock in the first bead you string on. I’ll show you just how to do that with pink string because fishing line is pretty darn invisible!


Run your line through an embroidery needle. Push the needle and string through the bead. Come back around and push the needle through one more time in the same direction. Hold onto the tail of the thread and pull the needle away from the bead. As you pull the string will form a loop around the bead.
Leaving just a little bit of wiggle room, run the needle between that loop and the bead two times. Pull taut to lock the bead into place. Give it a quick tug. The bead should not move up or down the string but stay locked into place.


After you’ve locked your first bead into place, string on a total of 12 wood beads then an acorn. Run the needle as close to the cap through the felt ball as you can so that it stays upright. Running the needle through the center or lower and the weight of the cap and glue will turn the acorn upside down.
To start with an acorn rather than a bead, run the string through the acorn near the cap. Move the needle over slightly and run back through in the other direction and pull tight, holding onto the tail so that it doesn’t pull through the acorn. Run the needle through a third time and pull taut. The acorn should stay in place and not move.
Finishing Your Felt Acorn Garland
Once you’re happy with the length, lock the last bead or acorn into place just as you did the first. You’ve finished your felt acorn garland!


