
This post and photos may contain Amazon or other affiliate links. If you purchase something through any link I may receive a small commission at no extra charge to you.
I’m not sure why it is but the other day I realized that I reach for different metals for different seasons. During the cool winter and spring months I find myself wearing the cool colors of silver or white gold. In summer I like wearing warm yellow gold and in fall I love the warmth of copper. Maybe it has something to do with the vision of gorgeous fall foliage even though we don’t really get that in the Houston area…
While walking around Michael’s one day I had a 40% off coupon burning a hole in my pocket and I perused the store looking for something to buy. Seeing the copper bracelet blanks I instantly decided that I absolutely needed them. And I absolutely needed to paint the with fire!
Why Does Copper Change Color When Introduced to Fire?
Did you know that the Statue of Liberty, though it looks green, is covered in copper? Over time copper oxidizes and changes color. This layer of oxidation is known as patina. When copper is introduced to heat this artificially speeds up the oxidation process giving us amazing shades of orange, green, purple, and blue!
Supplies Needed to Make Fire Painted Copper Bangles:
Kitchen Torch
When purchasing a kitchen torch it won’t come prefilled with fuel. You’ll need to purchase butane fuel and fill it yourself.
Copper Bangle Blanks
When looking for blanks to make fire painted copper you’ll need to make sure that it is genuine copper metal and not copper colored. Impressart makes good genuine copper blanks you can purchase in craft stores or online. I purchased my bangle blanks at Michael’s and used a 40% off coupon!
Like the Look of Textured Copper?

I love the look of textured copper and for some of my bangles I veered from the smooth, painted copper. It’s super easy to add texture… you just need a jewelry texturing hammer. Place your blank on a steel bench block (or something similarly sturdy) and carefully strike the metal. Depending on the strength of your hit you’ll texture the metal with whatever pattern is on your hammer. Take care, though, because whacking the daylights out of it will misshapen the metal and it won’t be straight.

A Few Safety Tips Before We Get Started
Because metal gets really hot you need to be very careful when painting copper with fire. If sitting down you’ll need to make sure you keep your work over a protected tabletop instead of working over your lap. That way if you drop a piece of flaming hot metal it won’t cause any damage to yourself or your stuff.
Don’t place the hot metal directly onto wood, Formica, or plastic as the heat can scorch or melt. A brick or a cement stepping stone works really well to place your hot metal onto as you work. You can purchase a stepping stone for less than $2 at a home improvement store.
You will hold onto the metal as you paint it with a pair of pliers.
Remember that while the handles will stay cool, the actual grabber parts of the pliers and will get just as hot as the copper will.
Heating the Copper Using a Kitchen Torch
Because we will be using the torch for long stretches of time, it’s best to work in a well ventilated area.

We will be using a kitchen torch for this project and it creates a crazy hot. My kitchen torch, which I highly recommend, has a top temperature of 2500°F. That’s not a typo – two thousand five hundred degrees… Yowza.
I’m not sure if I’m a moron, or what, but I have the hardest time refilling a butane torch. I’ll sit there and try and try and every time I try to start the flame it doesn’t have any fuel to go. If you’re the same I’m going to recommend the torch I have in my kitchen again simply because it has a fuel gauge! It may seem silly, but this little feature has saved me A LOT of tears :)
Fire Paint BEFORE Bending Your Blanks into Bangles
It’s much easier to fire your blanks with your torch while the bangle blank is still flat. This means you aim the torch away from yourself. It’s harder to hit the copper with the torch when it’s bent into a circle and you wind up aiming the torch at the hand holding it! Be sure to get the color you want BEFORE you bend your bracelets.
If You’re Sensitive to Smells
First up, I’m going to remind you again that it is super important to work in a well ventilated area. Smells really bother me and I’m fairly sensitive to chemicals and whatnot. Since it was a bit chilly outside I decided to work in my office with the window open. But while I worked on a few bangles while snapping photos and I got this lightheaded and tingly sensation and a really miserable headache. It turns out just having a window open wasn’t well ventilated enough. After I snapped my photos I continued to paint my bangles but I did it while sitting on my back porch. After that I had no trouble with headaches or those terrible tingles.
Ready to cautiously (and awesomely!) create some fire painted copper bangles?
Preparing Copper to Flame Paint

Using a very fine grit sanding sponge or sandpaper buff the top layer of copper on both sides of the bangle. Your copper will go from a deep orangey color to a much lighter pinkish color. Use a clean, slightly damp rag to remove any dust and allow to dry.
How to Paint Copper with Fire

Grab a pair of long nose pliers and hold onto your bangle near the end. Start your torch and run int up and down the metal keeping it in motion. As you work you’ll notice the copper starting to turn kind of a flat gray. This is perfect! Grab on to the other end of the bangle with your pliers and heat up the other side, too. Set the copper down on something heat safe (I used a brick) and allow it to rest about half an hour or until completely cool.

Painting copper with fire is a project where patience is a virtue. In a word it can take AGES to get designs that you’re happy with. Once your bangle has completely cooled from the first pass of heat you can use the flame to begin painting colors onto the metal.
Hold onto the bangle with your long nose pliers and move the flame from the torch over the surface of the metal. As the metal gets hotter the copper will oxide and make the bangle change colors. Work for a little while and allow the metal to cool completely. Overheating the copper will cause the colors to fade from vibrant shades. If you look above you can see how on the left side of the bangle there is a fairly pastel area next to a nice and dark blue/purple, orange area. The area on the left overheated and it’s actually creeping toward the center of the bangle. Eventually the entire bracelet turned dull and pastel.
If you overheat your bangle, no worries! You can keep coming back over and over with heat onto the cooled copper to again paint on vibrant colors! After overheating I like to take the sanding sponge back over the bangle to give it a nice, even surface color-wise before continuing.

Want Some Insight from an Expert? Check Out This Video!
Since I’m enthusiastic but new to copper painting I found this awesome video so you can get some more info! You’ll even see the moment when the copper overheats and turns dull so you know what to look for!
How to Bend Bangle Blanks into Bangle Bracelets


Place the end of a bangle blank into the lip on a bracelet bending bar. Hold the copper steadily in place with your thumb and forefinger.
Using your dominant hand, and while still holding the bangle end firmly in place, bend the blank over the bend in the tool.

Remove the blank and place the other end into the lip. Bend around the curve and you’ve made a bangle!
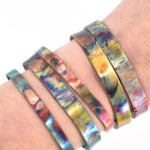
Seal Your Copper Bracelets for the Brightest Colors


The colors on your painted copper will dull with time. See the photos above? Those are the same bangles but the photos were taken a day apart. In just 24 hours they lost quite a bit of their pretty and sharp colors.
To keep your pretty colors bright and crisp, use a clear sealer on them as soon as you bend your bracelets into place. So far I have tried spray polyurethane and Triple Thick Glaze Spray. Both well but I much prefer the very shiny look of the triple thick glaze.

You Might Also Like

DIY Stamped Lucky Penny Jewelry

DIY Rainbow Beaded Safety Pin Bracelet
