
This post and photos may contain Amazon or other affiliate links. If you purchase something through any link I may receive a small commission at no extra charge to you.
If you didn’t already know I live in Texas. And living in Texas the past week hasn’t been the most fun. In fact, Texas has been a total mess.
Honestly, I’ve hardly had the times that you might have seen in the photos online. My ceiling fans don’t look like crazy ice sculptures. I was able to go to the grocery store and get everything on my list yesterday. And my power wasn’t out long enough for it to get so cold that the olive oil on my kitchen counter could freeze solid.
But it did get cold. And it was isolating not having any cell service to see how things were going with my family in West Texas and Oklahoma. And it wasn’t fun dealing with a busted pipe on the side of my house, in the dark in single digit weather. I was amazed at how warm the water was. But I don’t think it was warm, I think my body was just super soaked and confused :)
Inside and not soaking wet the next day, I realized that I really needed to save the battery on my phone. I decided to turn it off an keep myself busy. Sitting on the sofa with a lot of layers on and two dogs and a cat shoved up against me trying to keep warm, I crocheted up a really thick and warm crochet hat pattern I just love.
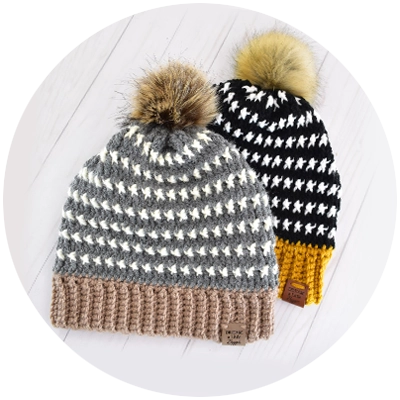
And because I made it during the storm, I decided to call it the Uri Crochet Beanie.
You know… after the storm Uri. In my head I wanted something I could have a striking and bold pattern. My first go was using gold, black and white yarn and I just loved it once done. As I tested out the pattern and hooked up another hat from it I decided to see how it would look with a more muted color palette. In the end, I truly love BOTH versions of this bold crochet hat.
Since I was freaking cold, I also wanted to make a hat with a THICK crochet fabric that would be nice and warm. You know, to keep all of that heat from escaping out of the top of my head :) What we have is a whole bunch of front post half double crochet stitches that work up on top of one another to make a really nice, thick and WARM crochet beanie. This fabric, however, does crochet up tightly because it is so dense. So feel free to go up a size in hook, or add a few more stitches to the band to make the hat looser.
Convenient, Free Printable Crochet Patterns Are Available to Our Newsletter Subscribers
Want to print your crochet pattern out and be able to easily hook your projects without constantly checking your phone or tablet? We’ve got printable PDF patterns that you can print take with you anywhere.
Newsletter subscribers get this and other files at Dream a Little Bigger for free. (Yay!) Not a member? Signing up is easy and costs nothing. Enter your information in the form below below to join our growing community of makers. You’ll get this freebie emailed to you. As a member you’ll also get post updates, tips and tricks, craft & DIY inspiration, and more sent right to your email a few times a week. Questions or download issues?
Uri Beanie Crochet Hat Pattern
Sign up for our newsletter and you’ll get an email to download your free file.
Supplies Needed to Hook Love Hearts Crochet Beanies:
The Yarn
I made these beanies in 3 different colors, all using Loops and Threads Impeccable Yarn at Michael’s Stores.
For the darker beanie I used Impeccable in Gold (Color A), Impeccable in Black (Color B), Impeccable in White (Color C). Fur pompom used on this hat is from this set.
For the lighter beanie I used Impeccable in Soft Taupe (Color A), Impeccable in True Gray (Color B), Impeccable in Aran (Color C). Fur pompom used on this hat is from this set.
The Hook
I’m currently obsessed with Furls Fiber Arts Hooks.
The Leather Garment Tags
For all of my current designs I use the faux leather garment tags on the hats from Birch and Cider. I love this small business. Great quality, prices, and reasonable time between order and receiving the tags. Plus when you chat with her about proofs and whatnot, she’s super sweet!

Pattern Notes
- The crochet fabric for the body of this crochet hat pattern is quite tight. If you are a tight hooker, for an adult hat crochet a hat band that has 68-72 stitches around OR work with a larger hook.
- In this pattern three colors are used. See above section for supplies needed for the exact yarn colors we used.
- Chains at the beginning of the rounds do NOT count as the first stitch.
- When working this project do not turn your work. Continue to crochet in the same direction for every round.


Uri Crochet Hat Pattern
Crochet the Stretchy Hat Band
Use a size H hook for regular adult size and an I hook for larger heads. The band is made using color A.
← Row 1:
FSC 10 leaving a tail of 4-6 inches.
→ Row 2:
CH 1 (does NOT count as first ST) and turn your work. SCBLO in every stitch. (10 ST)
← RND 4-64:
Repeat row 2.
Chain 1 and match up the ends of the band making sure it does not twist. Match up the stitches of both ends and slip stitch the sides together. For more detailed information please visit this post.
Crochet the Hat Body
This hat works every round in the same direction. Do not turn your work. At the end of every round, slip stitch to the first stitch to join and end the round. Chains at the beginning of the rounds do NOT count as the first stitch.
← RND 1:
(A) CH 1. (does NOT count as first ST here or in any RND) SC in every ST. (64)
← RND 2:
(B) CH 1. HDC in every ST. (64)
← RND 3:
(B) CH 1. FPHDC in every ST. (64)
← RND 4:
(B) CH 1. Starting in first ST *FPHDC, CH1, SK 1. RPT from * to end. (64)
← RND 5:
(C) CH 3. SK first ST. *FPHDC, CH 1, SK 1. RPT from * to end. (64) (worked in gaps from previous round)
← RND 6:
(B) CH 1. HDC in every ST. (64)
← RND 7:
(B) CH 1. FPHDC in every ST. (64)
← RND 8:
(B) CH 3. SK first ST. *FPHDC, CH 1, SK 1. RPT from * to end. (64)
← RND 9:
(C) CH 1. Starting in first ST *FPHDC, CH1, SK 1. RPT from * to end. (64) (worked in gaps from previous round)
← RND 10-25:
RPT RND 2-9
← RND 26:
(B) CH 1. HDC in every ST.(64)
← RND 27:
(B) CH 1. FPHDC in every ST. (64)
← RND 28:
(B) CH 1. Starting in first ST *FPHDC, CH1, SK 1. RPT from * to end. (64)
← RND 29:
(C) CH 3. SK first ST. *FPHDC, CH 1, SK 1. RPT from * to end. (64) (worked in gaps from previous round)
← RND 30:
(B) CH 1. HDC in every ST. (64)
← RND 31:
(B) CH 1. FPHDC in every ST. (64)
Measure hat. If from the bottom of the brim to the top of the hat is 9-10″ seam your beanie closed. If not, add HDC rows in Color B until 9-10″ length is achieved and then seam closed.
Stitch Abbreviations Used:

You Might Also Like

How to Make a Crochet Gift Bow

Easy Crochet Hearts Beanie Pattern
