
This post and photos may contain Amazon or other affiliate links. If you purchase something through any link I may receive a small commission at no extra charge to you.
I’m going to tell you a quick truth… right now I’m neck deep in Christmas crafting and my house is a disaster. My dining room table is COVERED with craft supplies. The only place in my kitchen that isn’t currently stacked up with something to DIY with is the stove. And that’s only because I worry about a yarn-tastic fire, or something!
There is glitter EVERYWHERE. I’ve changed my sheets twice this week for scratchy glitter bits and Opal had a shiny heinie for a while after sitting smack dab into a concoction of glue and glitter. She hid underneath my bed to avoid a bath and the glue dried ONTO MY RUG. I got to take Little Bit to the vet with a big old bald spot on her butt. Now I get to figure out how to wriggle myself under the middle of a king-sized bed to remove glued on glitter and dog hair in the middle of my rug :) Fun Christmas crafting times, right?!?
But Honestly, Christmas Crafts are Some of My Faves
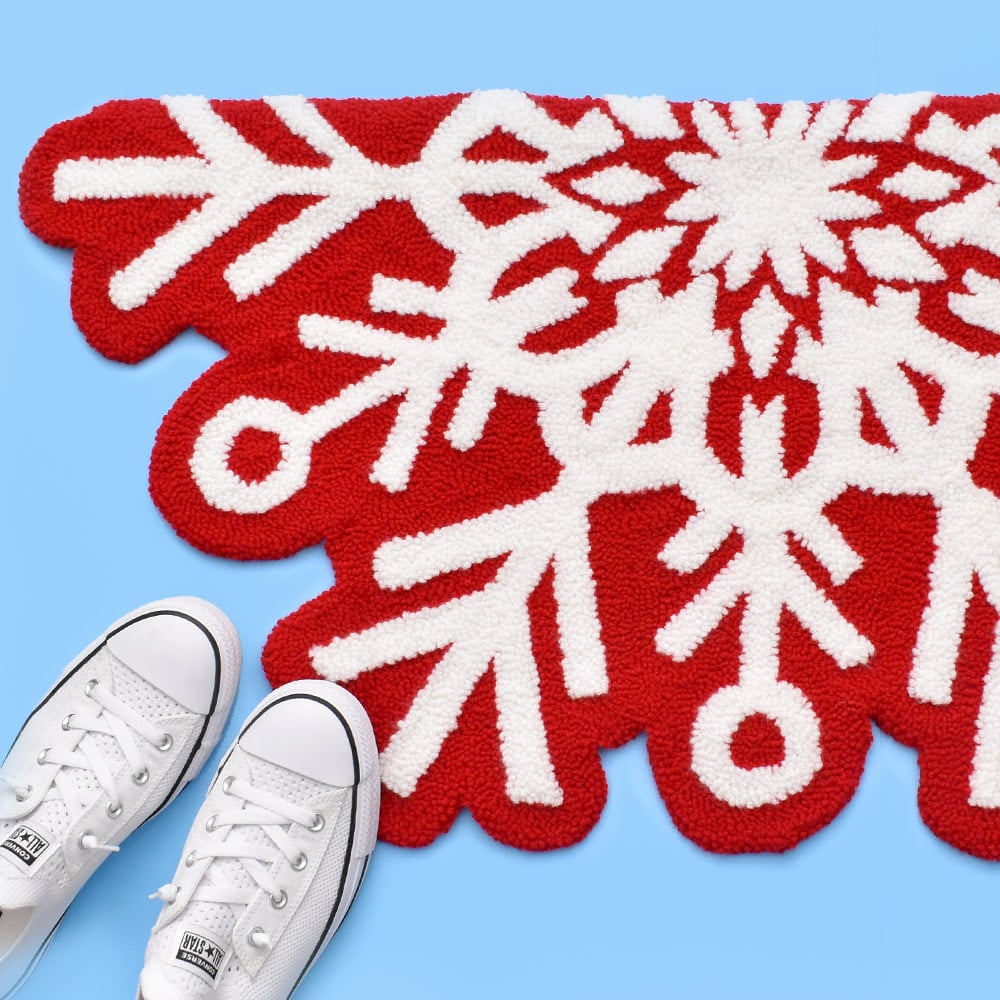
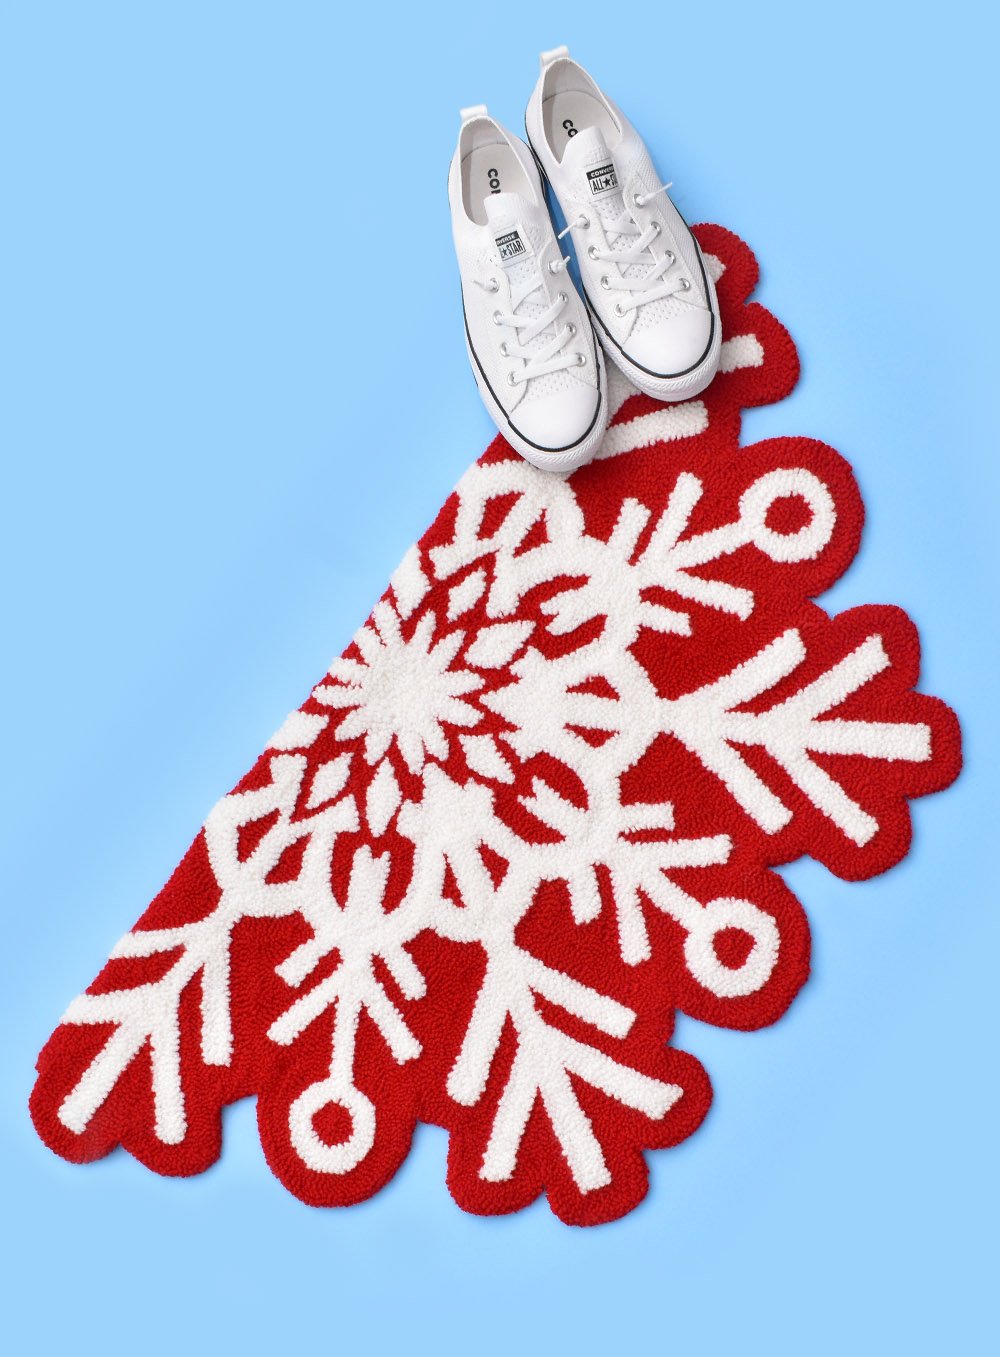
And so on my birthday I decided that I wasn’t going to worry about anything. Not house cleaning, not other projects, and I was going to make myself a bright and fun red and white snowflake rug. Because this thing had been in my head for YEARS.
And guess what? I totally did. And you know what else? I am in LOVE with it. Even if I have no place to sit down to a proper meal these days :)
To Make This punch needle snowflake rug you will need:
What is a Punch Needle Tool?
A punch needle is this handy wooden handle with a metal shaft that yarn runs through a metal eye, in through the needle and down through a hole in the metal tip. I currently have and use an Oxford Punch Needle which is basically like the Ferrari of punch needles. An Oxford will run you around $40 but it’s a sleek tool that won’t give you any trouble with yarn getting stuck.
I’ve ordered this Wool Queen brand punch needle which is much cheaper but I sent it back the same day I received it. The metal bit wasn’t as smooth as an oxford and it would occasionally get a bit stuck in the cloth. Worse was the fact that the inside of the wood handle was coarse and the yarn kept getting stuck on the rough bits and wouldn’t properly feed through.
Why 2 Sizes of Punch Needle?
Using 2 punch needles for this snowflake rug is totally optional. I like to have some variation in the length of the loops so that there is added texture to the design.
For the white snowflake I used a #8 punch needle which has a 1/2″ loop. The red background was punched using a #10 punch needle which has a shorter 1/4″ loop. This makes the snowflake stand up about a quarter of an inch higher than the background.
I LOVE using 2 different loop heights to add some character to a simple 2 color design, but you can punch the entire rug in any size loop, with any size punch needle you prefer.
Need a Little More Information about Punch Needle in General?
I’ve got a whole post dedicated to learning how to punch needle, so check that out!
Free Printable Punch Needle Patterns Are Available to Our Newsletter Subscribers
Newsletter subscribers get this and other files at Dream a Little Bigger for free. (Yay!) Not a member? Signing up is easy and costs nothing. Enter your information in the form below below to join our growing community of makers. You’ll get this freebie emailed to you. As a member you’ll also get post updates, tips and tricks, craft & DIY inspiration, and more sent right to your email a few times a week. Questions or download issues?

Free Snowflake Rug Punch Needle Pattern
Sign up for our newsletter and you’ll get an email to download your free file.
How to Print Your Pattern for Use

When you download the free pattern above you’ll get a ZIP file with 2 different options for printing your rug. You can print a large-scale blueprint/architectural print at a store like Office Depot for around $3 (this is sized at ARCH-D). You can also print out standard letter-sized pages on your home printer that you can piece together.
If you’d like more information we showed the two print options in more detail in our Halloween Spiderweb post, so check that out!
Selecting Colors for Your Rug
Since this is a rug that won’t be down more than a month out of the year I decided to go with inexpensive Red Heart Super Saver Yarn. I wanted the design to really pop, even from a distance, so I went with a white snowflake on a bright Cherry Red background for my colors.
Other color options I had considered included off-white snowflake on a burgundy background, bright teal on red, or white on a rich royal blue. Even though this is a fairly simple design, you can make such a striking rug with a variety of color choices!
If you’re wanting a better quality rug I’d suggest looking wool yarns instead of bargain acrylic yarn.
Transferring the Design to the Monk’s Cloth
The easiest way to transfer the snowflake design to your monk’s cloth is to first tape your pattern to a large window. I use the picture window in my master above my bath tub. And I literally stand IN the bathtub to transfer the design :)

I first tape the design to the glass and then tape the monk’s cloth on top of the paper. Run your hands over the monk’s cloth to make sure it’s nice and smooth. If not your pattern won’t be accurate and it will have a funny shape after you punch it.
While the sun is shining, use a fabric marker or a Sharpie, trace the design directly onto the monk’s cloth. Once you’ve outlined the design, mark the black parts of the design with lines or something similar. This will help you quickly identify which parts of the design to use your background color on. It may seem like overkill, but once you’ve started punching and you haven’t made it quickly recognizable, you will sit there for a moment from time the time trying to figure out which color to use :) Or, worse, ripping out work when you used the wrong color.
Building a Frame to Hold Your Monk’s Cloth
To punch your snowflake design you’ll need a frame to hold your monk’s cloth nice and taut. My frame measured 23″ x 42″ along the outer edge and 20″ x 39″ inside of punchable space.
The easiest way to create a punch needle frame…
Without needing tools like a saw the easiest way is to use 4 artist canvas stretcher bars in the appropriate lengths. You can buy these online but they tend to be much cheaper at stores like Hobby Lobby. Larger stretcher bars, like 48″ ones, even at Hobby Lobby where they tend to be the most affordable will cost you around $7 apiece. Purchasing two 48″ bars and two 24″ bars from Hobby Lobby to make a punch needle frame would cost around $20 just for the frame. But remember you can take these apart and easily store them to make another custom sized frame for future punch needle projects.
Although they may not have the exact size you’re hoping for you might need to make your frame a bit larger which can make it more unwieldy. But these stretcher bars slot together so that you just pop them together to form your frame and you’re done! For
The cheapest way to create a punch needle frame…
Costing $2 or less for one 96″ piece of lumber, furring strips are a super inexpensive way to build your own frame. For a frame as large as ours for a rug you’ll need to buy two 1″ x 2″ wood furring strips. If you don’t have a saw, or just don’t want to fuss with it, take your lengths needed to your local big box hardware store where they will also cut your lumber to size for a nominal charge (if they charge at all).
Rather than cutting the frame to have fancy mitered (angled) sides that fit together, simply straight cut. You can attach the frame together using your staple gun then screw a flat corner brace in each corner overlapping the two pieces where they form the corner to make it extra sturdy. If you have a power drill you’ll knock this out in no time but you can also use a handy dandy (and cheap) screwdriver.
Framing your Monk’s Cloth
Place your monk’s cloth with the design transferred to it onto your frame, centering as well as you can. Tack the cloth around every inch or two using your staple gun, stretching the cloth just enough to keep it nice and taut on the frame. Wrap the cloth around to the back of the frame and tack down again.

Finishing Your Snowflake Rug
Remove the staples from your monk’s cloth and frame. Working one edge of the design at a time, cut the cloth about 2″ away from the punched edge. Fold the cloth underneath so that it is no longer visible. Stitch into place using embroidery floss that matches your background color. When working on the curved sides, cut each curve as you go. Monk’s cloth is notorious for unravelling and is best cut just before sewing it down into place.
Lay your rug down indoors or in covered outdoor areas where it won’t get wet. I guarantee it will be the most fun snowflake rug you’ve got lying around. :)

You Might Also Like

Heart-Shaped Leopard Punch Needle Rug

Halloween Spiderweb Punch Needle Rug

