
This post and photos may contain Amazon or other affiliate links. If you purchase something through any link I may receive a small commission at no extra charge to you.
When I was a kid I spent a lot of weekends with my Mimmie and Poppa (grandparents). My Mimmie worked in a dry cleaners and it was open on Saturdays. If both Mimmie and Poppa had to work I went to the cleaners. But Mimmie had to be there early in the morning, before the sun even came out. So she’d dress me and put me in the back of her car where I would sleep and slide all over the vinyl backseat until we got there.

Even though my day started uncomfortably early, this was a lot of fun for a few reasons:
- old fashioned calculator that spit out paper
- tag attacher gun
- played big boss in a squishy leather chair in the empty big boss’ office
- got driven around in a big canvas cart used to move the clothes around
- the lady on the pants press that was addicted to candy
The lady that was addicted to candy was also very generous. We would walk past the car wash, past the snow cone stand to 7-11. She would get a paper bag and we’d fill it with penny candy. It took forever to pay because the cashier would have to count out every little Tootsie Roll Midget, every Atomic Fireball and every Fortune Bubble Gum. And though they called it a penny candy bag, some cost a whopping quarter.
When we got back we’d sit at the table at the back with it’s padded vinyl chairs and just. eat. candy.
So when I noticed a trend in coin jewelry and since I’ve never been abroad to make a necklace with foreign change, I thought I’d make a penny bracelet.
For this project you will need:
- 7 pennies
- baking soda
- white vinegar
- toothbrush
- drill and a tiny bit
- copper jump rings
- copper lobster clasp
- jewelry pliers

First you’ll need to gather pennies and drill two holes in them. I wanted mine to all be the same so one hole was drilled behind Abe’s head and the other in front of his face. Use a flat edge like on a screwdriver to knock off any curled pieces of metal that linger around the drilled hole.
Also, stick with fairly new pennies. I had a hard time getting the sharp metal bits off of any pennies from the 70s and wound up leaving them behind.

Here they are! But they’re not very pretty…
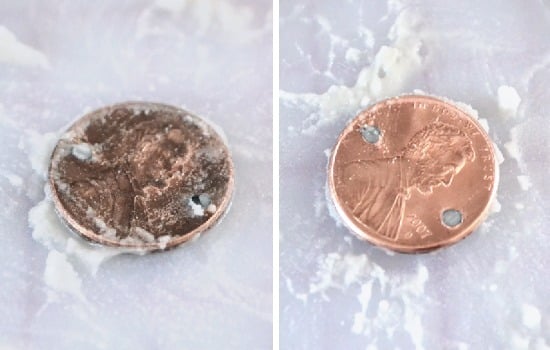
Make a scrub out of white vinegar and baking soda. Remember that when you mix the two it bubbles up so you may want to mix it over the kitchen sink.
Make a juicy paste, rub it on the pennies and let it sit a few minutes. Come back with an old toothbrush and give ’em a scrub. The penny on the left and the right are the same penny. Crazy, huh?
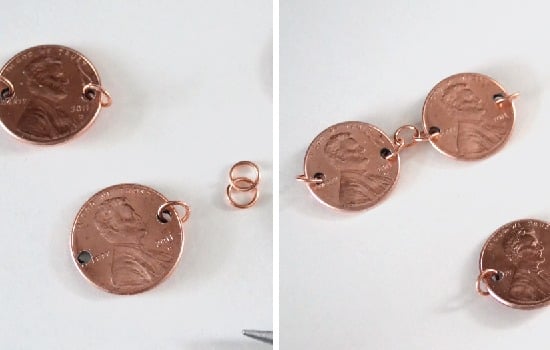
Take your jump rings and attach one to the left and one to the right of each of you 7 pennies.
Next take a jump ring to connect the pennies together.

Continue connecting and then add your clasp to one end and an extra jump ring on the other.

Try your bracelet on and be sure it fits, add a few jump rings to the end if needed.

If you already have copper findings, this project will cost you seven cents. Pretty crazy, huh? Happiest of Fridays!!!