This post and photos may contain Amazon or other affiliate links. If you purchase something through any link I may receive a small commission at no extra charge to you.
So 3 months ago I shared with you my first ever punch needle pillow pattern… The Monstera Punch Needle Pattern! And then I teased about a companion piece, the palm frond punch needle pattern. But I got busy, like you do, and I kept forgetting to turn my embroidered piece into an actual pillow. Fast forward to this week where I was amazed at how much time had flow by. And I couldn’t just sit on my hands! I got after stitching that pretty puppy into a pillow as quickly as I could manage.

In the end, I’m super happy with both of my pillows. If you’re new to punch needle, you might want to tackle the monstera design first. It doesn’t have any thin lines (like the leaves of the palm fronds here) making it super beginner friendly.
Free Printable Punch Needle Patterns Are Available to Our Newsletter Subscribers
Newsletter subscribers get this and other files at Dream a Little Bigger for free. (Yay!) Not a member? Signing up is easy and costs nothing. Enter your information in the form below below to join our growing community of makers. You’ll get this freebie emailed to you. As a member you’ll also get post updates, tips and tricks, craft & DIY inspiration, and more sent right to your email a few times a week. Questions or download issues?
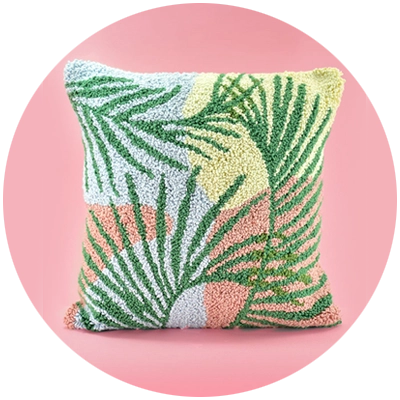
Palm Punch Needle Pillow Pattern
Sign up for our newsletter and you’ll get an email to download your free file.

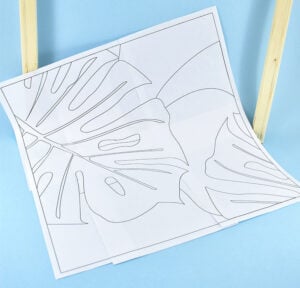
Print your free pattern. Tape together the last 6 pages of the PDF together to form one large pattern.
Love that monstera pattern in the pic above? Check out our sister embroidery pattern – the Monstera Punch Needle Pattern (also free!)
Supplies Needed to Embroider This Monstera Punch Needle Design

Punch needle supplies can be very expensive. Since I am still fairly new to the craft myself, I’ve opted to find inexpensive alternatives to the supplies needed, like a frame to punch this design on.
- Punch Needle (Etsy | Amazon)
- 20″ x 20″ Artist Stretched Canvas
- Staple Gun
- Monk’s Cloth (Etsy)
- Yarn (my colors below)
- Sharp Scissors
Making an inexpensive frame.

Grab a 20″ x 20″ fine art canvas that is stretched over a frame from the craft store. Remove the canvas and you’ve got the perfect frame for this project!

Wrap Monk’s cloth over the frame and use a staple gun to secure it. Now you’re ready to get your pattern going!
Transfer the pattern to your fabric.
While this is my first big punch needle design, I’ve already made 2 others, as well. That’s given me quite a bit of experience back to back to back of what works and what doesn’t. If you transfer the pattern onto your monk’s cloth before you put it on the frame, you stretch out the design and lose a good few inches of it all around. I have found 2 ways that work well to transfer the pattern to the fabric that is already stapled to its frame.
Creating an Iron-On
The first option is to turn your pattern over and trace all along the back using an iron-on transfer pen.I like to use the Sulky Iron-On Transfer Pen in either Red or Black. When it’s time to replace I just buy whichever of the two colors is cheaper. Place something inside of your frame that is thick enough to make the fabric fairly even with the height of the frame. Place the pattern on the fabric and loosely pin in place, iron-on side down (printed side up). Use the heat from a household iron to transfer the design according to your pen’s directions.
If, like me you don’t have an iron (what? I’m self-employed and believe in knit fabrics :) if you have a Cricut EasyPress, bust that baby out and it’s big heat plate means you’ll knock this pattern out in literally a few minutes.
Transferring with Light
Place the pattern inside of the frame with the printed design facing the back of your fabric. Push the paper edges slightly beneath the wood of the frame so that it stays put or pin in place. Take the frame and place it in front of a light source like a bright window or an LED light box for tracing. Trace the design onto the fabric using a fabric marker or a plain old sharpie.

Punch it!!!
Palm Punch Needle Design
Equipment
Ingredients
- Yarn Green, Gold, Pink, Blue and Ivory
- Monk's Cloth
Instructions
- Print the PDF free pattern and piece together last 6 pages to form one approximately 18" x 18" punch needle pattern.

- Secure Monk's Cloth to a 20" x 20" frame made from canvas stretcher bars or reclaimed from a stretched artist's canvas.

- Transfer design from the pattern to the monk's cloth using a backlit tracing box or a window.
- Punch the design.