
This post and photos may contain Amazon or other affiliate links. If you purchase something through any link I may receive a small commission at no extra charge to you.
So I spied this watch face at Hobby Lobby and I was all about it. I instantly knew that I wanted more rhinestones, pearls and lace. To be honest, what I wound up doing isn’t what I saw in my head, but what I saw in my head just wouldn’t work out in real life. Sometimes that happens and you’ve just got to roll with it.
My initial plan had been to use a bunch of different things and make the strap quite bulky. But in the end, I think I like this thin and simple strap quite a bit better. It feels very nice on and there’s something incredibly feminine about this watch DIY. If you want to make your own, grab a needle and let’s get after it!
For this project you will need:
- ribbon bar watch face (mine is from Hobby Lobby)
- rhinestone and/or pearl chain
- lace
- white embroidery floss
- embroidery needle
- ribbon end findings
- clasp

First up, your watch face… I got this one at Hobby Lobby and because of the pearl-looking appearance and the rhinestones along the face, I decided to use a pearl/rhinestone combo chain. Use whatever will work with your face.
Also, you’re looking for a ribbon bar watch face. That simply means that your face will have the wide bar at the top and bottom to connect to.

Take your ribbon and run about 1/4 to 1/2 inch of the lace through to the back. Turn over and stitch the lace shut as close to the bar as you can. If you use the same color floss as your lace, you won’t even see the stitches.
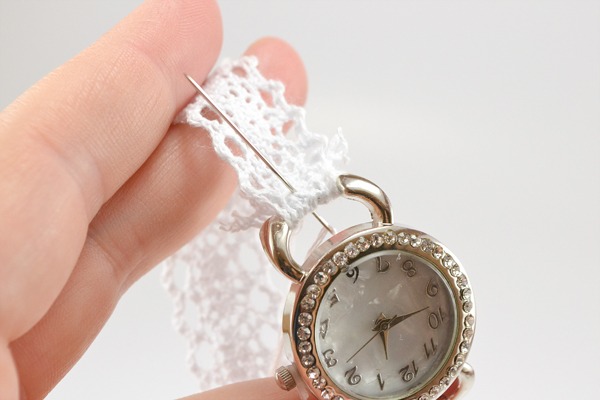
Stitch that sucker up well… I don’t know if there is such a thing as overkill here. Repeat for the other side.

Next take your chain and arrange it onto your lace running down the center. You may need to trim your chain to fit, so keep a pair of nippers handy.
Glue your first stone/pearl down and allow the glue to set. Then follow along and tack the chain down the center with your embroidery floss. Be sure to cover the little metal pieces that connect the stones into a chain.

When you get to the end you might find, as I did, that getting the ribbon end to close within the ribbon end is a pain in the rear. And I’m being kind here. I want to curse my face off right now. So, to fix this little problem I put some glue inside of the ribbon end, tucked the lace in and let it set in place before trying to close the darn thing. (can you tell I’m kind of bitter – gah!)

Pinch the end closed when the glue is dry.

Add your clasp with jump rings and jump on it!
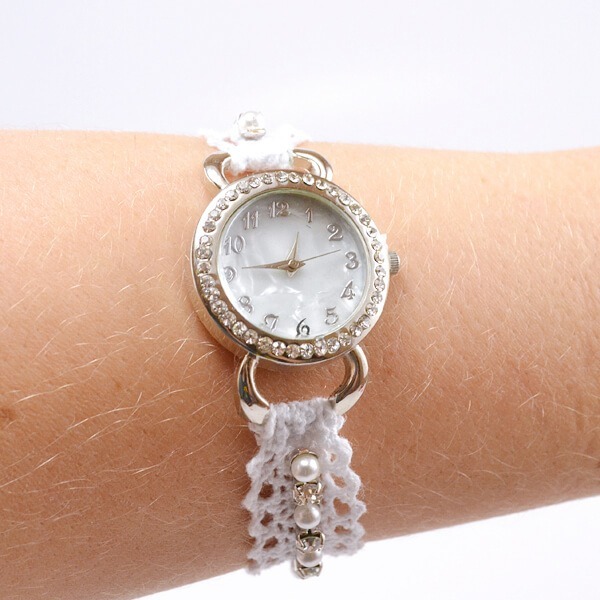
I am absolutely in love with this watch DIY. I think it’s so, so, pretty. And sorry for the glue on my fingers. I have no idea where that came from!

I’ve actually worn this guy out quite a bit. Unfortunately I didn’t think about the size of my clasp BEFORE I put my ribbon ends on there so it’s just a wee bit too bit. Rather than trim the chain and all of that, which sounds far, far too difficult, I’m going to find a different clasp to use that isn’t quite so large. But I will miss my pretty rhinestone toggle clasp!

The white lace looks great with my new, Texas gal tan :) Plus it’s so fun and feminine!
