
This post and photos may contain Amazon or other affiliate links. If you purchase something through any link I may receive a small commission at no extra charge to you.
Ack! It’s Friday the Thirteenth! Are you superstitious? I kind of am but I think it’s just because I have totally crap luck. For instance, I once ran out onto the back porch to escape a wasp that had gotten in my kitchen. He was busy banging himself into the window over and over but I was so scared of this silly thing.
And what did I do? In my getaway to the back porch, I slammed the door and disturbed a new wasp’s nest with a ticked off meanie in it. He then promptly stung me on my head. My head people. It hurt and I wound up going inside with a huge lump on my head and crying while I was staring at this other wasp still freaking out on my kitchen window.
Had I stayed put, I probably would have been fine, but I have bad luck so things wound up sucking that day. So this Thirteenth I’m staying home and doing nothing. Better safe than sorry. But moving on…
The Kumihimo thing is huge with me, and if the emails I’ve been getting from sweet readers are any testament, you’ve been pretty down with it, too. So I’ve been experimenting. Experimenting with different kinds of cords and beads and patterns and basically wearing my foam kumihimo disk out! This project is one of my experiments that ended up really well. I took a Kumihimo braid OVER some beads on paracord and the results are awesome! I’ve already wasted your time with tales of bad bugs so let’s just get on with it.
For this project you will need:
- Kumihimo Disc (or a Kumihimo Kit)
- 1mm rattail (satin cord)
- 16mm wood beads
- #550 paracord
- hot glue gun
- Fast Grab Tacky Glue

Now a lot of this process was trial and effort for me but this is what worked the best for me. These big beads have big holes in them so they fit on the paracord well, but when braiding they’re going to try to shimmy away from you. To stop that, put some hot glue inside of the bead resting where you want it on the paracord. Be careful, though. I’m still sporting a decent sized blister where the glue came pouring out onto my thumb that was holding the bead steady.
I’d really recommend doing a practice run before using up expensive materials. This isn’t hard but it does take some getting used to when covering the beads.
When working on a necklace, space the beads however you’d like. On a bracelet, I’d really recommend spacing about 0.5 inches apart. I went further than that on my first bracelet attempt, about an inch apart, and it sits kind of funny on my arm. My second attempt was much more comfortable at the half an inch increments. Quarter of an inch also seems to work pretty well.

We’re going to do a basic 8 strand Kumihimo braid. So take 8 pieces of rattail and tie them onto the end of your paracord. Use a little daub inside of the knot of hot glue to get it to stay put.

Pus your cord through and set up as for a normal 8 strand Kumihimo braid. If you need help, go here for the Kumihimo tutorial.

Start working the braid just as you normally would… bottom left to top left top right to bottom right. If you need a refresher, ain’t no shame.
Keep your paracord and bead over the two cords nearest you, so keep moving it with every turn of the disc.
Be sure to hold the disc nice and straight while working so that the braid wraps evenly around the cord.
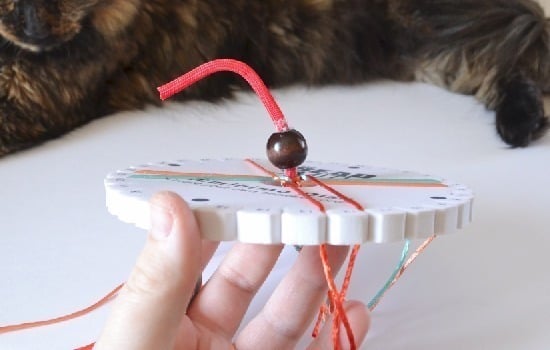
As you get closer to a bead, the cord will try to stand up.

When you start to braid around the bead, move the cords in a sweeping motion, much like the hands on a clock.

And just so you know, this is what the rest of that photo looks like. Liddy’s gnawing on my business. I’m so used to crafting with cats that I don’t even notice anymore!

As you work, the bead will become covered.

Keep going until you reach about halfway over the bead.

Take your Fast Grab Tacky Glue and put a healthy dose all over the top portion of the bead.

Continue braiding while the glue is wet. This fast grab will hold the cord nice and flush with one another. In my first 3-4 attempts I went without glue and even after all of those tries had gaps in the bottom portion of my beads. This is so much easier!
Continue the braid down the cord after you’ve covered the bead. Now doesn’t that look so neat and lovely?

Here is my first attempt at a bracelet with this technique and it’s the one that sits kind of funny. Bringing your beads totally fixes this.
When I get in my end caps I’ve ordered, I’ll share the results of the braided bracelet with them better set up.
To make a bracelet I used 1-1/4 yards for each strand. For practice I wound up mostly using off-cuts.
I hope you enjoyed this Kumihimo tutorial! Will you be making some of these very interesting covered bead braids? I’d love to see the results!!
The Kumihimo thing is huge with me, and if the emails I’ve been getting from sweet readers are any testament, you’ve been pretty down with it, too. So I’ve been experimenting. Experimenting with different kinds of cords and beads and patterns and basically wearing my foam kumihimo disk out! This project is one of my experiments that ended up really well. I took a Kumihimo braid OVER some beads on paracord and the results are awesome! I’ve already wasted your time with tales of bad bugs so let’s just get on with it.
For this project you will need:
- Kumihimo Disc (or a Kumihimo Kit)
- 1mm rattail (satin cord)
- 16mm wood beads
- #550 paracord
- hot glue gun
- Fast Grab Tacky Glue
Now a lot of this process was trial and effort for me but this is what worked the best for me. These big beads have big holes in them so they fit on the paracord well, but when braiding they’re going to try to shimmy away from you. To stop that, put some hot glue inside of the bead resting where you want it on the paracord. Be careful, though. I’m still sporting a decent sized blister where the glue came pouring out onto my thumb that was holding the bead steady.
I’d really recommend doing a practice run before using up expensive materials. This isn’t hard but it does take some getting used to when covering the beads.
When working on a necklace, space the beads however you’d like. On a bracelet, I’d really recommend spacing about 0.5 inches apart. I went further than that on my first bracelet attempt, about an inch apart, and it sits kind of funny on my arm. My second attempt was much more comfortable at the half an inch increments. Quarter of an inch also seems to work pretty well.
We’re going to do a basic 8 strand Kumihimo braid. So take 8 pieces of rattail and tie them onto the end of your paracord. Use a little daub inside of the knot of hot glue to get it to stay put.
Pus your cord through and set up as for a normal 8 strand Kumihimo braid. If you need help, go here for the Kumihimo tutorial.
Start working the braid just as you normally would… bottom left to top left top right to bottom right. If you need a refresher, ain’t no shame.
Keep your paracord and bead over the two cords nearest you, so keep moving it with every turn of the disc.
Be sure to hold the disc nice and straight while working so that the braid wraps evenly around the cord.
As you get closer to a bead, the cord will try to stand up.
When you start to braid around the bead, move the cords in a sweeping motion, much like the hands on a clock.
And just so you know, this is what the rest of that photo looks like. Liddy’s gnawing on my business. I’m so used to crafting with cats that I don’t even notice anymore!
As you work, the bead will become covered.
Keep going until you reach about halfway over the bead.
Take your Fast Grab Tacky Glue and put a healthy dose all over the top portion of the bead.
Continue braiding while the glue is wet. This fast grab will hold the cord nice and flush with one another. In my first 3-4 attempts I went without glue and even after all of those tries had gaps in the bottom portion of my beads. This is so much easier!
Continue the braid down the cord after you’ve covered the bead. Now doesn’t that look so neat and lovely?
Here is my first attempt at a bracelet with this technique and it’s the one that sits kind of funny. Bringing your beads totally fixes this.
When I get in my end caps I’ve ordered, I’ll share the results of the braided bracelet with them better set up.
To make a bracelet I used 1-1/4 yards for each strand. For practice I wound up mostly using off-cuts.
I hope you enjoyed this Kumihimo tutorial! Will you be making some of these very interesting covered bead braids? I’d love to see the results!!
