
This post and photos may contain Amazon or other affiliate links. If you purchase something through any link I may receive a small commission at no extra charge to you.
Why giant checkers?
Simply put, giant checkers are BIG fun! But more than that they’re an interesting way to change up a classic game we all already know and love. When I have given the kids a chance to play checkers they have always been interested but it has never been an overly big deal. It WAS, however, a HUGE deal when they noticed the checkerboard I had made in the lawn. “What’s that for?” “It’s a checkerboard to play giant checkers.” “Can we play now?”
I don’t know why it is, I just know that it is always more fun to play something that is oddly gigantic. And another thing I have to tell you, playing with big checkers makes it more of an exercise, too! You’re up and down, squatting and reaching to move your piece and then back up again. And if it’s a fast-paced game, you’re up and down pretty regularly. At the time I don’t really notice but if you’ve got a family tournament going and get a few games in during one day, you’re going to feel it in your thighs a bit. :)

They’re not just a game.
Giant checkers are a great conversation piece, too. In July we had a guest over during fireworks who noticed the checkerboard in the grass. After asking about it she decided that giant checkers are immensely cool. And then she mentioned they would make a neat summertime gift.
And you know what? I think she was right! In the past, I’ve made giant lawn dice (like Yahtzee) and outdoor dominoes. And both of those were a lot of fun. The dominoes were just an absolute ton of fun. And even a handful of times people drove by and offered to by them off of me. I like the checkers for the same reason I like the lawn dice, because they have less/smaller pieces than the dominoes so they aren’t quite so much work to carry out to play.
While fun, the dominoes are HEAVY. But my little checkers have been sitting in an old plastic sink tub with plenty of room to spare. They’re super lightweight and I typically carry them around with a BUNCH of other stuff (like my camera, my phone, bottles of water,e tc.) and it’s possible without even worrying about dropping them. And I think that’s pretty cool.
How do you play giant checkers?
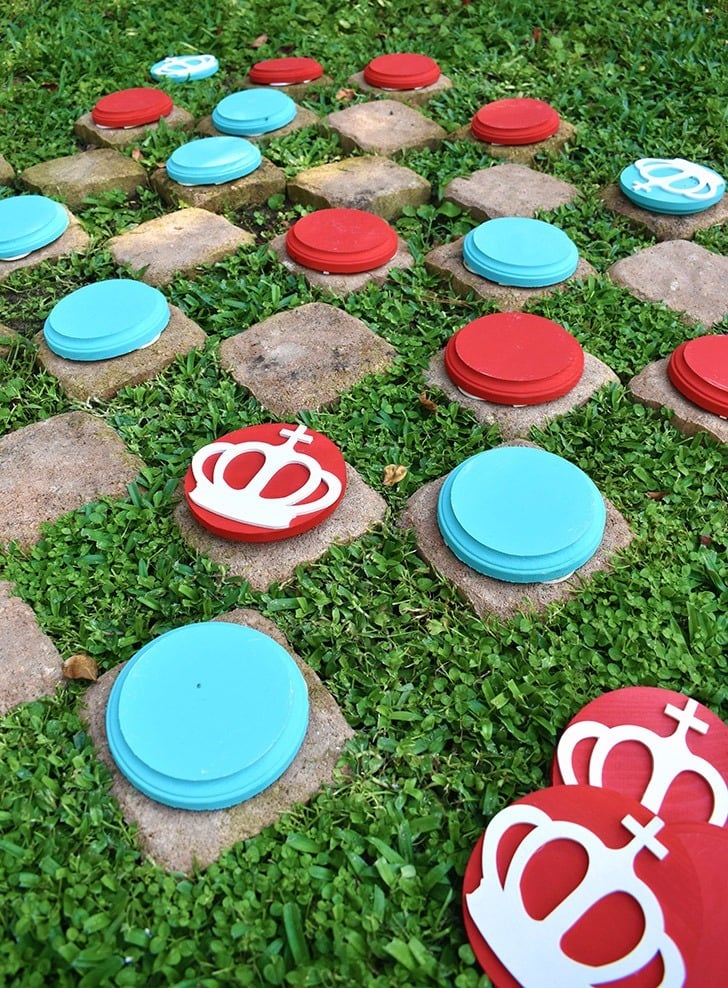
Playing giant checkers is pretty much the same as the regular-sized version. Instead of stacking 2 checkers when you shout “king me” you now just have to flip the checker over. As long as you use a contrasting paint color, you can’t miss which checkers are the dangerous move in any way king pieces once flipped!
Just because we’re a game-loving family that likes to spend time in the yard, I knew this would be a game that got a lot of use. I made a permanent checkerboard in the lawn using small, square pavers from the hardware store. Each paver is an almost 6-inch square and costs $0.98 a piece at Lowe’s. Since each checkerboard is made of 64 squares, I purchased 32 and set those in the yard. The blank spaces in between the spots are the other “squares” that aren’t used for play. Cool, right?

Now if you have little to no yard or if you just don’t want to spend $32 + tax on concrete pavers, you can still play jumbo checkers outside. Simply draw a checkerboard on the ground with chalk. How cool is that?
And last, but not least you can even play giant checkers indoors. Using 2 different colors of acrylic felt you can easily make a jumbo gameboard that you can fold up and store away with the checker pieces when not in use.
Materials needed to make DIY giant checkers.
- 4″ wood plaques (24 needed) Consumer Crafts| Amazon
- 4″ wood crowns Drash Craft Supply
- craft paint in 2 colors + white
- wood glue
- spray polyurethane
Three years ago when I made my giant dominoes I also had on my to-do list to make giant checkers. But the thing of it is, I couldn’t figure out how I wanted to do it. I could easily source wood plaques for the checker pieces but how could I make the crown. I had thought about painting them on but that is a lot of work and I’m too much of a perfectionist to be happy with anything I would paint up. And lots of y’all aren’t going to be interested in painting a bunch of crowns, either.
Then I imagined using outdoor vinyl, cutting the crowns out and then sticking them on. That seemed like a winner until I was reminded how one of my nephews, one of the most frequent players of this game, likes to peel stuff off. Those crowns wouldn’t be on there but a few games before they started being mindlessly peeled away.
Where to buy these wood crowns.
It took me almost 3 years to figure it out and the only reason I did was because I was contacted by Drash Craft Supply. I was asked if I could use anything from their Etsy shop for any upcoming projects and I decided to ask if they could make me something custom. And guess what? They totally can make custom wood cutouts!
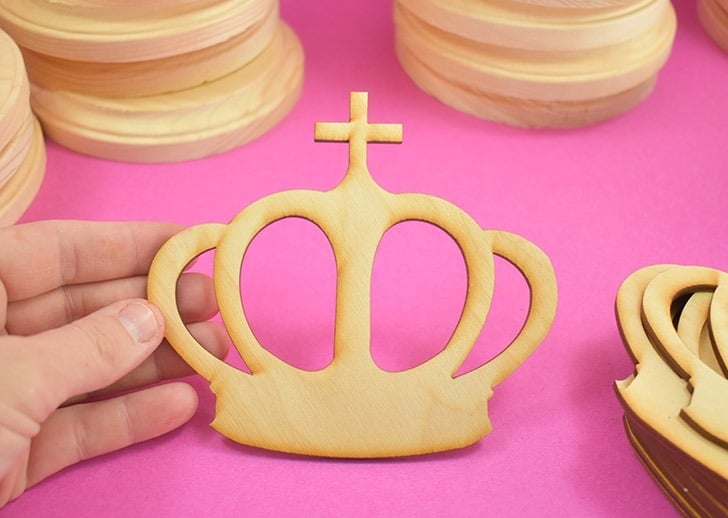
So, I sent them images of the checkers that I remember as a kid with the exact crown I always see in my head when I think of checkers. I doubt it was even 15 minutes before my email dinged and I had a mock-up for this custom crown shape. Isn’t that the coolest? After giving the go-ahead, they cut 24 wood crowns for me and sent them from Florida to Texas and the rest is history.
What’s more, Drash Crafts are keeping these checker crowns in their shop so you can purchase some, too. And if you’re wondering, while they did send me my crowns gratis (thanks!) they did not pay me to say nice things about them. I’m saying nice things about them all on my own because they have amazing quality and customer service. And besides custom wood shapes, you can also order stencils and order custom acrylic shapes and I have to think of a project for them because that is too cool! Fangirling over, let’s move on…
How to make giant checkers.
And now we get to the fun part. Let’s make some big ol’ checkers, y’all.

When choosing your colors for your checkers you don’t have to go traditional red and black unless you want to. One of my favorite color combinations is red and teal and so that is the color scheme I chose to go with. You can choose team colors, your favorites or whatever you please, really!
For each color, paint 12 wood plaques and allow them to fully dry. Go over them again if the first application didn’t dry as clean and opaque making sure that they are all perfectly dry before continuing.

Paint your crown shapes white (or your choice of contrasting color) and allow them to dry.

My wood plaques are 4″ wide and so are my crowns. That means that every once in a while when one of my plaques is slightly smaller than the others, the crown shape peeks out over the edge of the circle. You can always order the 3″ crowns instead and center them but I like the giant crowns on my giant checkers!
Using your favorite wood glue, adhere 1 crown onto the flat side of each crown. Place a narrow bead of glue around the center of all shapes of the design. You want enough to make each area adhere to the checker but not so much that glue seeps out.
Stack the crowns as you work and after every 6 crowns place something heavy on top and allow them all to dry. This prevents the wood crowns from bowing up as they dry and keeps them flush against the giant checker. As far as something heavy goes, just use what you have on hand. I used books, canned goods, and even a kettlebell!

After the glue dries protect your finish with 2-3 coats of spray polyurethane. Take care not to spray too heavily to where liquid pools up in the gaps. You just want a nice, smooth and light coverage. Allow the poly to dry between passes.

Once dry you can play giant checkers to your heart’s content! Dig around in your overflow area and grab a bucket or a basket to tote your checkers around. If you’re crafty and you’re here on this blog I KNOW you have an overflow area! It might be in the basement, garage or guest closet, but you’re stashing stuff for crafty use somewhere!
Whether you play on a board made of pavers or chalk, giant checkers are giant fun!
