
This post and photos may contain Amazon or other affiliate links. If you purchase something through any link I may receive a small commission at no extra charge to you.
Some days I walk around my house and I’m disappointed that I haven’t made it my own, yet. The previous owner had a very strong and very pretty design sense. And though his furniture is gone, the look is still very prominent in the flooring, paint colors and light fixtures. And it doesn’t necessarily work with my comfy, cozy, lots of color everywhere type of style.
Little by little I’m changing things here and there. But since I promised my dad I’d paint his house I’ve taken a break on painting my own. There’s only so many days you want to spend with a roller in your hand, am I right? In all honesty, I’ve jacked up my back and have only primed a single wall in his house so far but that’s just semantics :)
With it not being safe to travel just yet I doubt very much I’ll have guests any time soon. But the other day I got a bee in my bonnet because the room is so dark and uninviting. It was also messy and full of boxes of craft stuff that needed to be sorted. After clearing it out I started to doll it up. As I got the room set up I realized that it was still just way too dark in there for my tastes. With almost black tile and very dark gray walls it felt like I was hanging out in a shadow.

And I’m a bright and cheerful kind of a gal.
Since it’s going to be awhile until I can get to painting the room I decided to brighten things in other ways. I tossed a chenille cover on the bed and added a big picture that’s mostly white on the wall. Even with those efforts I needed something more to help brighten the space.
With my dad up at my house enticed by the promise of sloppy joes and curly fries, I got help with my cut list for this furry headboard. It’s a super easy project that is also easy to change a little down the road. Because in 2 or 3 years I may not want a faux fur headboard, this one is made in such a way that you can easily remove and replace the fabric for something new.
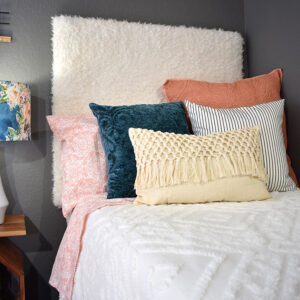
That off white faux fur headboard does a LOT to brighten the room up even more. Yay!
Now if you’re wondering how I got the idea to use fake fur rather than a more traditional fabric it just so happens I watched Get Him to the Greek last week. So, yeah :) AND I’ve been super into crafting with wood (like this cat scratcher I re-made recently). So the worlds aligned and my kind of out there project became a furry reality. If you’ve never made anything with wood, don’t be the least bit intimidated. We’ll go through each step and you’ll be super impressed with your very first DIY furniture project.
Ready to make your amazing faux fur headboard?

Supplies Needed to Make a Faux Fur Headboard:
Tools:
A mitre saw is the bees knees in my amateur wood crafting opinion. If you don’t have one you can use a far less expensive hand saw and mitre box. Don’t purchase the yellow one from Lowe’s, though. The saw it comes with is just terrible and practically had me in tears :) I’d definitely look for any online reviews before you buy one.
Materials:
- 1″ x 3″ x 8′ Furring Strip – qty 2
- Pegboard
- Wood Glue
- Gorilla Glue + Spray Bottle of Water or Spray Adhesive
- Faux Fur Fabric – 1.25 Yards (Mine is from Hobby Lobby)
- Quilt Batting
- Upholstery Foam
- Large D-Ring Hangers
- #6 1″ Wood Screws
- Wall Anchors
When purchasing faux fur make sure that it is at least 38″ wide. A lot of faux fur I found was only 28″ wide and wouldn’t work well for this project.
Cut List:
- 1″ x 3″ x 32″ Furring Strip – qty 2
- 1″ x 3″ x 31″ Furring Strip – qty 2
- 41″ x 35″ Pegboard
- 1″ x 3″ x 26″ Furring Strip – qty 1
Don’t have a circular saw? Don’t buy one just for this project unless you think you’ll get some good use out of it. Stores like Home Depot and Lowe’s have saws in store. Just take your dimensions in with you and ask them to cut your wood to size for you.

Having moved to the same city as my parents has 2 definite advantages… 1 – my dad is nearby to help me knock out my cut list! 2 – I don’t have fight with anyone else’s junk and clutter. It’s so nice to have a garage that’s organized enough that my dad and I have a place in the shade to work :)
How to Put Your Faux Fur Headboard Together:
Building the Headboard Base from Pegboard

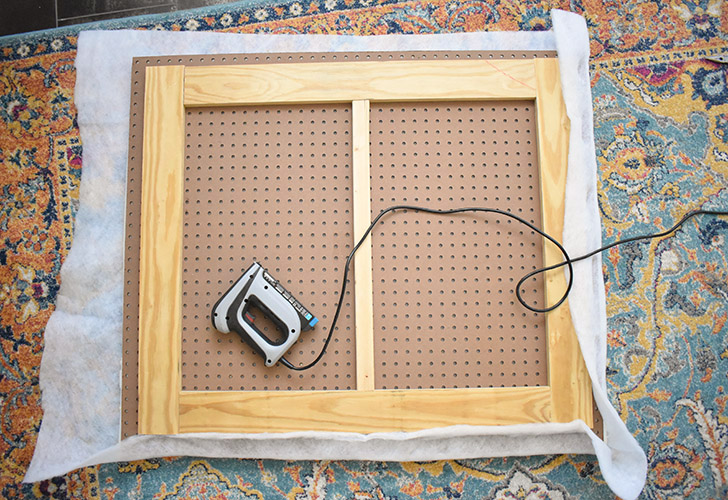
Lay your pegboard on a flat surface. Arrange your cut wood like so. The shorter 31″ boards are on the short sides of the pegboard. The longer 32″ boards are placed inside of the side boards along the top and bottom (longer side) of the pegboard. Lastly, the shortest 26″ piece is a little extra support placed in the center.
Apply a thin line of glue on the pegboard where each piece of wood goes. Make sure to avoid the holes and not apply so much glue that it will seep through the front of the pegboard and onto your work surface. Glue all 5 of the pieces in place and wait 1-2 hours for it to dry.

Flip your headboard over and drill several screws in through the pegboard into the support pieces behind. You don’t need to go nuts… One screw in the center of each board and one on each end is sufficient.
Giving Your Furry Headboard Some Cushion

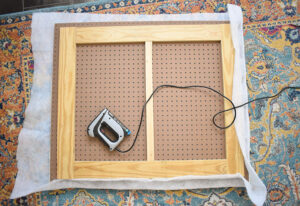
Place your upholstery foam onto your work surface. Place the headboard front side down on top. Trace and cut the foam to size. You might need to cut multiple pieces to cover the entire board, depending on the width of your foam.
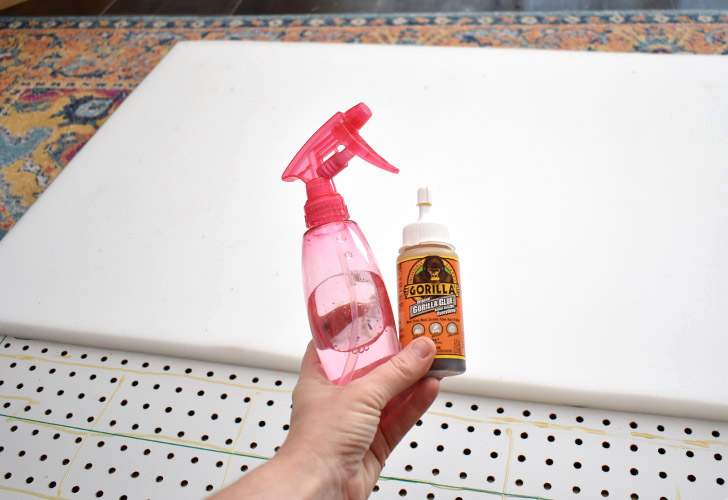
Using either run a trace line of Gorilla Glue on the front of the pegboard avoiding the holes. Spray water so that it is damp, but not dripping, onto the foam. Set in place. Apply weight to the foam and give it about 20-30 minutes to dry.
Alternatively, you can use a spray adhesive which dries much more quickly. But I personally HATE spray adhesive. It gets all over the place and means a lot of extra clean up for me. Plus it makes the inside of my nose weird and dry/sticky. I truly despise the stuff :)
How to Upholster a Faux Fur Headboard
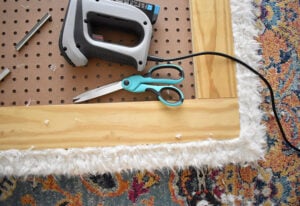
Place quilt batting on your work surface and then the headboard on top with the support wood facing you. Make sure there are no wrinkles or bulges in the quilt batting. Trim so that you have 4-5″ of batting on all sides. Fold the batting over and staple in place onto the pegboard. Fold at the corners and use several staples to tack it down with as little bulk as possible. Use sharp scissors to trim away the excess.

Repeat the process with the faux fur material but tack it to the side of the wood frame rather than to the pegboard. This will give the back side a nice, clean edge.

Using screws attach large D hooks to the top and back side of the faux fur headboard. Make sure the bottom loop of the D hook is even with the top edge of the wood. (This will make the headboard easier to hang.)
Installing a Hanging Furry Headboard

Measure the distance in between the center of each of the hooks on your D-ring hangers. Mark the center of where you want your headboard to be on the wall and determine the height you want to place it at. Divide the distance of the rings in half. Use that number to mark a spot on the left and on the right of center. This will be where you need to place the D-ring hooks.
The tops of your D-ring hooks may not be perfectly even with each other. This means even if you use a level to mark your spots on the wall, your furry headboard might still tilt to the left or the right. I suggest using some big ol’ nails with large heads (I used roofing nails) to first test the position of the headboard on the wall. Is your headboard is not level across the top? Finagle the placement until it works.
If you’re lucky your placement will coincide with studs in the walls. If not, you’ll need to use drywall anchors to hold the full weight of the headboard as it hangs.

In the areas determined to attach the faux fur headboard to the wall, set a sturdy wall anchor into place. I LOVE these wall anchors that work like a screw you drill into the wall. Add screws to the anchors, leaving the screw peeking out enough for the D-ring to hook on. Add your headboard and push your bed back into place.

DIY Faux Fur Headboard
Ingredients
- 2 1" x 3" x 8' Furring Strip Wood Boards
- Pegboard
- Wood Glue
- Gorilla Glue + Spray Bottle of Water
- 1.5 yards Faux Fur Fabric
- Quilt Batting
- Upholstery Foam
- 2 Large D-Ring Hangers
- 15 #6 1" Wood Screws
- 2 Wall Anchors
Instructions
- Cut your lumber as follows: 1″ x 3″ x 32" Furring Strip - qty 2. 1″ x 3″ x 31" Furring Strip - qty 2. 1″ x 3″ x 26" Furring Strip - qty 1. 41" x 35" Pegboard.
- Lay your pegboard on a flat surface and place your cut furring pieces on top. The shorter 31" boards are on the short sides of the pegboard. The longer 32" boards are placed inside of the side boards along the top and bottom (longer side) of the pegboard. Lastly, the shortest 26" piece is a little extra support placed in the center.Apply a thin line of glue on the pegboard where each piece of wood goes. Make sure to avoid the holes and not apply so much glue that it will seep through the front of the pegboard and onto your work surface. Glue all 5 of the pieces in place and wait 1-2 hours for it to dry.

- Flip your headboard over and drill several screws in through the pegboard into the support pieces behind.
- Place your upholstery foam onto your work surface. Place the headboard front side down on top. Trace and cut the foam to size.
- Using either Gorilla Glue and Water or Spray Adhesive, secure your foam to the front of your pegboard.
- Place quilt batting on your work surface and then the headboard on top with the support wood facing you. Trim so that you have 4-5" of batting on all sides. Fold the batting over and staple in place onto the pegboard. Fold at the corners and use several staples to tack it down with as little bulk as possible. Use sharp scissors to trim away the excess.
- Repeat the process with the faux fur material but tack it to the side of the wood frame rather than to the pegboard.
- Using screws attach large D hooks to the top and back side of the faux fur headboard. Make sure the bottom loop of the D hook is even with the top edge of the wood. (This will make the headboard easier to hang.)
- Secure to the wall using wall anchors.


Love the headboard and would buy o e if you sold them. But I’m VERY interested in your octagon side table. Where might I find one? Greedy job on the headboard and room. :)
Hey! I actually purchased my table at Kirkland’s last year. Here’s the listing but it looks like they’ve gone on clearance. Hopefully there will be one at a store near you.