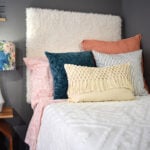
DIY Faux Fur Headboard
This DIY furry headboard is super easy to make and so comfy to rest against. Add some fun boho flair to your bed with a faux fur headboard!
Cost 30
Ingredients
- 2 1" x 3" x 8' Furring Strip Wood Boards
- Pegboard
- Wood Glue
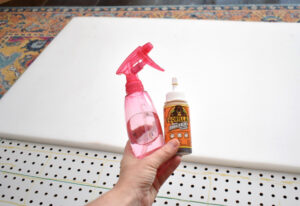
- Gorilla Glue + Spray Bottle of Water
- 1.5 yards Faux Fur Fabric
- Quilt Batting
- Upholstery Foam
- 2 Large D-Ring Hangers
- 15 #6 1" Wood Screws
- 2 Wall Anchors
Instructions
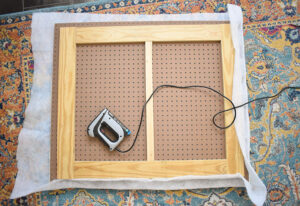
- Cut your lumber as follows: 1″ x 3″ x 32" Furring Strip - qty 2. 1″ x 3″ x 31" Furring Strip - qty 2. 1″ x 3″ x 26" Furring Strip - qty 1. 41" x 35" Pegboard.
- Lay your pegboard on a flat surface and place your cut furring pieces on top. The shorter 31" boards are on the short sides of the pegboard. The longer 32" boards are placed inside of the side boards along the top and bottom (longer side) of the pegboard. Lastly, the shortest 26" piece is a little extra support placed in the center.Apply a thin line of glue on the pegboard where each piece of wood goes. Make sure to avoid the holes and not apply so much glue that it will seep through the front of the pegboard and onto your work surface. Glue all 5 of the pieces in place and wait 1-2 hours for it to dry.

- Flip your headboard over and drill several screws in through the pegboard into the support pieces behind.

- Place your upholstery foam onto your work surface. Place the headboard front side down on top. Trace and cut the foam to size.

- Using either Gorilla Glue and Water or Spray Adhesive, secure your foam to the front of your pegboard.
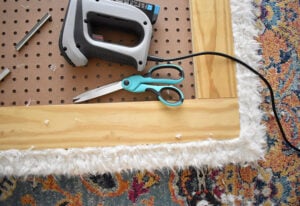
- Place quilt batting on your work surface and then the headboard on top with the support wood facing you. Trim so that you have 4-5" of batting on all sides. Fold the batting over and staple in place onto the pegboard. Fold at the corners and use several staples to tack it down with as little bulk as possible. Use sharp scissors to trim away the excess.
- Repeat the process with the faux fur material but tack it to the side of the wood frame rather than to the pegboard.
- Using screws attach large D hooks to the top and back side of the faux fur headboard. Make sure the bottom loop of the D hook is even with the top edge of the wood. (This will make the headboard easier to hang.)

- Secure to the wall using wall anchors.