
This post and photos may contain Amazon or other affiliate links. If you purchase something through any link I may receive a small commission at no extra charge to you.
Doing dishes is not in my job description. I will, on occasion start the dishwasher but that is where my participation ends. Since I dirty the dishes by cooking, what I can only assume everyone else believes to be amazing homecooked meals, I get to sit out on the pot scrubbing.
I am also the organizer. So while I will organize the most efficient method of storage for dishes, since I don’t do them my schemes rarely get followed. Often it would appear that the inside of the cabinets exploded with bowls on two different shelves – the HORROR.
So one day I was re-organizing the kitchen because since I do the cooking and I cook like the chef on the Muppets, I need to get to my pots, citrus zester, whatever 30 seconds ago or else my gravy will thicken too much, the steak will be overdone, the chocolate will scald. It occured to me that I could buy one of those label makers and put little tacky strips everywhere to ensure that my gravy ladle goes where it belongs. I’ve been looking for any excuse to buy one, honestly so that is awesome.
But drawer organization is a total different story. The fact that my drawers that actually have bottoms in them are dinky at best and add the fact that absolutely no storebought organizers will fit and you’ve got a big ol’ pile of spoons and forks to dig through everytime sup is on.
In comes some cardboard and a few other supplies, and now I know it is time for someone else to do dishes when a quick glance shows me we are currently out of clean butter knives!
For this project you will need:
- Durable cardboard
- Contact Paper
- Tape
- Hot glue gun
- Scissors
- Utility knife or X-acto Knife
- Tape measure
- Foam Mounting Tape

First measure the inside of your drawer and trim a piece of cardboard to nicely fit inside. You want to go as close to the edges as possible (for a small gap) but you don’t want the piece to get stuck.

Figure up how many partitions you will be needing. You’ll need to do math to figure up exactly how many and what size each will be in regard to the size of your drawer but leave about an inch for wiggle room. For example, if you needed 5 partitions on a 11 inch piece of cardboard you could safely make each section 2 inches.
When you have that size, cut out one piece for each section. The section titled “bottom” will be the measurement that you came up with just prior to this step. The other two called “flap” are the partitions themselves. I wanted mine to be 2.5 inches tall. Well enough to divide but not so tall as to hinder getting into the back sections of the drawer.

Cut out your piece of cardboard and score, but do not cut through the lines for the flaps. Fold inward so that you have a boxy “u” shape. Repeat for as many sections as you need.
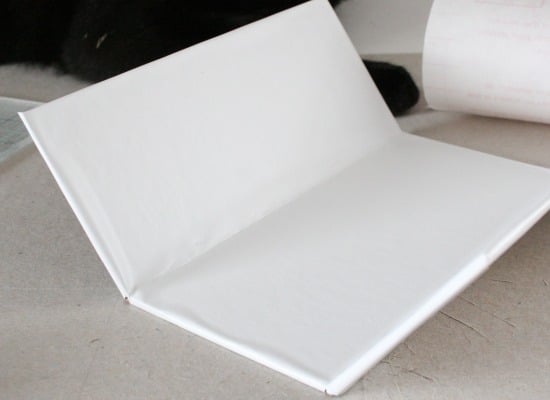
Take a piece of contact paper larger than your cardboard piece. Remove the backing and stick to the front side of the cardboard.
If you are making an organizer for another room, perhaps your bedside table, you could use pretty scrapbooking paper instead. Since the silverware sometimes get thrown into the drawer while still wet, the contact paper is going to extend the life of this cardboard creation.

Cut slits at the folds and wrap the paper around to the backside, using the paper’s sticky to adhere.

My paper is kind of old and didn’t stick too well. As a result I used tape to make sure that the contact paper was good and secure.
Repeat the process with the contat paper for your bottom piece.

Heat up your hot glue gun and glue one “u” shaped piece to the next as shown above.

Next use your foam mounting tape to adhere your partitions onto the bottom board. See how my first partition is kind of wonky? We doubled up on the inner ones to make them good and sturdy. This first one will be butting up against the front of the drawer, though, so it will be fine on its own.
Allow the tape about 2 hours to sit to make the bond permanent. This stuff means business and you’re not going to get your organizer apart again without seriously damaging the cardboard. You will be able to lift the whole thing out of your drawer easily and without worry of it falling apart on you.

Toss it into your drawer and get your stuff organized. Even the oddest shaped places an be perfectly neat with minimal time and money! Happy Monday!