
This post and photos may contain Amazon or other affiliate links. If you purchase something through any link I may receive a small commission at no extra charge to you.
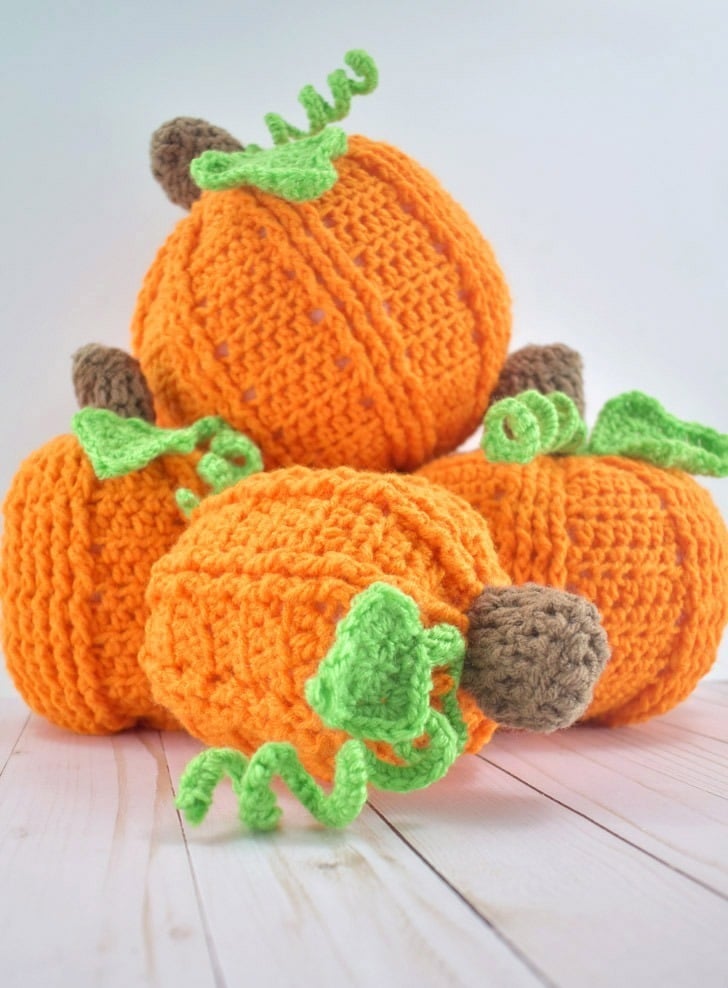
I’m not going to gab a whole lot today because we’ve got a LOT GOING ON. And by a lot, I mean FOUR different crochet pumpkins AND a printable pattern book for them all.
Yep, I’ve been a busy hooker getting after these adorable orange yarn gourds. And, honestly, I couldn’t be any happier with how they turned out. In a word, they are ADORABLE! Want to whip up a batch yourself? Let’s go ahead and get right on into it…

Our Crochet Pumpkins
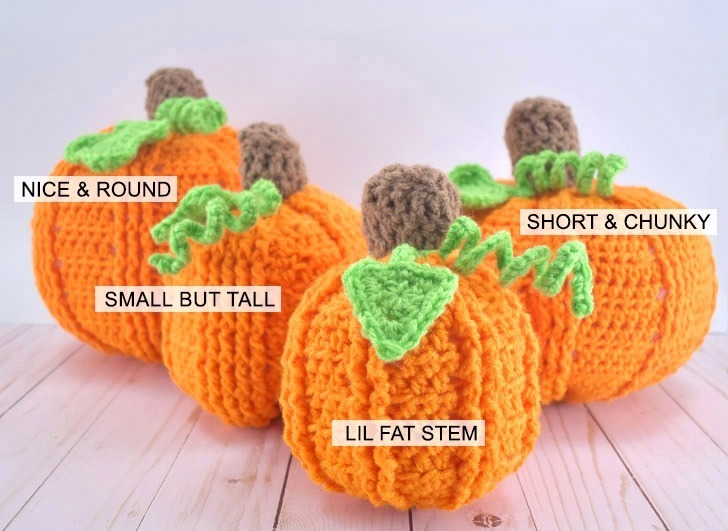
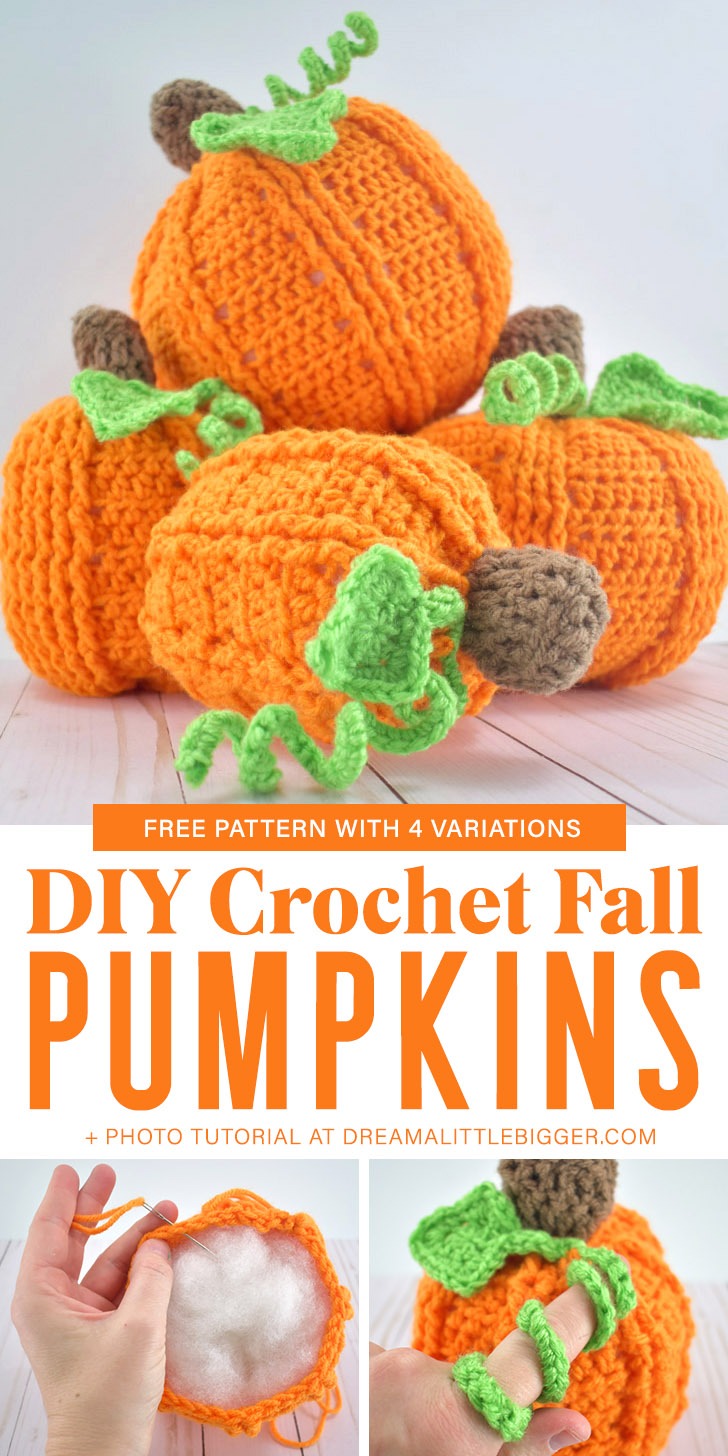
Simply because I was getting confused about which pumpkin was which, I decided to name them. The pumpkin I will be piecing together in the photo tutorial after the crochet patterns is the one in the front, the “Lil Fat Stem” crochet pumpkin.
Convenient, Free Printable Crochet Patterns Are Available to Our Newsletter Subscribers
Want to print your crochet pattern out and be able to easily hook your projects without constantly checking your phone or tablet? We’ve got printable PDF patterns that you can print take with you anywhere.
Newsletter subscribers get this and other files at Dream a Little Bigger for free. (Yay!) Not a member? Signing up is easy and costs nothing. Enter your information in the form below below to join our growing community of makers. You’ll get this freebie emailed to you. As a member you’ll also get post updates, tips and tricks, craft & DIY inspiration, and more sent right to your email a few times a week. Questions or download issues?

Free Crochet Pumpkin Patterns
Sign up for our newsletter and you’ll get an email to download your free file.
Supplies Needed to Hook Love Hearts Crochet Beanies:
The Yarn
For this project I used inexpensive Red Heart Super Saver yarn in the colors Pumpkin, Spring Green, and Cafe Latte.
The Hook
I’m currently obsessed with Furls Fiber Arts Hooks.
Stitches used:
- FDC: Foundation Double Crochet
- CH: Chain
- ST: Stitch
- FPDC: Front Post Double Crochet
- BPDC: Back Post Double Crochet
- HDC: Half Double Crochet
- SC: Single Crochet
- DC: Double Crochet
- TR: Treble Crochet
- FDSC: Foundation Single Crochet

Small but Tall Crochet Pumpkin Pattern
Brown Stem
Top of Brown Stem:
Start:
Magic Ring.
← Rnd 1:
Ch 3. In magic ring, DC 3, TR 1, DC 1, HDC 2, DC 1, TR 1. SL to join and end round. Tie off and weave in ends.
Sides of Brown Stem:
← Row 1:
FDC 10. (Each row will have 10 stitches.)
→ Row 2-3:
Ch 3 (acts as first DC) and DC down the length. Leave a tail of 5-6 inches.
Pumpkin Body
← Row 1:
FDC 40. (Each row will have 40 stitches.)
→ Row 2:
CH 2. FPDC in next 5 ST. HDC in next 4 ST. * FPDC in next 6 ST. HDC in next 4 ST. RPT from * to end.
← Row 3:
CH 2. HDC in next 3 ST. BPDC in next 6 ST. * HDC in next 4 ST. BPDC in next 6 ST. RPT from * to end.
Row 4 – 19:
Repeat rows 2 & 3. Leave a tail of 5-6 inches.
Stitch Abbreviations Used:

Lil Fat Stem Crochet Pumpkin Pattern
Brown Stem
Top of Brown Stem:
Start:
Magic Ring.
← Rnd 1:
Ch 3. In magic ring, DC 3, HDC 3, DC 2, TR 5. SL to join and end round. Tie off and weave in ends.
Sides of Brown Stem:
← Row 1:
FDC 14. (Each row will have 14 stitches.)
→ Row 2-3:
Ch 3 (acts as first DC) and DC down the length. Leave tail of 5-6 inches.
Pumpkin Body
← Row 1:
FDC 40. (Each row will have 40 stitches.)
→ Row 2:
CH 2. FPDC in next ST. HDC in next 3 ST. * FPDC in next 2 ST. HDC in next 3 ST. Repeat from * to end.
← Row 3:
CH 2. HDC in next 2 ST. BPDC in next 2 ST. * HDC in next 3 ST. BPDC in next 2 ST. Repeat from * to end.
Row 4 – 15:
Repeat rows 2 & 3. Leave a tail of 5-6 inches.
Stitch Abbreviations Used:
Round Larger Crochet Pumpkin Pattern
Brown Stem
Top of Brown Stem:
Start:
Magic Ring.
← Rnd 1:
Ch 3. In magic ring, DC 3, TR 4, HDC 3, SC 3. SL to join and end round. Tie off and weave in ends.
Sides of Brown Stem:
← Row 1:
FDC 14. (Each row will have 14 stitches.)
→ Row 2-3:
Ch 3 (acts as first DC) and DC down the length. Leave tail of 5-6 inches.
Pumpkin Body
← Row 1:
FDC 64. (Each row will have 64 stitches.)
→ Row 2:
CH 2. FPDC in next 2 st. HDC in next 5 ST. * FPDC in next 3 ST. HDC in next 5 ST. Repeat from * to end.
← Row 3:
CH 2. HDC in next 4 ST. BPDC in next 3 ST. * HDC in next 5 ST. BPDC in next 3 ST. Repeat from * to end.
Row 4 – 22:
Repeat rows 2 & 3. Leave a tail of 5-6 inches.
Stitch Abbreviations Used:
Short and Chunky Larger Crochet Pumpkin Pattern
Brown Stem
Top of Brown Stem:
Start:
Magic Ring.
← Rnd 1:
Ch 3. In magic ring, DC 6, TR 5, DC 2, HDC 2. SL to join and end round. Tie off and weave in ends.
Sides of Brown Stem:
← Row 1:
FDC 16. (Each row will have 16 stitches.)
Row 2-4:
Ch 3 (acts as first DC) and DC down the length. Leave tail of 5-6 inches.
Pumpkin Body
← Row 1:
FDC 80. (Each row will have 80 stitches.)
→ Row 2:
CH 2. FPDC in next 3 ST. HDC in next 6 ST. * FPDC in next 4 ST. HDC in next 6 ST. Repeat from * to end.
← Row 3:
CH 2. HDC in next 5 ST. BPDC in next 4 ST. * HDC in next 6 ST. BPDC in next 4 ST. Repeat from * to end.
Row 4 – 22:
Repeat rows 2 & 3. Leave a tail of 5-6 inches.
Stitch Abbreviations Used:
Leaves & Stems
Leaves for Smaller Pumpkins
Start:
Magic Ring.
← Rnd 1:
Ch 3. In magic ring DC 7. SL to join and end round.
← Rnd 2:
Ch 1. SC twice in first ST. In next ST: SC, HDC, DC, HDC, SC. SC twice in next ST. In next ST: HDC, DC, TR, DC, HDC. SC twice in next ST. In next ST: SC, HDC, DC, HDC, SC. SC twice in next ST. SC once in last ST. SL to join and end round. (24 ST)
Leaf stem: Turn. FDSC 4 times. Leave tail of several inches.
Leaves for Larger Pumpkins
Start:
Magic Ring.
← Rnd 1:
Ch 3. In magic ring DC 7. SL to join and end round.
← Rnd 2:
Ch 1. SC twice in first ST. In next ST: SC, HDC, DC, HDC, SC. SC twice in next ST. In next ST: HDC, DC, TR, DC, HDC. SC twice in next ST. In next ST: SC, HDC, DC, HDC, SC. SC twice in next ST. SC once in last ST. SL to join and end round. (24 ST)
← Rnd 3:
SC twice in first ST. SC in next ST. HDC in next ST. In next ST, DC then CH then DC. HDC in next ST. SC in next 3 ST. HDC in next ST. DC in next ST. In next st, TR then CH then TR. DC in next ST. HDC in next ST. SC in next 3 ST. HDC in next ST. In next ST, DC then CH then DC. HDC in next ST. SC in next 4 ST. SL to join and end round.
Leaf stem: Turn. FDSC 4 times. Leave tail of several inches.
Curly Green Stem for All Pumpkins
Slip stitch with green yarn around a green pipe cleaner. Fold the end of pipe cleaner over the first stitch. Continue to slip stitch until 1/4-1/2” of pipe cleaner is still visible. Tie off leaving a tail.
Stitch Abbreviations Used:

Pieces all hooked up? See how to Put your Crochet Pieces Together.
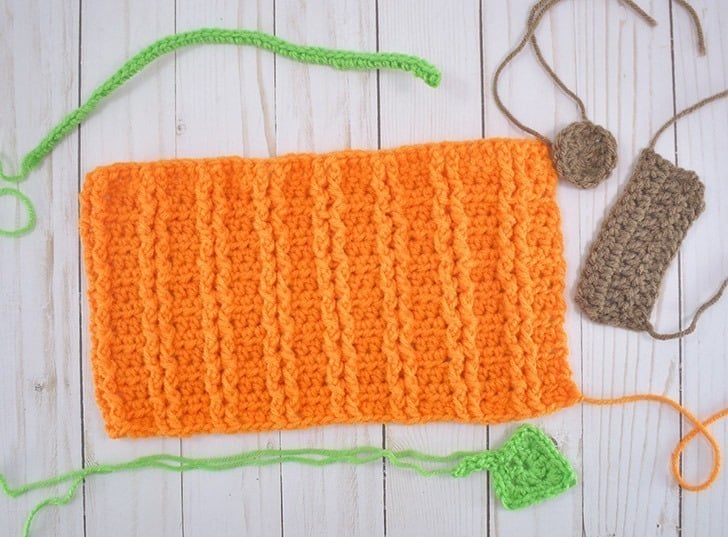
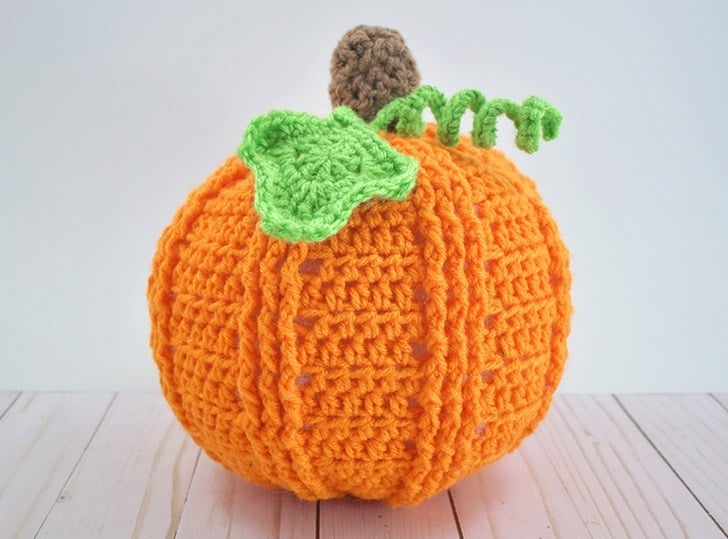
These are the pieces for your pumpkin. The body is a flat crochet piece rather than something worked in the round.

Fold your body piece into a tube form overlapping the first raised stitch and the last that is not. Using one of the tails, stitch closed with a yarn needle.

Continuing with the same yarn, thread it through every other stitch on the end to form a drawstring.

Once the drawstring is complete, cinch the end shut pulling tightly to prevent a hole. Stitch shut and run the tail through to the inside of the pumpkin body, weaving in the end.

Stitch the wide end of your flat stem piece around the edge of your top stem piece using a yarn needle.
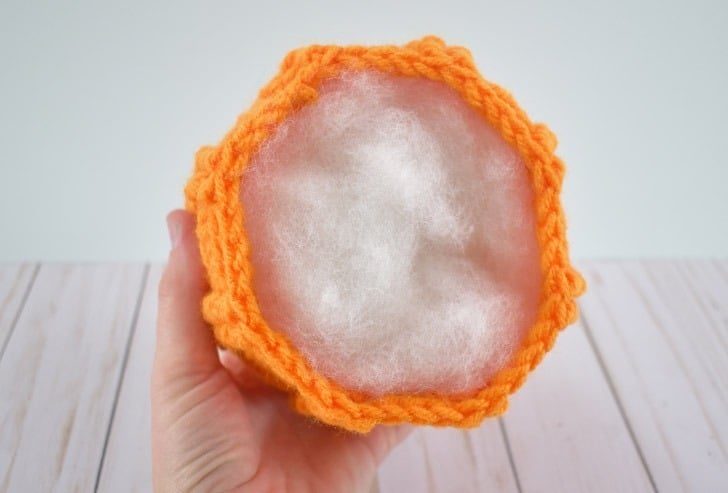
Flip the pumpkin body over and stuff with Polyfil. Fill to your preference. More filling with make a more firm shape. The spaces in between stitches will be more prominent with more of the white fiber filling inside visible. It will also make the raised ridges of the pumpkin stand out a little less.

Double a piece of yarn threaded through a needle, tying a large knot at the end. Weave through the stitches on the edge, just like for the other side. Tie off the yarn to keep this side cinched and push the ends of the yarn inside of the pumpkin’s body.

Pull the drawstring taut, leaving a hole large enough to place the stem inside, but small enough there isn’t a huge gap.

Using orange yarn, stitch the stem in place. Go around once or twice making or until there are no obvious gaps between the body and stem. In this and all instances where you have a tail to hide, run it through the body of the pumpkin out one of the sides, pulling taut to trim the excess with scissors.
Add the greenery to your stuffed pumpkins.

Using the leaf’s tail, stitch it into place on the pumpkin’s body.
How to Crochet around a Pipe Cleaner.
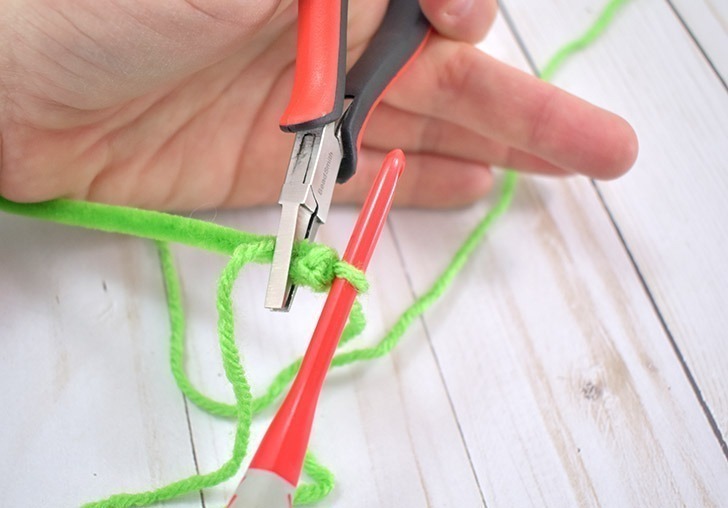
Working around the pipe cleaner very near the end, slip stitch once. Using a pair of pliers bend the end of the pipe cleaner over the backside (the flat side) of your slip stitch.

Hold the tail along the pipe cleaner and slip stitch around both working your way down.
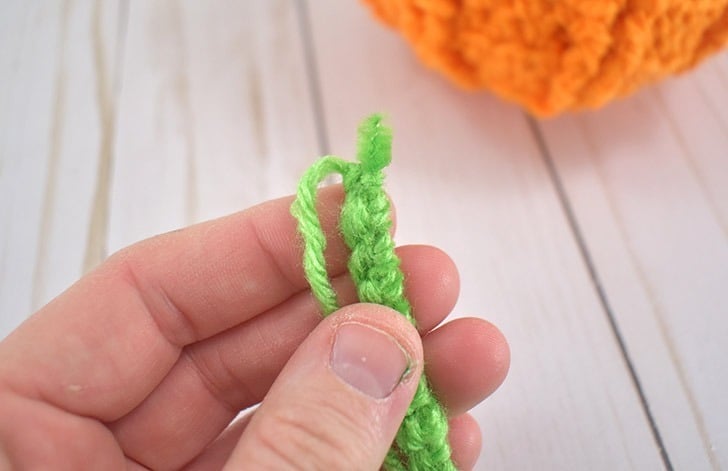
Leave 1/4 – 1/2 an inch of pipe cleaner visible. Knot the yarn to tie off, leaving a tail of several inches.

Shove the unfinished end of the pipe cleaner into the pumpkin where you would like it to be placed. Thread the tail through a needle and stitch into place. To make sure this is really attached well and can withstand being moved around quite a bit, really tack this sucker into place using 6-7 stitches around. Weave tail into the body of the pumpkin and trim off the excess.

Use your finger to curl and position however you please.

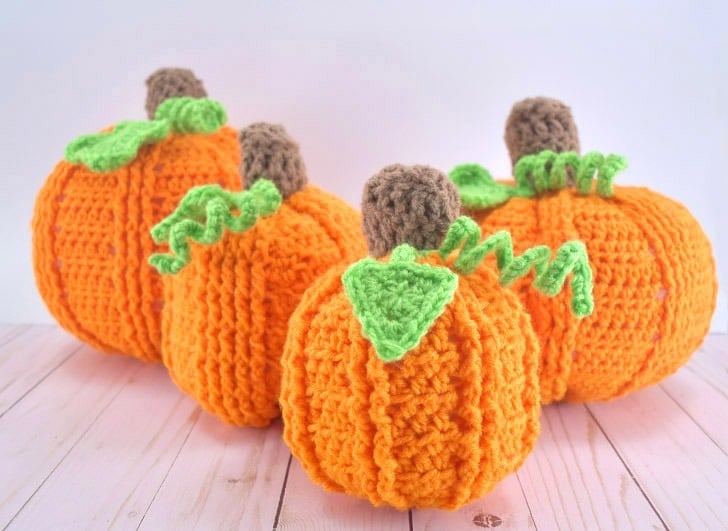
One crochet pumpkin done, only 3 more to go!
You Might Also Like

Easy Loom Knit Pumpkins Tutorial

DIY Fresh Pumpkin Vase for Fall Flowers

Jack-o’-Lantern Pumpkin Terra Cotta Pot Tutorial
Filed Under:
- Crochet
- ·
- Crochet Patterns
- ·
- Fall
- ·
- Occasions
- ·
- Thanksgiving