
This post and photos may contain Amazon or other affiliate links. If you purchase something through any link I may receive a small commission at no extra charge to you.
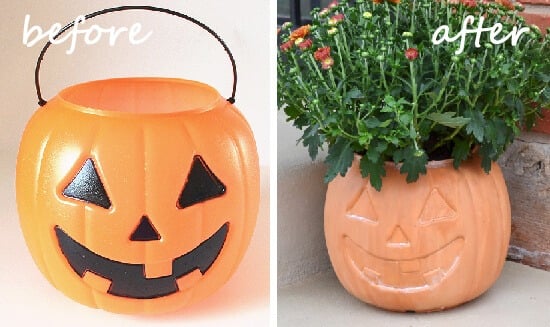
I wanted a terra cotta pot in the shape of a pumpkin or a jack-o’-lantern for some time now and had searched online for one but while there were tons of pots made to look like pumpkins, there were no pumpkins made to look like pots. And then I kind of dropped it.
Until just the other weekend when browsing the Halloween aisle I saw the traditional pumpkin shaped trick-or-treat pails for a cool buck apiece. I studied all of the different faces Jacko was wearing and chose my favorite and then headed out to the nursery to find a pretty fall mum to put inside of it. Russell thought this was a great idea until I informed him that, yes, he’d driven me all over creation this afternoon but I needed him to take me back to the craft store. I could tell he wanted to rip my ears off.

But instead he carried me back and I ran in and got some terra cotta colored paint from the craft acrylics. Because I wanted the PERFECT terra cotta color to start with I went premixed over attempting (and probably failing and wasting a boatload of paint trying to mix up my own).
When he saw the finished project he was impressed and even informed me that if he hadn’t known what I was up to, he would have been very surprised that this wasn’t a real terra cotta pot. And I count that as a huge success in my book. Want to make your own? If you already have a craft stash, this project is SOOO cheap!
For this project you will need:
- plastic pumpkin pail
- spray primer (I used gray because it’s what I had on hand already)
- terra cotta colored acrylic paint (I like the Ceramacoat version the best but you can buy Americana at Amazon)
- cream or off white acrylic paint
- soft bristled brush
- decoupage or glue and plaster of paris (optional)
- matte polyurethane or matte fixative (because terra cotta isn’t shiny!)

Spray paint your pumpkin with whatever primer you have on hand. I had gray so that’s what I used and in the end, it worked a lot better than I’d expected.
Give it several coats and allow to completely dry.
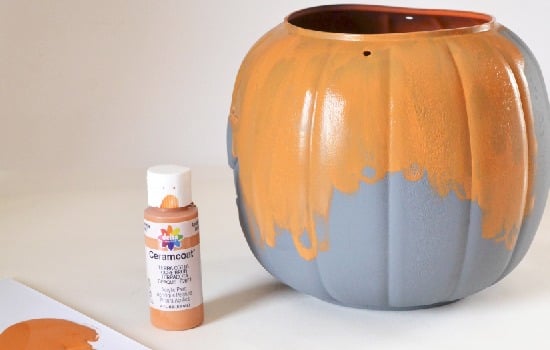
Using your soft bristled brush paint your pumpkin the terra cotta color you selected. Start at the top and paint downward in straight lines. Don’t go side to side or all crazy, just up and down.

And prepare to give this bad boy a good 3-4 coats of paint. See how mine is still showing some of the gray? It’s okay.

Take your terra cotta paint and add a whole mess of your cream/off white colored paint and mix it up really well. We’re going to use a good 2-3 coats of this stuff so don’t be shy mixing up a whole mess of it.

First give the pumpkin a full coat.
While the paint is still wet, dip your brush in both the light and the dark terra cotta colors and brush into the wet coat of paint below. Basically smear it on and then thin it out a bit. Always use the up and down motion as best you can.
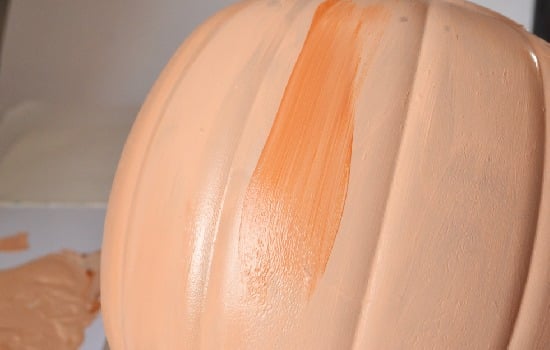
Give your pumpkin this treatment, adding more and more of the streaked coats while the undercoat is still wet. I rotated my pumpkin 3-4 times doing this until the coverage was good enough you couldn’t detect the gray underneath anymore.

The area around the face is really hard to get the paint to stick. Take your light color and go around the areas that the gray is still showing through. Allow each coat to dry but continue until you can’t see the primer underneath anymore. On the last coat, dip your brush with a bit of light and a bit of dark and streak those areas up like the rest of the pot.

So this is where we’re at at this point and if you want to stop here, that’s totally cool.

But if not, take your brush and dip it in a bit of decoupage and run the glue around the top edge.

Sprinkle your plaster of paris (or other white powder) and tap the pumpkin to remove the excess. Do the same for the bottom sides of Jacko’s features and run a bit down the vertical veins of the pumpkin every now and again.
Allow to fully dry and then brush off any excess that doesn’t want to stick around. Wipe away any that is on the sides of the pumpkin.
Take your MATTE polyurethane spray and go over the pumpkin at least 2 times. This will help seal in our paint and our terra cotta pot powder.

You may have to tear up the roots a bit from the shape of the pot, but that’s good for the plant as long as you don’t take it too far.
Using your choice of potting soil fill the inside of the pumpkin terra cotta pot as best you can. I used Miracle Gro moisture control that I used in the past. Since my other plants are still alive who-freaking-hoo! It’s all I use anymore.
If you’re not using a moisture smart potting soil, you should drill some drainage holes from the bottom before planting.

And that’s all she wrote, folks. I love that my little pot is kind of versatile. I mean, after Halloween, I can turn this sucker around and it’s just a mum in a pumpkin terra cotta pot. How great is that? Plus the full cost since I had most everything already on hand was $2.50 for the pail and terra cotta paint. Well, if you add in the plant it was $6.50 and that still ain’t bad!
And just so you know, my pot totally tricked the UPS guy who asked if he could pick it up to take a look. He did that thing where you expect something to have weight and when it doesn’t you raise it up way too quickly. It was awesome.
Will you be making your own faux terra cotta pumpkin pots?
