
This post and photos may contain Amazon or other affiliate links. If you purchase something through any link I may receive a small commission at no extra charge to you.
Last year I was pretty darn stoked to be in a new house. I moved in during winter so when it became spring and it was all lovely outside I was doubly stoked. Tons of garden projects (like these awesome embossed stepping stones) and redoing furniture on the patio (like my red to peacock cabinet) ensued.
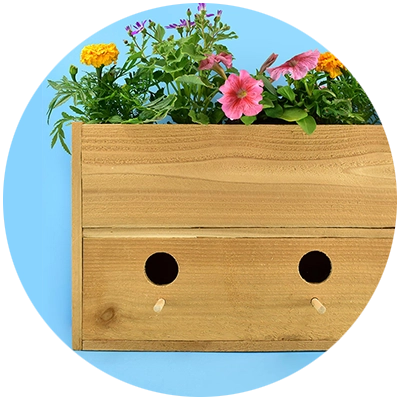
Because I was excited I hopped all over the place and I have a ton of projects that I didn’t finish or just didn’t photograph. Today I’m super pleased because I’ve finally added plants to this awesome cedar picket birdhouse planter that I built last spring. You’ll even notice in the pics that the area rug in my workspace changes toward the end :)
But I talk too much… Ready to make your own cedar picket birdhouse planter?

Free Printable Building Plans Are Available to Our Newsletter Subscribers
Newsletter subscribers get this and other files at Dream a Little Bigger for free. (Yay!) Not a member? Signing up is easy and costs nothing. Enter your information in the form below below to join our growing community of makers. You’ll get this freebie emailed to you. As a member you’ll also get post updates, tips and tricks, craft & DIY inspiration, and more sent right to your email a few times a week. Questions or download issues?
Cedar Fence Picket Birdhouse Free Printable Building Plan
Sign up for our newsletter and you’ll get an email to download your free file.
Supplies Needed to Make a Cedar Picket Birdhouse Planter:
- 5.5″ Wide Cedar Pickets – qty 3
- 5/16″ Wood Dowel
- Wood Glue
- 1″ Zinc Corner Braces – qty 4
- 2mm Plastic Painter’s Tarp
- #6 – 1″ Wood Screws – qty 24
When buying fence pickets I try to get dry boards. I’m not super strong and wet wood is HEAVY wood. Since I most often woodwork alone, if I get the drier and lighter boards I can manipulate them much more easily. If they’re all wet (like they are stored outside and it has rained) I will leave them in my garage and the heat typically helps dry them out.
Save Big Bucks by Shopping Around… I purchased my 3 pickets for $3.07 apiece at Home Depot – 50 cents cheaper than I could find them anywhere else. I purchased all of my other supplies at Walmart and saved some serious $$$ by doing so. These supplies included the 5/8″ wood dowel for $0.97, a set of 4 corner braces for $1.67, and a 24 pack of #6 – 1″ wood screws for $0.97. (Notice how all of my required supplies are the exact same as the # in the packages I purchased? :) The total to build the birdhouse was only $13.59 with tax and it’s a big ol’ 2 foot wide sucker, too!

Tools Needed to Make a Cedar Picket Birdhouse Planter:
- Mitre Saw or Miter Box and Hand Saw
- Power Drill
- Spade Drill Bit or Hole Saw
- 5/16” Drill Bit
- Staple Gun
As far as tools go, this doesn’t have to be an expensive project. Some hardware stores will cut your wood to size for you, but they don’t typically guarantee that the cuts will be accurate. Only once have I ever had a problem with this. If you don’t have a fancy power Mitre Saw and don’t trust the store to cut your wood, or if they won’t cut fence pickets, a Miter Box and Hand Saw works really well for nice straight cuts on a budget.
- ” (5/8” x 5.5“) QTY: 6
- 12” (5/8” x 5.5“) QTY: 2
- 4.5” (5/8” x 5.5“) QTY: 2
- 5/16” x 3” Wood Dowel QTY: 4

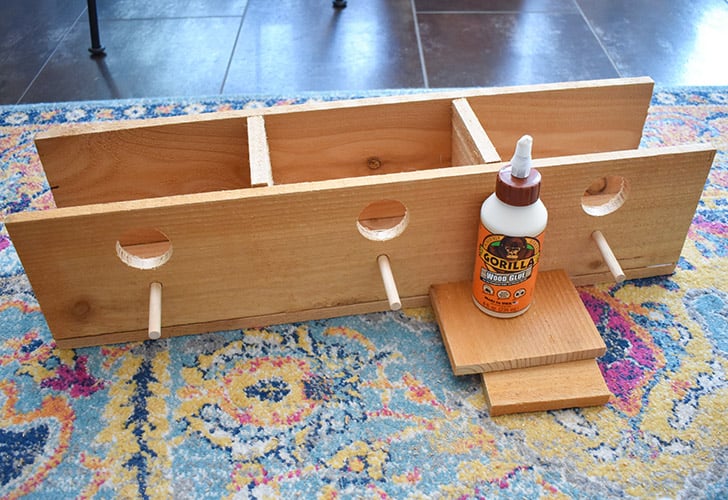
Creating the Birdhouse Openings:

From the left side of one 24” board measure and mark at 4”, 12”, and 20” all 2” from the top of the board.

Drill a 1” hole in the marked spots spots. Drill a 5/16” hole 1 inch down from larger.

Place a trace of wood glue inside of the smaller holes beneath the larger. Tape the 3″ wood dowels into each of these holes. Gently use a hammer or mallet, if necessary, to place the dowels firmly inside of the holes. Set this piece to the side so the glue can dry.
Building The Lower Level of the Cedar Birdhouse Planter.
Note * To prevent your wood from splitting, always pre-drill holes before screwing pieces together even if not specifically stated in the directions below.

Lay one 24″ board flat on your work surface. Squeeze a thin line of glue to the board as pictured above.

To place the interior walls/dividers for the birdhouse measure the inside from the left at 8” and 16”. Lightly glue 4.5” pieces into place. Screw into place from the bottom of the piece. *Note – Since this area won’t be seen I put a warped board to good use!

Pre-drill holes through the bottom and screw the walls into place from the bottom of the piece.
Glue the board with perches into place in front of the inner wall pieces as seen above. Use something to hold the wall in place and allow 15-30 minutes for this piece to dry well enough to hold into place when moved.

Turn the birdhouse over. Pre-drill 3 holes and add 3 screws from the bottom to hold the front wall in place.
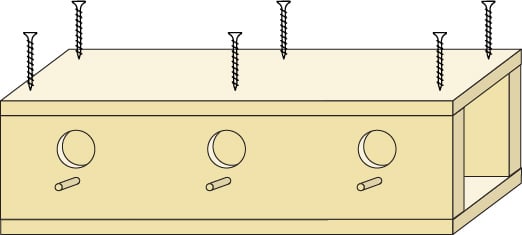
Glue a 24” board on top of the piece and drill into place with 6 screws. While you have the birdhouse flipped over, drill several small drainage holes into each section of the birdhouse.
Building The Upper Level of the Cedar Birdhouse Planter.

To begin forming the planter, place a 24” board on top of the birdhouse block as shown and glue together.

Attach the 2 pieces together as shown using 1” Zinc Plated Corner Braces using the screws that came with them.

Attach your final 24” board with glue and braces on the other side (above the birdhouse openings).

Flip the birdhouse on its side and apply glue as seen above.

Take a 12” board and glue onto the side. TPre-drill and tack each wall into place with 5 screws (4 where the corners of the board meet the sides and one in the center). Repeat for the other side.
Ready Your Cedar Picket Birdhouse for Planting.
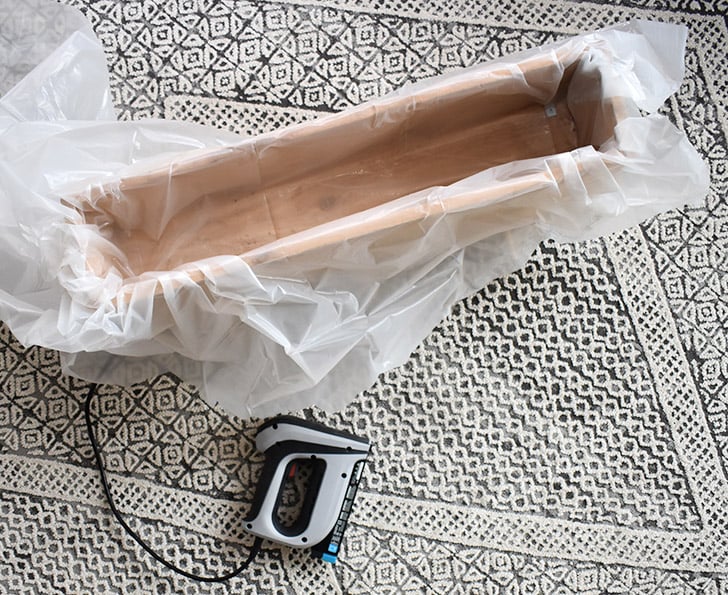

Line the inside with a plastic painter’s tarp or roofing paper. Fold the material in at the corners so that there are no gaps between the material and the walls of the planter.
Using a staple gun, tack the material into place a half an inch below the edge of the planter. Use a sharp utility knife and carefully trim away the excess.

With your planter lined, you can now get those pretty posies in! Because this planter is lined to prevent moisture from getting to the birds living on the lower level, I’d strongly suggest keeping your plants in pots and slipping the pots into the planter, like we have. Should something happen and it rains like crazy, you can easily pull the potted plants out so the planter and pots can dry out. Or you can get inside of the planter to bail out water, if necessary.
And that’s how you build a simple but super pretty Cedar Picket Birdhouse!
