This post and photos may contain Amazon or other affiliate links. If you purchase something through any link I may receive a small commission at no extra charge to you.
Every once in a while I get it in my mind to make a totally comprehensive guide so that in one place you can get everything you need to get started with a craft. In the past I did this with learning How to Filet Crochet, and even made workbook pages to help with learning :) Basically, I think it boils down to whenever my OCD is bad, then I just HAVE to cover every possible base. Heck, not just the bases, but left field, too! :)
Today I’m obsessing over how to apply HTV. All in all, it’s s simple craft but, like anything, when you’re just starting out you need a little more detail to get the job done. Today I’m covering everything from what is HTV, to what supplies (including cutting machines) you can use, down to brass tacks… the actual How to apply HTV tutorial.
If you’ve already got the supplies or if you’re just not down with my verbosity today, no sweat… Skip ahead right to the how to tutorial by clicking this link.
What is Heat Transfer Vinyl?
Heat transfer vinyl is a specialty material that has a heat-activated backing layer. When properly applied to a surface with heat and pressure, it is a permanent transfer and can withstand washing and drying.
You can purchase HTV on rolls that are 12″ wide to anywhere from 3 feet up to 50 yards in length. You can also purchase pre-cut sheets most often 12″ x 12″ or 12″ x 24″. Heat transfer vinyl is also called HTV, for short, or iron-on vinyl.
Vinyl vs. Heat Transfer Vinyl – Are they different?
Yes. When I first started out I didn’t realize what the difference but it’s pretty simple.
HTV has that heat-activated layer. Without heat, HTV won’t transfer.
Regular vinyl is sticky-backed (like a sticker) and can be applied just with pressure of your hands. To use regular vinyl, you simply peel away the backing sheet, the adhesive is visible and then it can be applied.
What can you apply HTV to?
Heat Transfer Vinyl is typically used on soft items (like fabric) that can withstand high heat but is sometimes also found on some pretty surprising projects. Here is everything you can apply HTV to:
- Fabric – Tee shirts, tote bags, shoes, throw pillows…
- Paper – Books, gift tags, journal covers…
- Art Canvas
- Foam – Flip flops, koozies, etc.
- Wood – Great for homemade signs like these vintage-inspired Christmas signs.
- Stuffed Animals
- Dishware (Metallic or Glitter work best) – Ceramic mugs, travel mugs, canisters…
- Leather – Journal covers, shoes, purses…
- Acrylic Blanks – Christmas ornaments, keychains, sheets…
Types of HTV
Solid Color – Siser Easyweed (Amazon | Expressions Vinyl ) • Cricut Everyday Iron On (Amazon | Cricut )
Most commonly used, inexpensive, widely available, huge variety of colors. Since I love cats, I just love this cat monogramed tee using HTV by Hey, Let’s Make Stuff. Click through to grab the free cut file and pin this image.
Holographic (Amazon | Cricut | Expressions Vinyl )
If you’re going to put a unicorn on a shirt then you’re the type of crafter that is gonna need to stock up on holographic HTV :) Comes in solid holographic and faceted (almost glittery).
Blackboard (Amazon | Expressions Vinyl)
Blackboard HTV is such a cool concept, isn’t it? Unfortunately, I haven’t tried it myself, nor have I found an awesome project I love using it, but I’m keeping my eyes peeled.
Flocked (Amazon | Expressions Vinyl)
Easy to weed (making it good for beginners) and has a fun, fuzzy texture. I find that children especially like items made using flocked HTV.
Glitter (Amazon | Cricut | Expressions Vinyl)
Glitter HTV can be used for an entire project but I love it best when it’s used to accentuate a particular part of a design. For example, the cloud on this Rainbow Baby Onesie by Happiness is Homemade is, for me, the perfect use of glitter HTV.
Glow-in-the-Dark (Amazon | Expressions Vinyl )
Works super great on wearables and bags like these Smell My Feet Halloween Totes.
Metallic (Amazon | Cricut | Expressions Vinyl)
Very shiny and light reflective. Works well on both fabric and ceramics. Also called electric HTV. Check out how I applied metallic HTV to a mug to make the coziest Hug in a Mug coffee cup.
Patterned (Amazon | Cricut | Expressions Vinyl)
Loads of patterns including seasonal designs and trademarked characters. Doesn’t always work with all cutting designs. The more intricate the shape (like thin text) the more likely you are to lose the design of the pattern or, even worse, be unable to distinguish what the shape or text is. The perfect example of patterned vinyl used for awesome pop is this State Shirt Tutorial (without a cutting machine!) from A Girl and a Glue Gun.
Stretch (Amazon | Cricut | Expressions Vinyl)
Perfect for items that, well, stretch. Available in solid colors by several brands. Get the cut file and use stretch vinyl on the cutest pair of cat leggings I’ve ever seen at Persia Lou. (Click the link to pin this image at Persia Lou.)
What tools do you need to cut and apply HTV to a project?
Cutting Machine
Before I go into machines, there is the occasional project you can hand cut (like the State Tee I shared from A Girl with a Glue Gun). Hand cut projects are more the exception than the rule. If you really want to start crafting with HTV, you’ll need to invest in a cutting machine.
Here are all of the most common Cutting Machine Brands and their models. All will cut HTV and thin materials.
Cricut Explore Air 2 – (Amazon | Cricut) Budget friendly (less than $200).
Cricut Joy – (Amazon | Cricut) Tiny and super portable. I own the adorably tiny Cricut Joy, which is super handy to have when cutting small projects that are 4.5″ wide or less.
Cricut Maker – (Amazon | Cricut) Deluxe model. Can cut heavier materials items like wood (1/32in, 1/16in, and 3/32in), leather, fabric, craft felt, chipboard (1.5mm, 2mm, and 3mm). I own a Cricut Maker and, as far as I’m concerned, the Maker is the big mambajamba of all cutting machines.
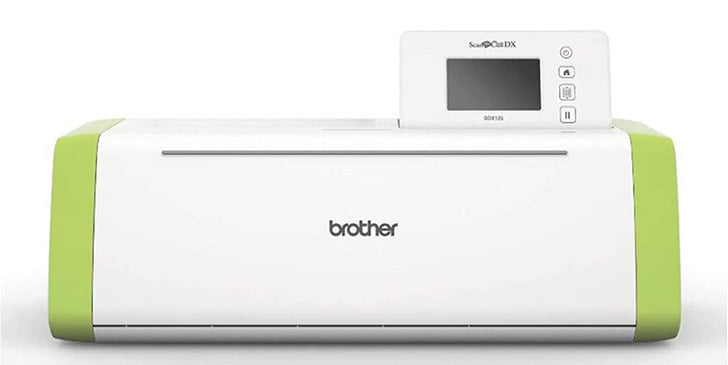
Brother ScanNCut – I’ve only met a single person who owns a Brother cutting machine and they aren’t super common. That one person had rumblings that it can be difficult to operate but did admit it can cut heavier materials (up to 3mm).
Silhouette Cameo 4 – Deluxe model. Can cut fabric and some 3mm thick materials like craft foam and leather.
Silhouette Portrait – Budget friendly (less than $200).
Weeding Tools
To remove the excess HTV from your cut design, you “weed” it. To start making tees with heat transfer vinyl, you’ll need a set of weeding tools. I love my Cricut set that has lasted years and years (Amazon | Cricut). If you’re watching your expenses, I also love this colorful and budget friendly beginner set of weeding tools, just be warned the tools themselves are kind of small.
Cutting Mats
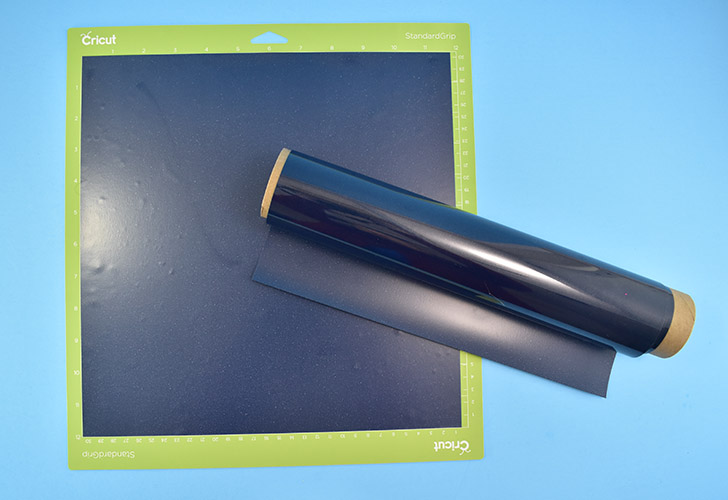
Most of the time when cutting HTV you’ll need a cutting mat (you can go matless for some Cricut Joy and Silhouette Cameo projects). A cutting mat is a thick, adhesive sheet that you apply your material to. The mat holds the material in place while the machine makes the cuts. Cutting mats come in different strengths of grab: Cricut has LightGrip, StandardGrip, and StrongGrip cutting mats. Brother has Low Tack and Standard Tack cutting mats. Silhouette has Light Hold and Standard Hold Cutting Mats. For HTV, you’ll typically use a standard grip mat (although a brand new lighter tack mat will often also work for a while).
Heat Transfer Tools
In order to apply heat transfer vinyl, you’re obviously going to need to add the heat, right? Here are several options ranging from something already in your laundry room to more expensive, professional tools.
Household Iron – The cheapest option to begin applying heat transfer vinyl is to use a household iron.
- Pros – You likely already have on in your laundry room. Even if you don’t have one you can buy one at Walmart for less than $10.
- Cons – An iron is small and so is the part that gets hot making it take a LOT of time to apply heat to an entire design. Can be especially tedious for very large designs.
Tee Shirt Heat Press – If you’re going to be making a lot of tee shirts, like as a side-hustle, you can bang out shirt after shirt in no time.
- Pros – Super fast to use. You can quickly lay down a tee and the HTV decal, pop the lid down, pop the lid back off to remove the tee and you’re on to the next. You rarely have any HTV that doesn’t stick down the first time, which is awesome.
- Cons – I’ve had a heat press just like this one and I wound up selling it in a yard sale. It was really big and cumbersome and extremely difficult to store. A heat press has so much heating area that it literally can heat up a room to the point of discomfort (at least for me). I’d be dripping with sweat before long. While great for designs smaller than the plates (in this case 15″ x 15″) it’s more difficult to adhere larger designs. It works great for flat items but is awkward for anything else, like when I applied HTV to some beach chairs. It can take a while to heat up. I would often heat mine up and by the time I went to check on it, the thing had already timed out and was cooling back off. And lastly, it’s freaking heavy (this model is FIFTY pounds). If you don’t have a tabletop location for it to constantly be, you’ll have to move it in and out of storage and it’s an awkward and heavy thing to move around which may not be feasible if you can’t lift heavy items.
Cricut EasyPress (Amazon | Cricut) – This is my favorite out of all of the options!
- Pros – Comes in multiple sizes including: 6″x 7″, 12″x 10″, 9″x 9″. Comes with a drawstring bag, making it easy to store. All models heat up super quickly and have a sound that plays when it’s reached the set temperature (and again when it hasn’t been used and is going to shut itself off). Because it’s basically just the top of a tee shirt press, you can use it on anything you can lay on a flat surface. Compared to a heat press’s weight of 50 pounds, the largest EasyPress is 8.6 pounds making it far more manageable.
- Cons – Kind of pricey and you might want to
Protective Top Sheet
It’s always recommended to place a protective sheet in between your heat source and the carrier vinyl of your HTV. I prefer to use a Teflon Sheet. Teflon sheets reusable, inexpensive and work really well. However if you need to put down some HTV and you don’t have a Teflon sheet, you can also use Parchment Paper (the same stuff you bake with in the kitchen) or a piece of scrap fabric.
The designs that you use to cut HTV are called cut files.
Let’s discuss what they are and the basics of how to use them.
Most commonly you’ll use SVG cut files.
This is a generic type of file that all cutting machines can cut. If you have an SVG file and you want to see what it looks like on your computer, you’ll need to open it with a vector software like Adobe Illustrator (which you likely don’t have) or a web browser like Google Chrome or Internet Edge. SVG files are vector, which means they can be scaled to any size and always look nice and crisp.
Other image files can be used as cut files:
You can also cut DXF, a type of AutoCAD file. Like SVG files, it is also vector and can be scaled to any size. I’d say DXF files are the least common you’ll come across.
More commonly you will find PNG and JPG files to use for cut files. These images are raster which means that they size you have is the size you are going to get. These raster image files need to be very large in size or they can be blurry which doesn’t translate well to cutting.
So, say you find an image on the internet, say in a Google search, that you wan to cut, like that Cricut Logo up there. While it looks okay on your screen, it might be too small for a clean cut. You can especially tell that it isn’t going to work well by the “Print Then Cut Image” because it’s super blurry.
Machine Specific Cutting Software
Each cutting machine has their own software that you use to edit cut files and and then send them to your machine to actually cut. Cricut has Cricut Design Space, Brother has Canvas Workspace, and Silhouette has Silhouette Studio. FYI – Silhouette Studio has their own cut file type .studio that can only be used in their own software.
Where to Find Cut Files
You can find cut files designed by your brand of machine in your machine specific cutting software. In Cricut Design Space, for instance, there are loads of FREE files and then a few premium files you can only access if you pay for a Cricut Access Premium subscription. There’s no work needed to cut these files, you simply select one, place it in design space and it’s ready to cut, which is really convenient.
You can Find TONS of Great (often free) SVG Cut Files on Blogs.
You can find all of my SVG files to download here and a few sites that I love where you can get good quality free cut files include:
- Happiness is Homemade
- Artsy Fartsy Mama
- Persia Lou
- Tried and True
- Hey, Let’s Make Stuff
- Dream a Little Bigger (okay, that’s me again :)
Purchase SVG Cut Files
If you can’t find a free cut file online or design in your software, you might be able to purchase it. There are tons of SVG files to purchase on Etsy. Keep an eye out, thought… some shops steal free content and then charge for it. If you find a design you love, do a quick Google Search by Image to make sure you’re getting the cut file directly from the source!
How to Apply HTV – The Basics
Prepare Your HTV to Cut
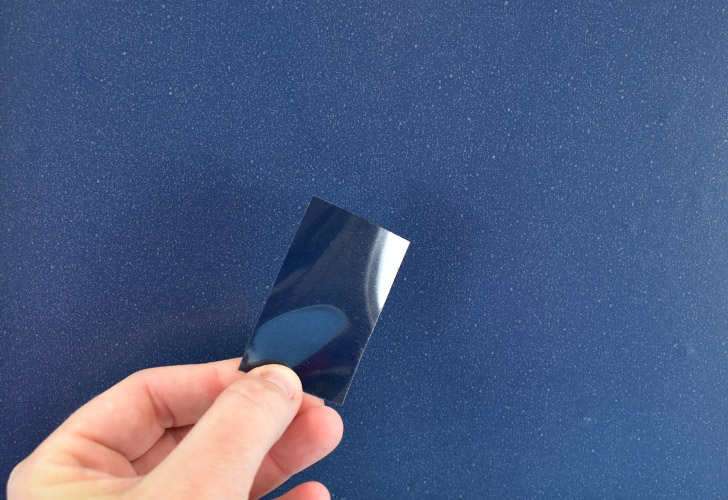
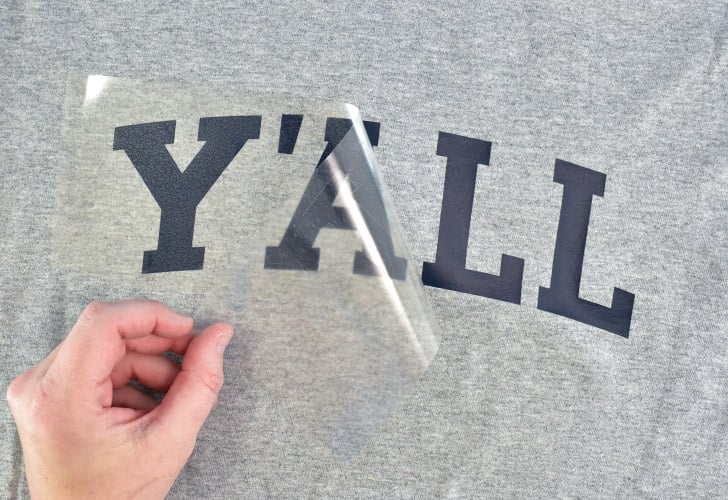
Heat transfer vinyl is a single sheet that is actually made of 2 separate pieces. The side that looks glossy is called the carrier sheet. The more flat looking side is adhesive (back) side of the heat transfer vinyl. If you’re not sure which side is the carrier sheet and which is the HTV, hold it up to light. The carrier sheet will reflect the light but the HTV side will not.
If necessary, cut your HTV from the roll. Apply the HTV carrier sheet (shiny) side down onto the adhesive side of a cutting mat. Smooth out any bubbles or creases as well as you can.
Prepare Your Cut File (in Cricut Design Space)
Since I have Cricut Design Space, I’ll be sharing step-by-step directions for this program in particular.
In Cricut Design Space click the icon in the left tool bar that says “Upload”. Locate the cut file on your computer and select it. If necessary, follow the steps (like to select any of the part of the image you DON’T want in the design, like the background) and click the “Upload” green button to import into Design Space.
Select your upload and insert it into your workspace.
Measure your tee shirt (or other item) to determine how much usable space you have for the design.
Size your cut file accordingly for your measurements and the size of your HTV.
Note * Most HTV is 12″ wide and most mats are 12″ or 24″ long, however there are exceptions so keep that in mind when planning out the size of your HTV design.
MIRROR YOUR CUT
If you’re wondering, mirroring your cut is an all caps type of situation :) Far too many crafters have ruined far too many perfectly good pieces of HTV by forgetting to mirror the cut.
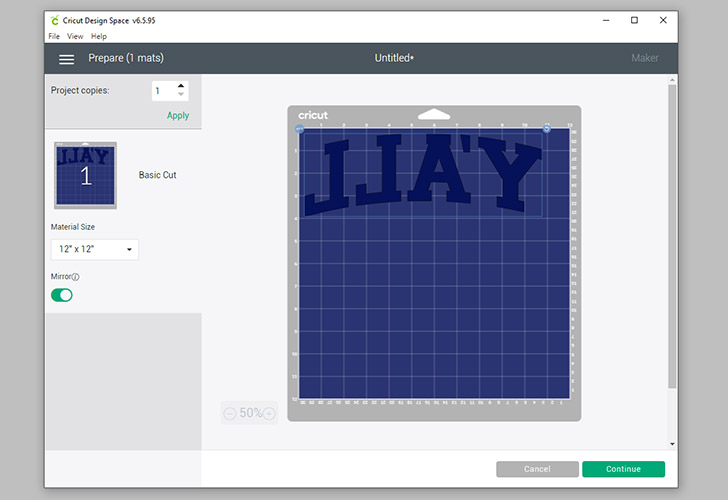
ALWAYS need to MIRROR your cut when working with HTV. If you cut HTV without mirroring, it will be backwards when you go to apply it.
In Cricut Design Space, you turn on the toggle that says “Mirror” AFTER you click the “Make It” button, but before you actually send the cut to your machine. In different programs, the option may be in different places so be sure to read your cutting machine’s information booklet so you can MIRROR your cut.
Load the cutting mat into your machine and follow the on screen directions to cut.
Weed HTV Design
Grab a weeding tool and use the pointed end to pry away parts of the design you do not want to transfer to your tee shirt. Sound simple? That’s because it is.
Once you’ve weeded your design, take a quick look over to make sure that you’ve removed everything you don’t want to transfer. Is there still a little triangle of vinyl in side of the A? Do you have stray vinyl around the design (see bottom left of the one above)? Are there tiny pieces (like the triangle from the A) that have gotten stuck onto the carrier sheet while you were weeding? All of these things need to be removed or they WILL transfer to your project.
Silly as it might be, my very first ever HTV design I had HTV in places that I didn’t want it, I just don’t guess I realized that it had to be removed NOW. And so, my very first HTV project I ruined a tee shirt (and some HTV) because I had a weird square around my design where I didn’t weed everything away.
Apply Heat to Apply HTV to your Substrate
Read the directions on your HTV and preheat your iron, heat press, or EasyPress accordingly.
While your device heats up, place your weeded HTV design on your substrate. If using something fabric, fold it in half (for example, match up sleeves on a tee shirt) to locate the center of the piece. Find the center of your HTV design and stick one half to the folded substrate. Unfold the item and smooth down the other side of the decal.
Step back, walk away, and wait a minute. Take another look – does it still look centered? If you’re not happy with the placement ADJUST IT NOW.
Set the temperature and time on your press according to your HTV packaging directions.
Using an EasyPress to Apply HTV
On a flat surface set out an EasyPress Mat or a folded towel. Place your tee on top of the mat/towel and double-check your that your HTV design hasn’t moved. Layer your Teflon sheet on top of the design. Place your EasyPress on top of the Teflon and press the Cricut logo button. Apply pressure to the EasyPress, pushing it down firmly. Do not wiggle the press around. Keep it steady.
The time will start counting down and beep when it is time to remove the press. Repeat until all areas of the HTV have been secured to the tee, trying to overlap coverage as little as possible to prevent overheating the HTV.
Using a Tee Shirt Press to Apply HTV
Layer your t-shirt, HTV, and Teflon sheet on the bottom plate of your tee shirt press. Bring the top plate down with the handle and pop closed. Open the press back up when the time counts down.
Using a Household Iron to Apply HTV
Empty any water that might be in your iron and set it to the LINEN setting. Allow the iron to fully heat up. Place an unfolded towel on a flat work surface like a wood table (do NOT use an ironing board). Lay out your tee shirt, make sure the HTV decal has not moved, and cover with a Teflon sheet.
With any iron the hottest part is right in the middle. Place the iron straight down onto the Teflon sheet, positioning the center of it on the design below as much as possible. DO NOT MOVE THE IRON LIKE YOU’RE TRYING TO REMOVE CREASES. Keep the iron steady, applying a good amount of pressure direction downward. Pick up the iron, and focus its center on the next area of the HTV to be applied. Repeat until the entire design has been applied.
Hot Peel or Cold Peel – What’s the Difference?
Once you’ve successfully tacked down the HTV you’ll need to remove the carrier sheet. Read your packaging directions and either peel away the carrier sheet while the vinyl is still hot (hot peel) or has cooled off (cold peel). Take care to slowly peel away the carrier sheet watching for any areas where the HTV is not secured to the shirt and still sticking to the carrier sheet. Apply more heat (with your Teflon sheet in place), as necessary to the areas of the design that need it.
Note * You can apply too much heat to heat transfer vinyl. If you overheat HTV, the adhesive will begin to seep from behind the vinyl. You can actually apply so much heat that the adhesive comes out entirely and your vinyl doesn’t stick to your substrate at all! This is why it’s really important to use the correct settings when you apply HTV.
What Settings Do You use for Different Brands/Types of Heat Transfer Vinyl?
Not all HTV has the same directions. The variables include temperature, time to apply the heat, and if your HTV is hot or cold pee. Directions to apply HTV will vary from brand to brand, and even within a brand from one type of vinyl to another.
For example, Siser Easyweed requires 305°, medium pressure, for 10-15 seconds and you can peel away the carrier sheet whether it’s hot or cold. The direct competitor for Easyweed by Cricut is the Cricut Everyday Iron On and though similar, it requires 300° for 30 seconds on the front and an additional 15 seconds to the back. And you are only supposed to peel the layer from Everyday Iron On when the carrier sheet has cooled.
There are so many different temperatures and directions and there’s no way to cover them all here. But, luckily, my 4 go-to brands have charts you can use to quickly reference time, temperature, and when to peel the carrier sheet:
- Cricut – Cricut Heat Guide is a webpage where you select your material and tool you’re using to apply it for very specific timings and temperatures.
- Expressions Vinyl – You can find all settings for Expressions Vinyl as an image underneaththe (HTV) Heat Settings Chart. It’s an image, so you can also save it to your computer or pin it to Pinterest or for quick reference.
- Siser – Siser has a handy PDF that actually covers in depth directions for the popular Easyweed plus ALL of their HTV products. <– extremely comprehensive and easy to print.
- Craftables HTV Temperature and Time – Craftables has a chart on their website you can easily reference. It’s an image, so you can also save it to your computer or pin it to Pinterest or for quick reference.
If you know of another chart for another brand, let me know and I’ll include that link as well!


