
This post and photos may contain Amazon or other affiliate links. If you purchase something through any link I may receive a small commission at no extra charge to you.
Today I am sharing with you the very first CHRISTMAS CRAFT OF 2019 here on the blog. It may not yet be Halloween, but, baby I am on FIRE with Christmas decorating this year! Not even playing my very first Christmas tree that I have already decorated ALL UP is going live on Friday. Christmas crafting is straight up in full swing around here and it makes me so happy.
If you’re not one to put things up until after Thanksgiving, I hear you. I wasn’t into things this early UNTIL I became a craft blogger. At first, I hated that I was having to get on this stuff so much earlier than I had before, but now I just love it and I live for it.
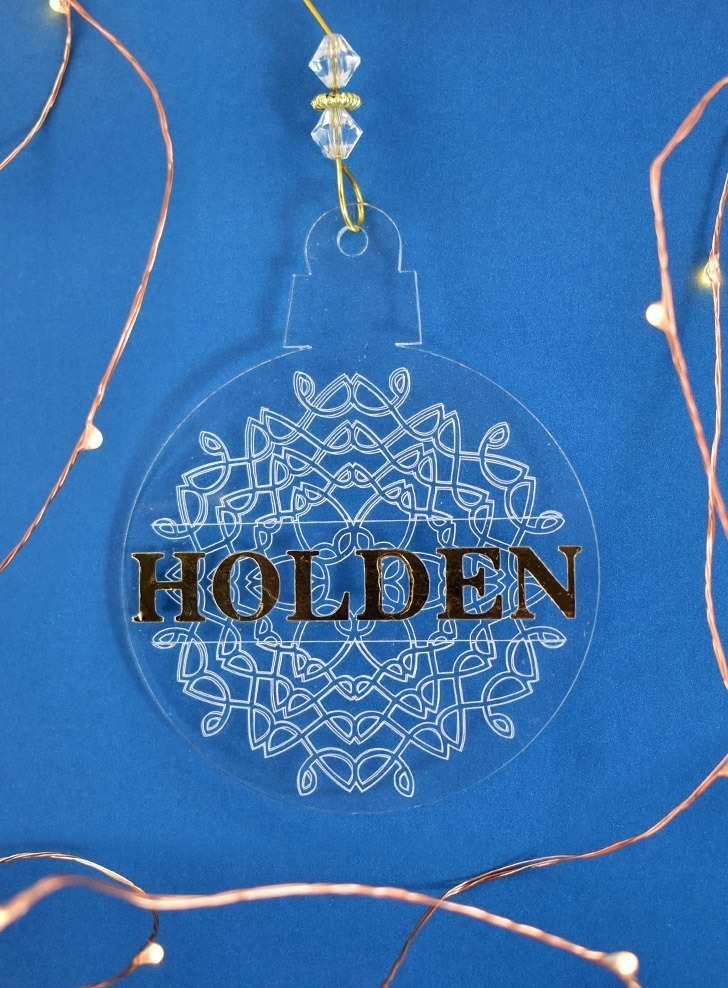
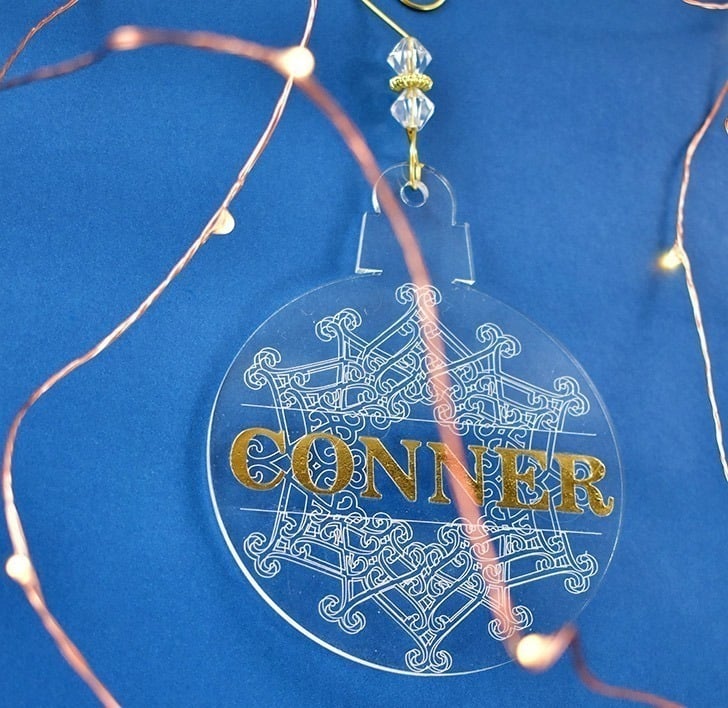
Today I’m sharing with you a totally gorgeous and impressive looking DIY engraved ornament project that, if you follow along with this tutorial, is so easy. And each ornament is personalized so that you can have one named for each family member on the tree, how sweet is that? Ready to learn how to personalize engraved ornaments at home?

Supplies needed to engrave ornaments yourself.
- Cricut Maker
- Cricut Maker Engraving Tip
- StrongGrip Mat (purple)
- Masking Tape (any)
- Acrylic Ornament Blanks (mine are 4.5″)
- Foil Iron-On in Gold
- Fine Point Blade
- StandardGrip Mat (green)
- Cricut EasyPress Mini
- Cricut Design Space Cut File
To engrave these ornaments you must use a Cricut Maker. The Maker has a whole bevvy of exclusive tools, including the Engraving Tip that we will be using for this project. If you already own a Cricut QuickSwap Housing from another Maker Tool all you need is just the Engraving Tip which can be purchased separately. Other Maker Tools that also use the QuickSwap Housing include the Fine Debossing Tip, Wavy Blade and Basic Perforation Blade. <– So if you have any of these, all you need to order is the Engraving Tip.
This project took some effort on my end to work out the kinks. I do have to say that if you’re going to spend money on acrylic blanks, the ones I linked to are the BEST that I attempted to use and my Cricut Maker had no problem engraving them. Also, the Design Space Cut File uses the size of the blanks I used. If you purchase larger or smaller, you’ll need to scale the designs down accordingly.
Preparing to engrave ornaments with your Cricut Maker.

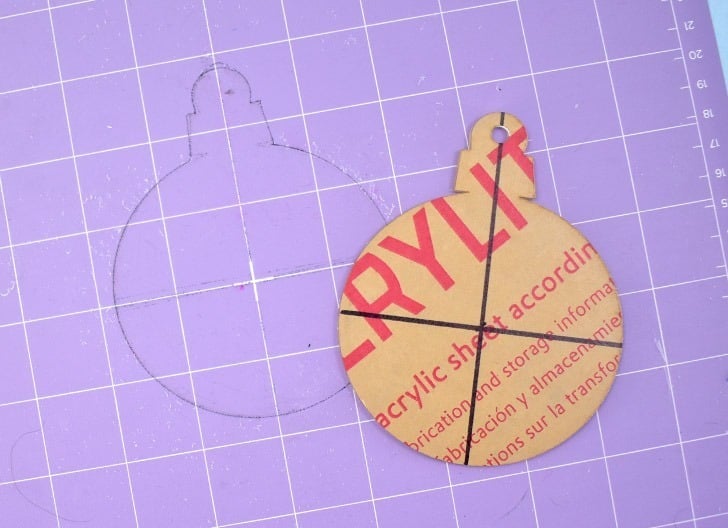
The ornament blanks should be covered on each side with a protective paper sheet. On top of this paper, measure out and draw a cross in the center of the rounded part of your acrylic ornament blank. Do your best to get this as close as possible because it will totally affect the accuracy of your engraving. It is kind of a bear to make sure you get right, but you only have to do this once so it’s worth the time.

Peel off the protective paper on the other, unmarked side of your acrylic ornament. See how you can easily see your drawn guide marks on the other side?

Place the paper protected side of the ornament onto a purple StrongGrip cutting mat directly in the center. When centered, both the horizontal and vertical lines you marked will run along as well as possible with both 6″ marks on the mat. Apply a strip of masking tape over the top of the ornament, not blocking the area to be engraved.
How to Center Your Cut Files in Cricut Design Space.

Remove everything from the cut file you are not currently working with in yourDesign Space file. Create a square in your work area and change the size to 11.5 x 11.5 inches. Set the Linetype to “Engrave”.
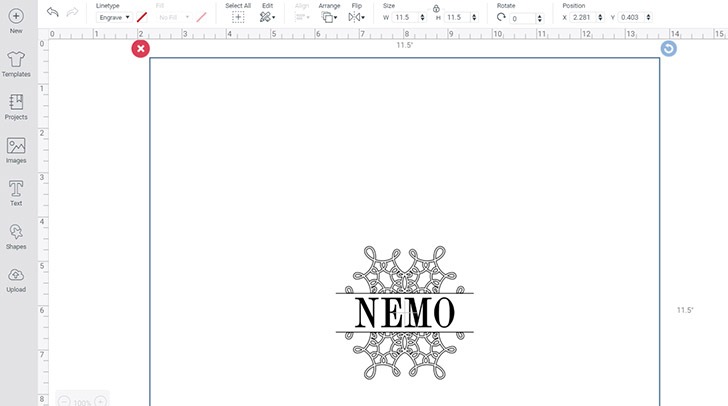
Center your file both horizontally and vertically within the large square. Select the square and its contents and click “group” at the top right to keep everything together.

When it’s time to engrave ornaments hit “make”. On the next screen, you’ll see that your design will automatically be centered in the same way we set up our physical ornament on the mat. Cool, right? But there is a catch… Every time you engrave a side of an ornament it’s going to also engrave that 11.5″ square around in your mat. And there’s nothing there so it will create a line in your mat in this location that removes the sticky in that line.
A quick word about your cutting mat…
BUT all of the debris that comes away when engraving is tough on your mat. I engraved a total of 12 ornaments, 2 sides on most and my brand new StrongGrip mat was DONE. After a few engravings that were way off because I was eyeballing moving the design to the center and also noticing how much sticky I was losing all around the design where the acrylic dust was coming off, I realized that this mat was going in the trash when I was done, one way or the other. I just decided that I was cool with messing up the mat around the edge rather than multiple acrylic ornaments.
You’ll have to decide how you want to proceed BUT if you want the most consistent results with engraved designs on BOTH SIDES that match up extremely closely, this is what you’ve got to do…
How to engrave ornaments yourself with your Cricut Maker.

After running through your Cricut Maker, you’ve got an engraved ornament! On one side, at least!
If you’re happy with the placement of the engraving on your ornament BEFORE YOU REMOVE IT FROM THE MAT, use a fine point marker to trace around the entire shape. Now you’ll never have to mark another ornament with a fiddly ol’ ruler again. Huzzah!
And like I stated before, this mat is pretty much done for so I wouldn’t sweat drawing on it AT ALL. But if you are worried because you’re only running 2 or 3 ornaments total, don’t be. You can still use this puppy by ignoring that mark you made :)

Remove the paper from the second side of the ornament and using the outline place it on the mat. You might need to fiddle with it a bit if your mat is still brand new or close to it. Apply a piece of masking tape to the top of the ornament, out of the way of the engraving.
Engrave the second side with the second design in the Cricut Design Space File. Each design has 2 engravings, one is a full snowflake mandala and the other has an open space for you to personalize your ornaments with names.

Boom! Can you even with that? This was the first ornament I engraved with the system I shared in the steps above. And the accuracy? Can you even with that stinking accuracy?
Okay, so, perfectly lined up is great but it isn’t totally necessary and I’ll show you why really quickly with a finished ornament…
Unless you look at one of these ornaments perfectly straight on, there’s going to be angles where it doesn’t look perfectly lined up. But it still looks good and this is a super steep angle. That’s just the nature of this being 2 sided on something transparent. BUT when it’s really, really off-center it will look terrible from any angle, I pinkie promise you on that.
Adding Iron-On Names to your Engraved Ornaments.
Also in your Design Space File are text boxes where you can type in your names. Input your names, make sure they are spelled correctly and resize if necessary. If you’re not sure on the size, just measure across your ornament and see how wide you’re comfortable with the text being and work from there. I used the Design Space Font “Chip Décor”. If your names are very long, you might find changing to a different font that will work better.
Oh, and remember to mirror your text. Then weed it. Moving on…

Apply the Iron-on Using Heat.
Heat up your Cricut EasyPress Mini to the medium heat level and wait for the beep. If you don’t have one of these things and you craft with HTV I say GET ONE. Or ask for it for Christmas. Seriously — it’s right over here. Email a link to whoever drew your name this year and prepare to be amazed. I won’t go into all of the details, ’cause I already did that when I made some mermaid sneakers a few weeks ago and you can read all about it over there if you want.
If you don’t have an EasyPress Mini, grab the iron from your laundry room. Even if you have a big EasyPress, don’t use it for this. With too much heat, these ornaments will warp and dome up and you can’t keep an eye on how they’re doing when everything is completely covered up by the plate.

Place your heated device on top of the carrier sheet for the iron-on design. Iron-on Foil is delicate and doesn’t need much time. Move the iron around for about 30 seconds, never keeping it in one place for too long. Place the engraved ornament off to the side and allow to cool before trying to remove the carrier sheet. If it doesn’t come away cleanly, repeat applying heat and try again.

Don’t remove the carrier sheet while it is still hot. It will burn and that hurts and it will also pucker your transfer and it looks awful. But that one up there doesn’t look awful, now does it? The D is a little weird, which I don’t notice in real life like I do that photo up there, but no matter, it’s still gorgeous, isn’t it?
Find some ornament hooks or ribbon you love and this ornament is done!

Now isn’t that just so pretty? And my mom is SUPER EXCITED that these pretty ornaments I engraved for her are going on her tree this year. Spoiler alert, she’s letting me do whatever I want to the main tree this year. Spoiler alert, there’s gonna be a lot of feathers! Check in later to see just how pretty these gorgeous DIY ornaments we made with our Cricut Maker and Engraving Tip look on my mom’s new tree!

Wondering which snowflake image was used from design space
Hey, Laura – Five different images were used:
#M7F4202B
#M800192D
#M80011F7
#M7F41CCD
#M8001355
Hello!
I purchased some acrylic disks and they were too thick. I ordered the ones off your blog link and I am really hoping they are thin enough to fit in my maker!
Unless they’ve changed them in the last year they should work brilliantly. Best of luck!
Such a cute idea! I can’t wait to make these.
Thanks for this tutorial on engraving; I have my engraving tool but haven’t tried it yet. I do have a tip – if you set your 11.5 inch square to draw, rather than cut, it works the same way to centre your project, without the extra engraving. Just don’t use a pen.
That’s genius! I’ll have to update my post. Thanks for the tip!
Hello Allison!
I loved this tutorial. I would have been reticent to try them if I hadn’t seen your post.
I’ll be posting alcohol and painted ornaments on my blog next week- I’m already behind!!
Happy holidays!
Susan