
This post and photos may contain Amazon or other affiliate links. If you purchase something through any link I may receive a small commission at no extra charge to you.
Back in 2021 I was all about decorating the front yard of my new house for Halloween. And I figured spooky DIY tombstones with funny sayings in a front yard cemetery would make the niftiest Halloween decor. What I didn’t count on was just how much my dad was going to love my headstones!
Literally the day my dad saw them in a stack ready to be stuck into the ground he asked if he could put them in his yard instead. Since he was so keen there was no way I was going to say no! But, funnily enough, he never actually got them in the ground!
So in 2023 I wanted to actually get these faux tombstones planted in his front yard for all of the neighborhood kiddos and trick-or-treaters to see. But my dad was like, 5 tombstones is hardly a spooky graveyard, is it? After a bit of haggling we decided that it would only be an impressive feat with at least dozen. Since I made 5 in 2021 that meant I needed to make 7 in a little over a week. Whew! Okay…
And so I asked myself how do you make a tombstone for a Halloween graveyard quickly?
To be fair, right at the beginning I was just like, I’m going to buy some tombstones and we’ll just stick store-bought and homemade in the same yard and be done with it. And I bought 4 different packs from different stores. But next to my pretty awesome DIY foam tombstones I hand carved in the past, the store-bought stones looked too small and odd.
In a time crunch and with all of these store-bought tombstones already in hand I decided to use the good parts and DIY the rest for some custom tombstones quickly. By adding them to a sturdy base, and adding a second layer of foam for a thicker stone, I was able to quickly, cheaply, and easily knock out the 7 needed stones in a little over a week, including time for paint to dry and glue to cure. Not bad, right?
Want to learn how to make a fake tombstone using a store-bought stone as a jumping off point?
Supplies Needed To Make Over Store- Bought Tombstones
Foam Tombstones
As soon as the Halloween section appears in your big box or craft store you’ll be able to find foam tombstones to make over. Be warned, however, that different stores share the same designs! I purchased 4 packages of foam tombstones including a set from Walmart, Target, Michael’s, and At Home.
When buying my stones I honestly just grabbed a set and got on with it. It wasn’t until I opened all of the packages to see pieces would be in this tombstone makeover post that I realized that there were the same designs in different packages from different stores. The only store that had absolutely unique designs was from Target.
Foam Insulation Board
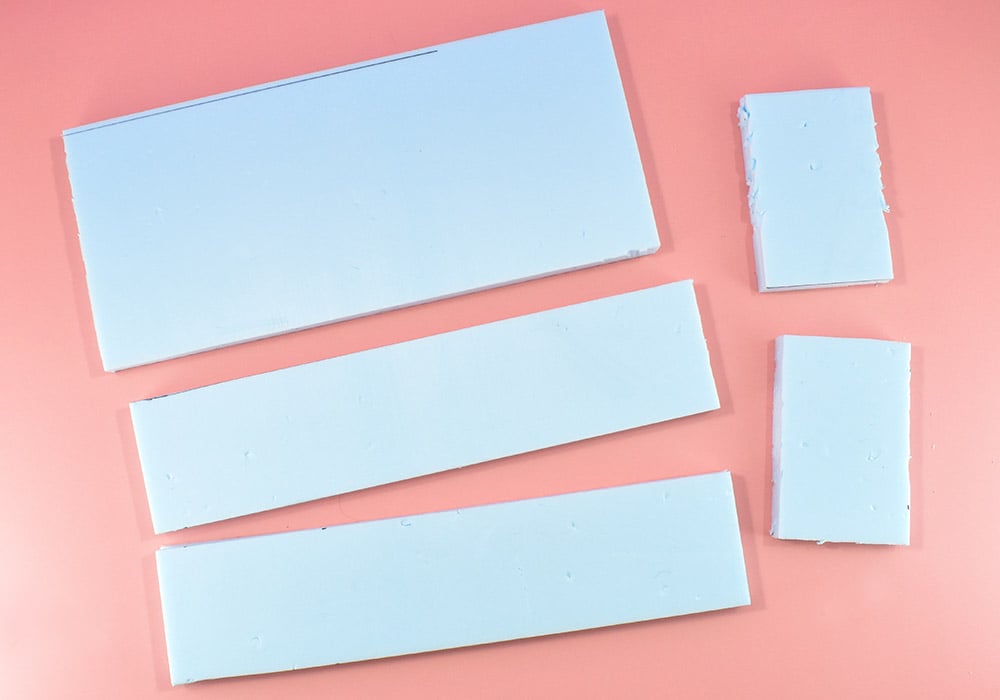
For this project you’ll need your tombstones before you head out to buy your foam insulation boards. Measure the thickness of your stones. Most of your stones will measure 0.75″ but some (like mine from Target) were thinner at only 0.5″ thick. For each stone you’ll need enough to add to the store-bought stone plus another piece the exact same size as the full stone to double the thickness. So basically measure up how much foam you’ll need to add to the stones and then double it.
QUICK TIP: There are 3 different types of foam you can find at the hardware store. What you want is extruded polystyrene (XPS). It is easy to find as it is normally a color like pink, blue, or green. It’s a super smooth and easy to carve foam that will make this project so easy to complete.
You want to avoid expanded polystyrene which is a white foam sheet. It looks an awful lot like those cheap foam coolers you can grab at the convenience store in the summer. The structure is very cellular and can make smooth carving difficult. Also avoid polyisocyanurate and it is a rigid foam that is covered in paper or silver material. It won’t cut as easily and smoothly as extruded polystyrene.
Drylok Primer
Before painting your foam tombstones you’ll need to seal them. I like to use Drylok Primer because it works well and has a gritty texture that makes your foam look more like stone. It can be expensive, and this year (2023) it was a bit difficult to find. Eventually I got a gallon for $37 at my local Ace Hardware.
Though I have not personally tried it, I would think that adding sand to an exterior water-based primer like Kilz or Zinsser would do a pretty similar job. Just be sure it is an exterior primer and thoroughly mix it up before every use to distribute the sand.
Foam Safe Construction Adhesive
In this store-bought tombstones makeover we are going to increase the thickness of each stone so that it is sturdier. To do that you’ll need FOAM SAFE Construction Adhesive that comes in a caulk tube. When purchasing construction adhesive it should say on the tube or in the online description that it is safe for use with foam. Other adhesives might melt your foam ruining it and releasing some nasty fumes.
Hardware for Anchoring
Last year when I made foam tombstones from scratch I used PVC pipe and spray insulation to use in conjunction with rebar in the ground to anchor them. This year I made 7 tombstones for my parents’ Halloween display and I didn’t really have the time to wait for all of that foam to dry. I wound up using some hardware from Amazon to anchor the newest foam tombstones and I’ll share that process today. Though not as nice looking as hidden anchoring, the new method was very fast and they feel more sturdily attached to the ground.
For this method you will need garden stakes and pipe straps. I also used grommets to keep the holes in the bases nice and clean looking. I’ll show how I used them in this tombstone tutorial because I did but they really aren’t necessary.
Garden Stakes
I found that the cheapest way to stake DIY tombstones in the ground is with inexpensive garden stakes. Initially I had purchased 36″ lawn stakes so I could have close to 24″ of stake in the ground keeping this guys from going anywhere. What I wasn’t counting on were all of the big tree roots in the front of my parents yard preventing from getting them in that deep.
My father would up ordering 24″ lawn stakes that we drove about a foot into the ground. So far there hasn’t been any problem with the shorter stakes but the tombstones are in an area where they don’t get a lot of crosswinds. If like us you have lots of tree or shrub roots you’ll probably have to go with 24″ lawn stakes. If you are placing your stones in a grassy yard where wind might be an issue, I’d go with the 36″ stakes for that extra in-ground support.
Tools Needed
Tartar Removing Tools
I know, I know… this sounds like SUCH a crazy thing to ask you to buy just to make DIY tombstones but, honestly, they aren’t all that expensive and work so well. I tried knives, heated foam carving tools, a Dremel, and more I just can’t think of right now.
The tartar tools pull the foam away from the design in chunks that create less of a mess, don’t create any funky fumes, and don’t create tiny foam dust that you can breathe in. And, honestly, once you have taken on a Halloween tombstone makeover or two, you’re going to want to make a whole lot more!
2023 Free Tombstone Makeover Designs:
Want to quickly update your store-bought tombstones? Download our free designs to use and make your own DIY tombstones. This download features 4 designs including:
- Anita Grave
- Hal O. Wheen
- Philmore Graves
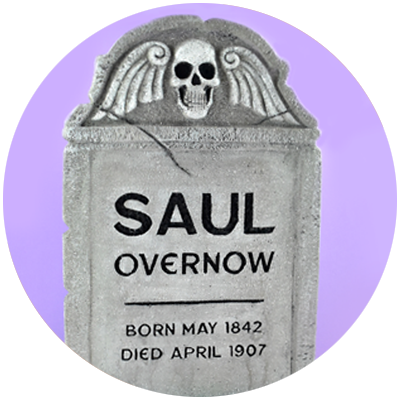
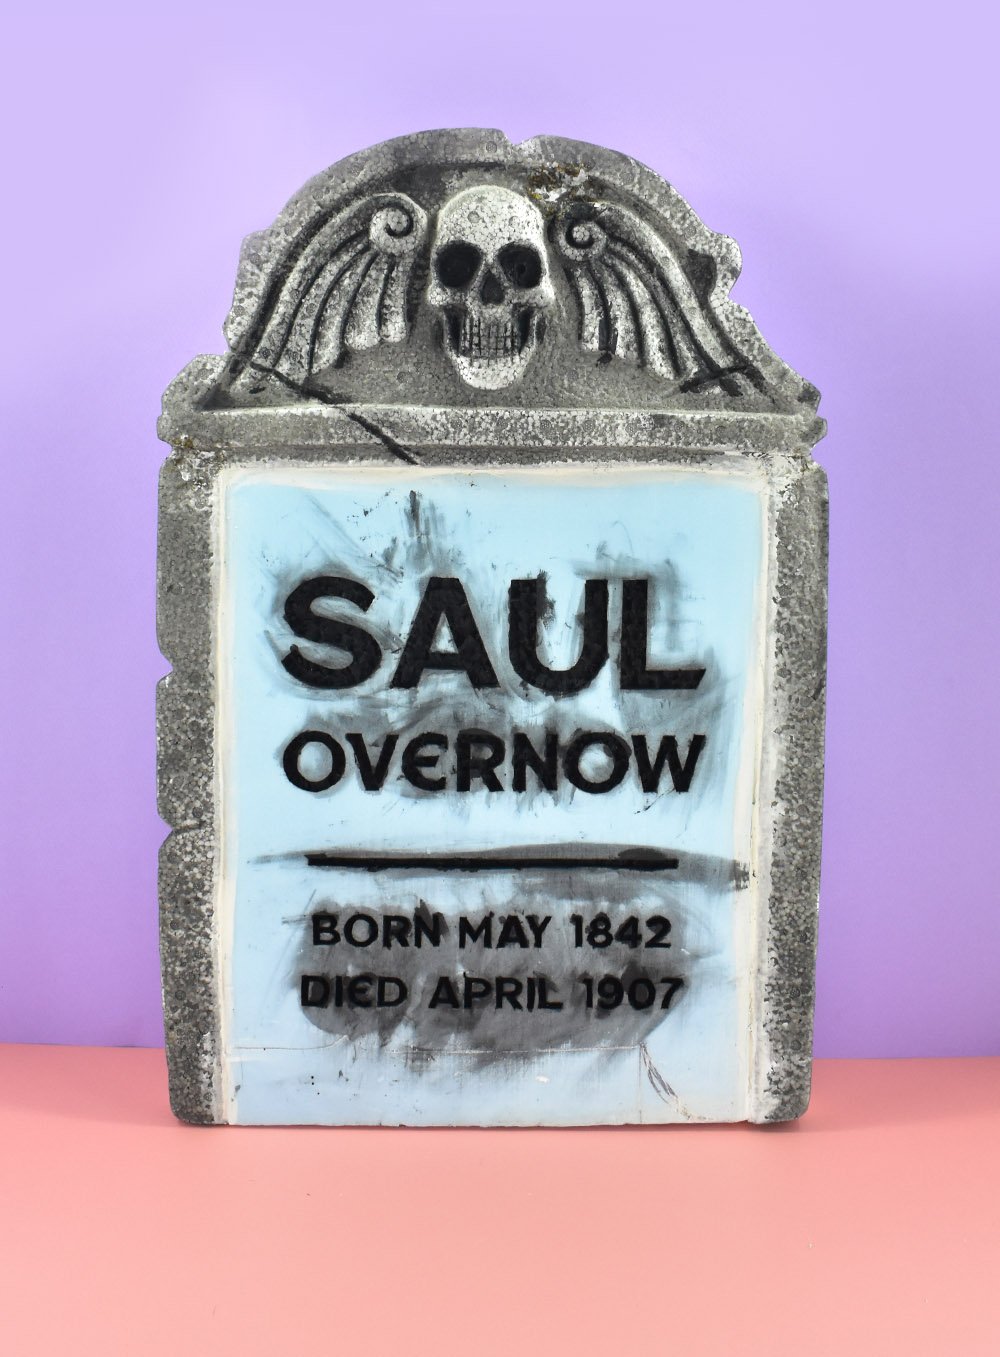
- Saul Overnow
To make this project less expensive, rather than creating the designs to be printed on huge pieces of paper, each tombstone design is on 6 pieces of 8.5″ x 11″ letter-sized paper. If your printer ink is expensive I’d suggest printing elsewhere. You can order letter-sized black and white prints for around 15 cents per copy. Check with your library, too. Here I can print black and white copies for only 10 cents apiece… score!
Our Printable Tombstone Sayings Are Available to Newsletter Subscribers for Free
Newsletter subscribers get this and other files at Dream a Little Bigger for free. (Yay!) Not a member? Signing up is easy and costs nothing. Enter your information in the form below below to join our growing community of makers. You’ll get this freebie emailed to you. As a member you’ll also get post updates, tips and tricks, craft & DIY inspiration, and more sent right to your email a few times a week. Questions or download issues?
Free Tombstone Designs
Sign up for our newsletter and you’ll get an email to download your free files.
Store-Bought Tombstone Makeover
Step 1: Decide which part of the tombstone design you want to keep.

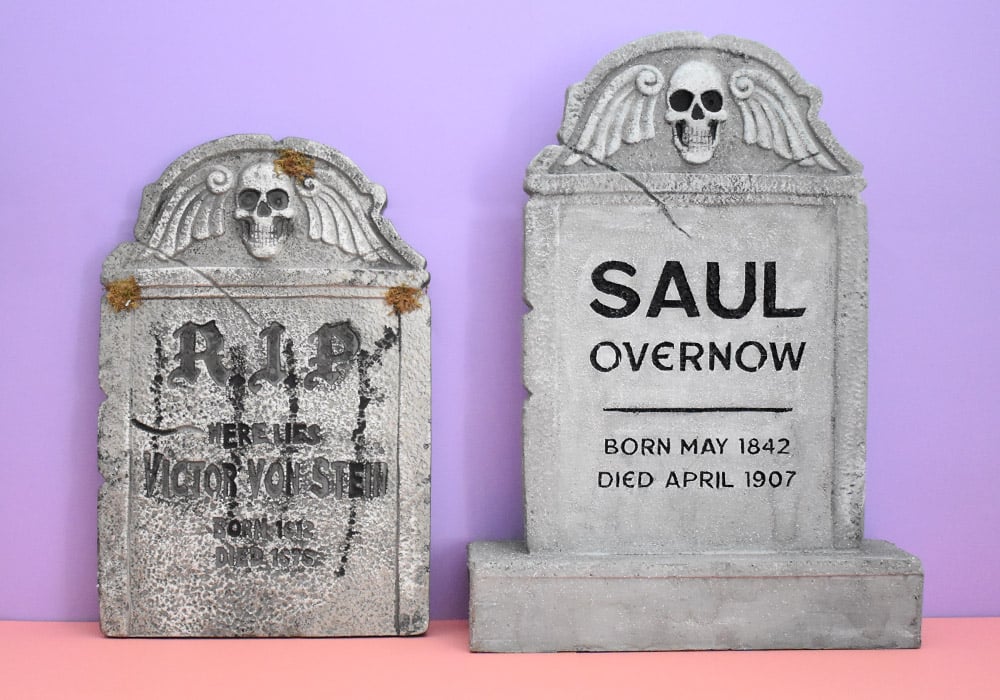
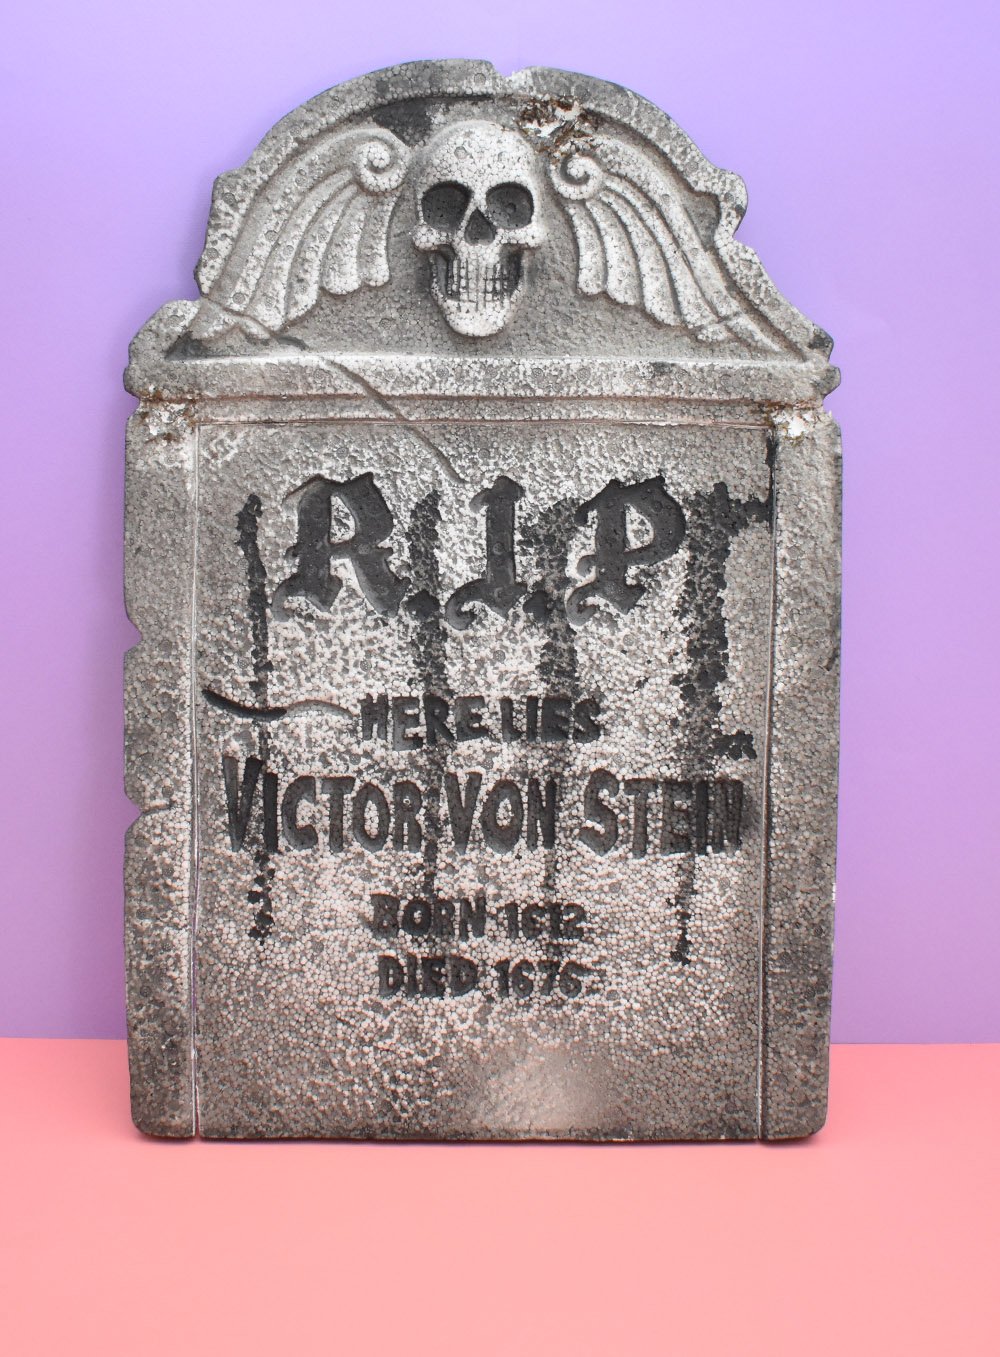
This design of tombstone I got in both my Michael’s and Walmart Halloween tombstone sets. While I loved the frame around the stone the text in the center was difficult to read. Using a sharp retractable utility knife and cut resistant safety gloves, trim away the part of the stone you want to get rid of. Cut slowly and carefully to keep the cut in a single piece, if possible.
Step 2: Trim insulation foam to fit.
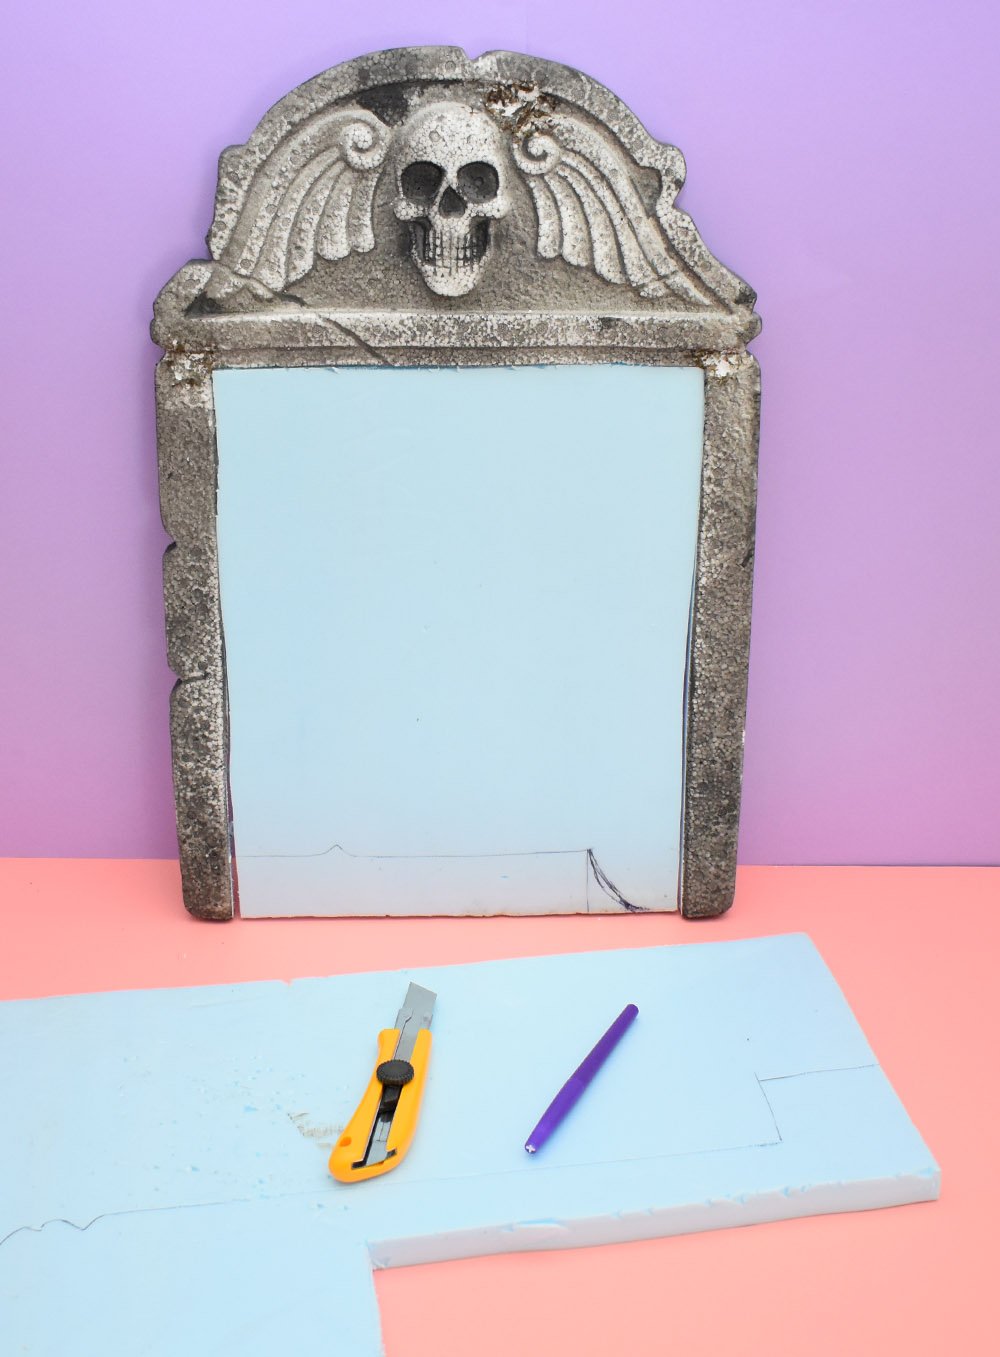
Place your tombstone pieces on top of insulation foam and trace the shape of the piece you need to complete the stone. Carefully trim out the shape with a retractable utility knife. It’s better to have the size a little bit smaller than a little bit bigger than needed.
Step 3: Cut a Back for Each Tombstone.
Part of the reason why DIY tombstones you makeover from store-bought tombstones is so much better is because they are so much sturdier. The extra thickness not only makes them a lot more likely to stay in place, but also makes them look a lot more realistic.
Simply trace the outer edge of the stone onto a piece of insulation foam. You can use the same thickness you used for your insert/front piece of you can have an even more sturdy tombstone using 1″ or 2″ insulation foam.
QUICK TIP: I used foam from my craft stash for ALL 7 of the DIY tombstones I made this year and so some of my stones are thicker than others. When using a thinner piece on the back I made a larger base to help keep them nice and sturdy.
Step 4: Print a Tombstone Saying or Epitaph.

All of our free designs will print on more than one page. Print all pages and match up to create the full template. Some designs will overlap in order to easily piece them up correctly.

The easiest way to make sure the pages line up well is to tape together the sheets on a window with bright sunlight coming in. You’ll be able to see the the designs on other pages so that the design matches up perfectly.
Step 5: Transfer Your Gravestone Saying onto the Foam.
Spray a moderate amount of repositionable spray adhesive to the backside of your full epitaph design. Allow to rest for about 30 seconds to get nice and tacky. Place the design as you want it on the the piece of foam you’ll be carving the design into. Gently smooth the design down to prevent wrinkles. Put up and move the design as needed until well placed.

Using a sharp craft knife to trace the design through the paper into the foam.
Step 6: Use Dental Tools to Carve the Epitaph into the Foam Tombstone. (Yes, really.)

Over the years I have made a dozen foam tombstones for our DIY Halloween Graveyard! The absolutely best way I have found to carve the designs is with tartar removing dental tools!
Carefully slide a tool into the area inside of your traced/cut design lines. Pull the foam up and out of the foam sheet to create awesome engraved stones! My favorite tool in the set to use is the widest flat tool for a more realistic stone texture inside.
Quick Tip: These tools aren’t made for comfort and my hands hurt after holding onto them for a while. My remedy is to take some plumber’s tape and wrap it around the grip making it the right thickness to slide a foam pencil grip over top. Voila! You now have a thicker and comfier tool to use when carving your foam tombstones!
Step 7: Glue all of your foam pieces together.

Gluing your stones together is pretty easy… Cut the tip, poke through the film inside of the tip, and then place your tube of foam safe construction adhesive into a caulking gun. Squeeze out a generous squiggle of adhesive onto your back piece of foam. Place the pieces of the original tombstone onto the back and make sure it is well centered. Place your carved/new pieces onto the the stone next. If you have areas where sides of old and new foam meet, be sure to put a little adhesive in between them to keep them neatly together.

Place heavy items (I used leftover bricks from my house being built) onto the top to keep the pieces weighted together. Allow the glue time to cure at least 12 hours.
Step 8: Fill in odd gaps.

Unless you’re an absolute genius with a box cutter (which I am not) you’ll probably have some funky looking edges where your old and new pieces match up. To keep the look nice a tight take spackling, concrete patch, or your construction adhesive to fill in those gaps. Wipe away the excess for a nice, flush edge. Allow time to fully dry.
Creating a Foam Tombstone Base
Step 9: Cut foam pieces.
Each base you create for your foam tombstones will likely be different because of differing sizes. I’ll show you how to work up the size of your base no matter the size of your tombstone.
The Top Piece
Measure the bottom of your foam tombstone and add 4″ to the depth and width. This measurement is the size of the top piece of your tombstone base. For example, if your tombstone measures 18″ wide by 2″ deep, you’ll want to cut a piece of foam that is 22″x6″.
The Front and Back Pieces
Next determine how high you want your base to be. (My shortest are 2″ and my tallest are 6″.) Cut pieces of that height that are the same width as your top piece, let’s split the difference for this example and say 3″ tall. Since our top is 22″x6″ the front and backside pieces of the base will need to be 22″ wide by 3″ tall.
The Side Pieces
Next we will cut the side pieces… Place the front and back piece together and then set on the top piece while still together with the lengths matching up. Measure out how much space there is between your two pieces and the end of the top. This is the measurement for each of your side pieces. They will, again, be 3″ tall and then the width of the top minus the thickness of the front and back pieces. In my case, this foam was 0.75″ thick so two pieces are 1.5″ subtracted from 6″ of depth of the top is 4.5″
Step 10: Glue Your Foam Base Together.

Squeeze a fairly thin line of glue onto the long end of the front of the stone. Place the foam glue side down matching up the front to the top.

Continue adding glue to piece together the foam base. As you work, glue in pieces of scrap into the corners and edges to help make the shape nice and sturdy. Allow the glue to dry at least overnight.
Step 11: Add Holes for Anchoring Tombstones into Place in the Ground.
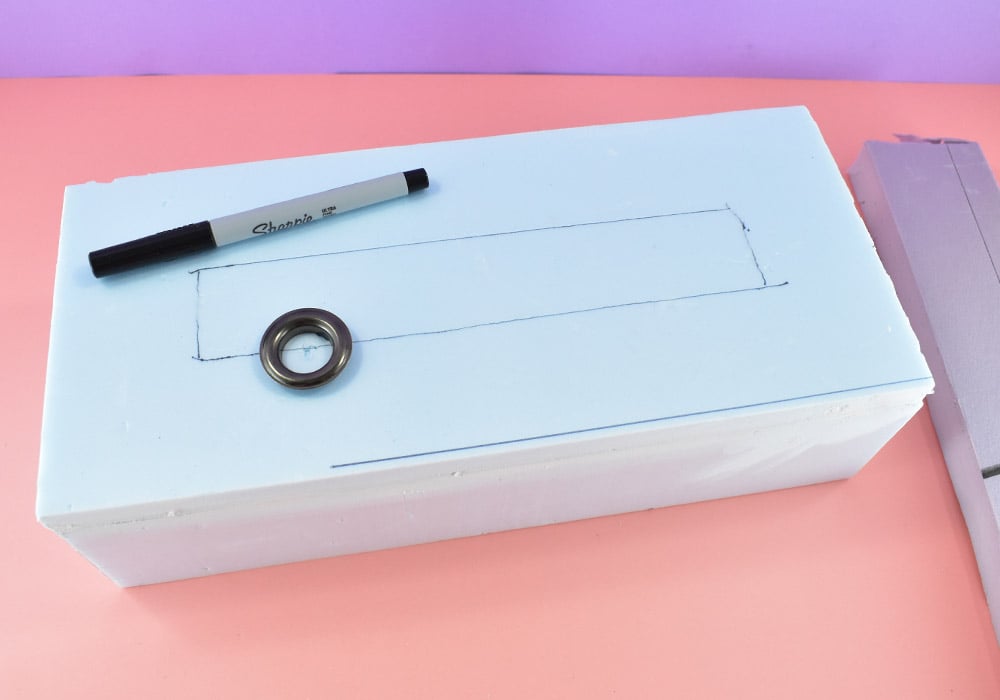
First place the tombstone smack dab into the middle of the base and trace onto the foam.
Take something small and round and about 0.75″ wide, I’m using grommets. Use it to draw 2 circles onto the backside of the base. Overlap the circle slightly over the traced line for the stone. Place your tombstone back into place and hold together.
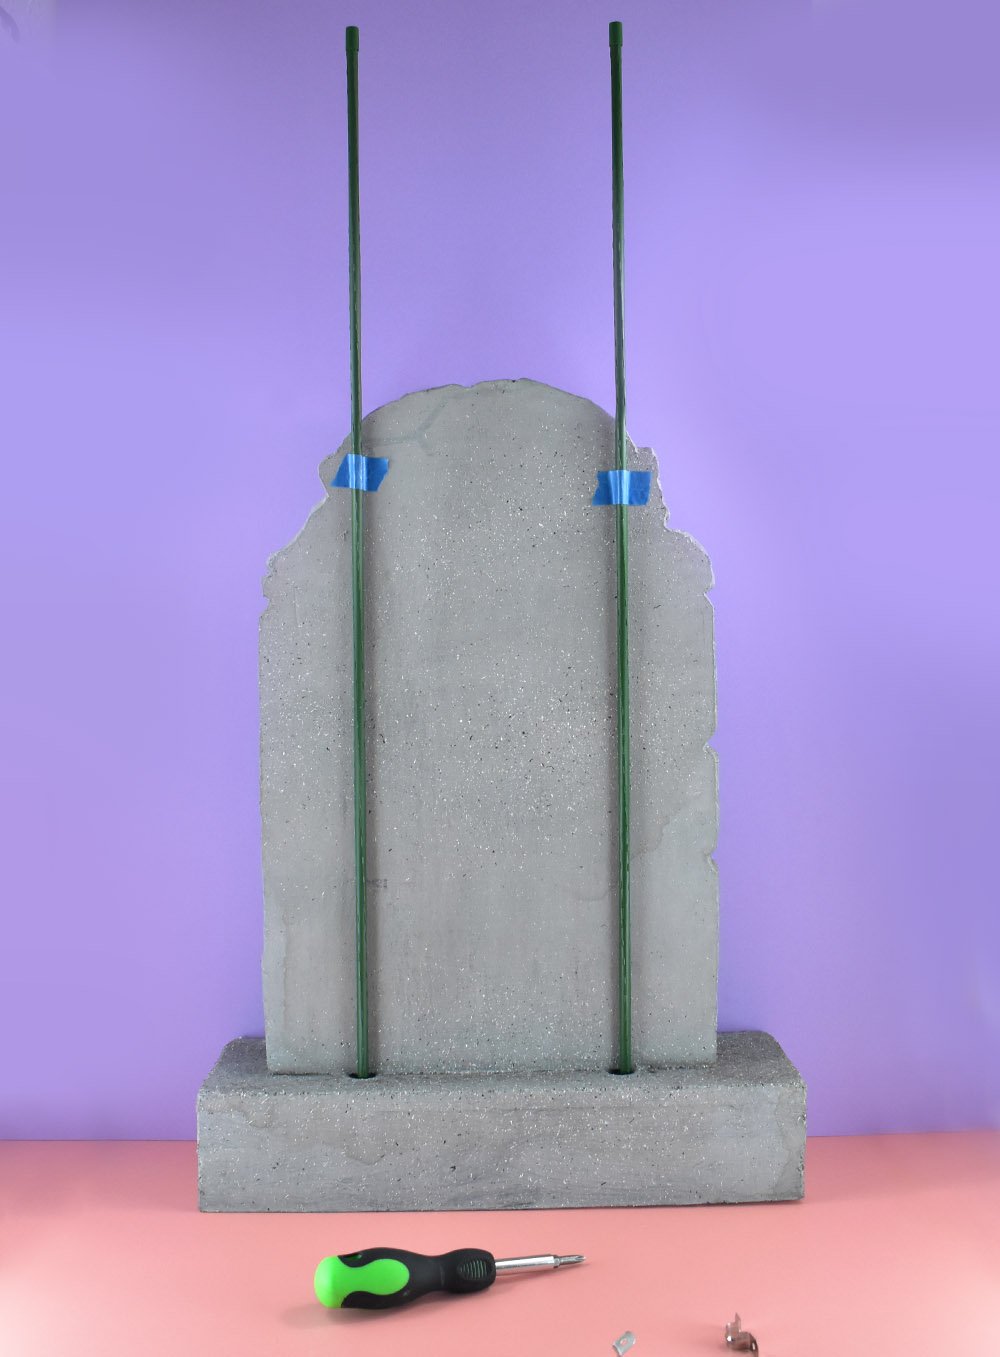
Run a yard stake into the center of each drawn hole to make sure that it will connect to enough of the back of the stone to be nice and sturdy. (I forgot to take a picture of this step so I had to improvise :)
Step 12: Cut Holes into Tombstone Base.
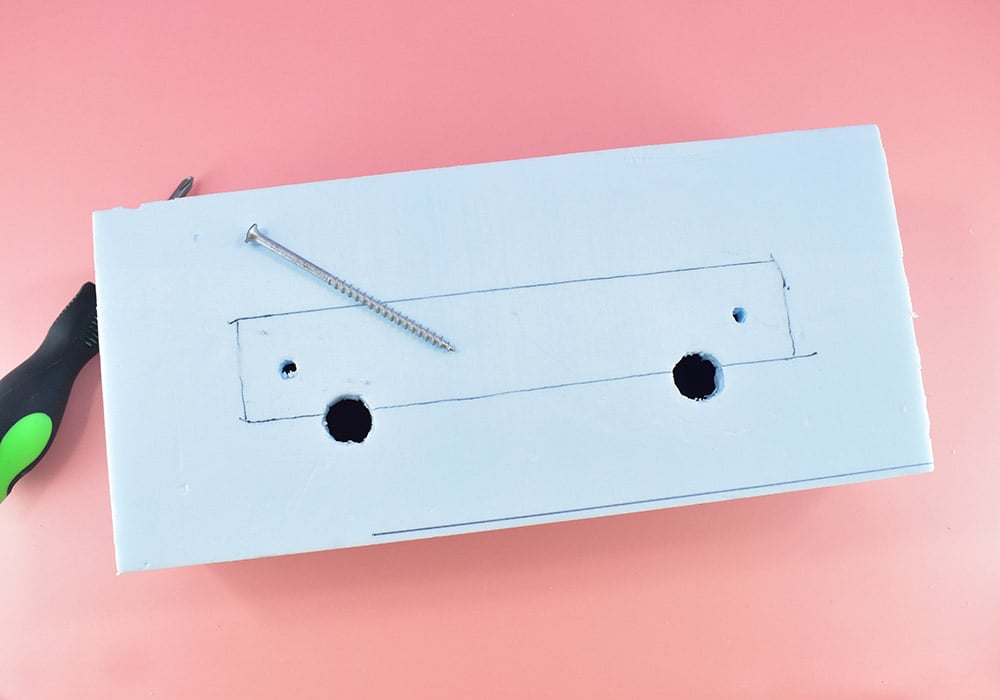
Using a craft knife with a sharp blade, cut out the holes as marked. Next, take a 4″ long screw and screw it through the center of the stone, nearer the edge and within the shape of the traced stone like shown above. If your stone is wider than 12″, create a hole right in the center, too. Leave the screws in place, just barely poking through the inside of the base.
Step 13: Reinforce the Base for Sturdy Foam Tombstones.

Cut a piece of scrap foam to fit inside of the stone’s base. Push the piece up into the tip of the screw just barely peeking out. Use this small puncture to screw through the scrap. Match up the screw holes and screw the two pieces together through the top. Apply a small amount of construction adhesive to the top of the block and screw back together. Be sure to keep the glue away from the screw to keep from permanently joining the two pieces together! Give the glue a few hours to cure.
Step 14: How to Join the Tombstone and Base Together.

Remove the screws from your tombstone base and check on the support pieces inside. If they stay in place with a little bit of handling, they’re dry enough to continue. Hold the base of the stone with the top on your work surface so that the bottom is facing up. Place the base pretty side up on top of the bottom of the stone. Use something sharp to poke through the screw holes up into the center of the stone.
Quick Tip: First be sure that the stone is definitely well centered and the back is on the side of the base with the stake holes.
Squeeze a squiggle of glue onto the top of the stone in the area marked for placement. Next place a dab of adhesive near the holes inside of the base.
Begin screwing a screw into the base of the stone at each of the puncture marks. Only screw up about a half of an inch, or so and make sure to screw STRAIGHT UP to prevent the screws from coming out the front of back of the stone.
Place the stone and the base together and screw through the bottom up into the stone to connect. Run a washer onto the screw and then use your guide holes to screw the pieces together. Once you’ve almost fully screwed together the pieces place the glue around the screw and washer to really lock into place.
How to Paint a Fake Tombstone.
Step 16: Age Your Stone with Cracks and Added Texture.
So our new carved design on nice and smooth foam looks quite a bit different from the texture of the store-bought tombstone, right? Using your retractable knife continue any cracks down into the new piece making sure they’re nice and jankety! For areas that need a lot more aging you can use coarse sandpaper or a suform rasp.
Step 17: Paint Carved Areas Black.
Using black EXTERIOR paint tint a small amount of Drylok as dark gray as you can get it. Paint it into all of the nooks and crannies of each carving, including any cracks/aging marks. Once dry, paint again with straight exterior black paint. Allow time for the paint to dry.
Quick Tip: I give my carvings their first coat of black paint BEFORE I glue to the bases. I have an easier time getting paint in all of the nooks and crannies when I can move the stone around in lots of directions.
Step 18: Paint a Base Coat of Light Gray.
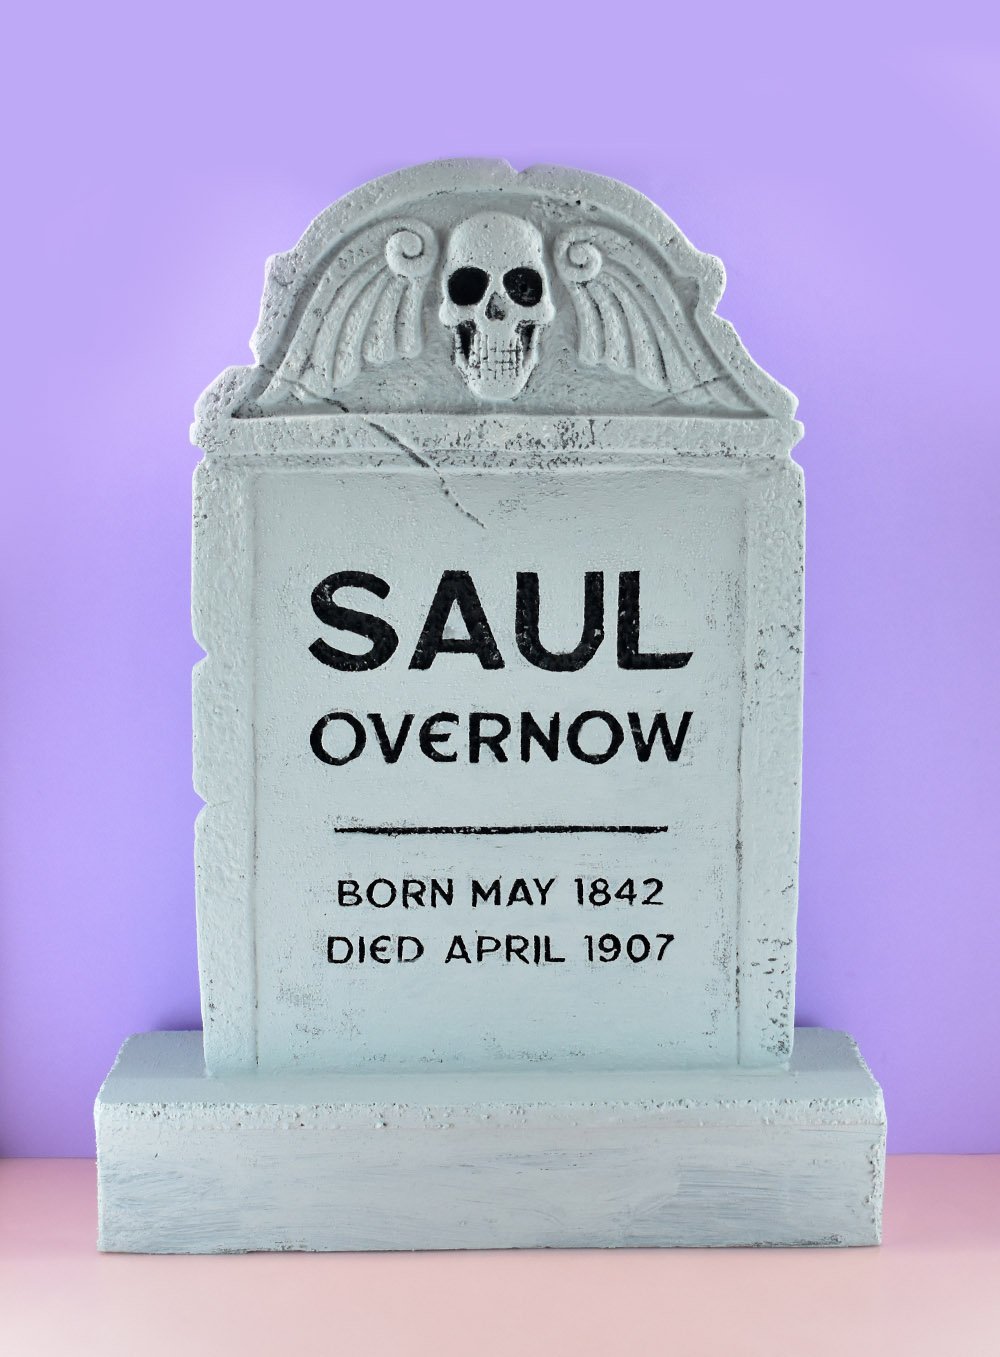
Mix a small amount of exterior black paint into a paint bucket Drylok to create a light gray color. Brush onto the stone for even coverage but try to keep the paint away from the already painted black carvings and texture.
You can paint on as many coats of Drylok as you’d like. The more you use the more textured the stone will be.
Step 19: Add Depth with a Black Paint Wash.
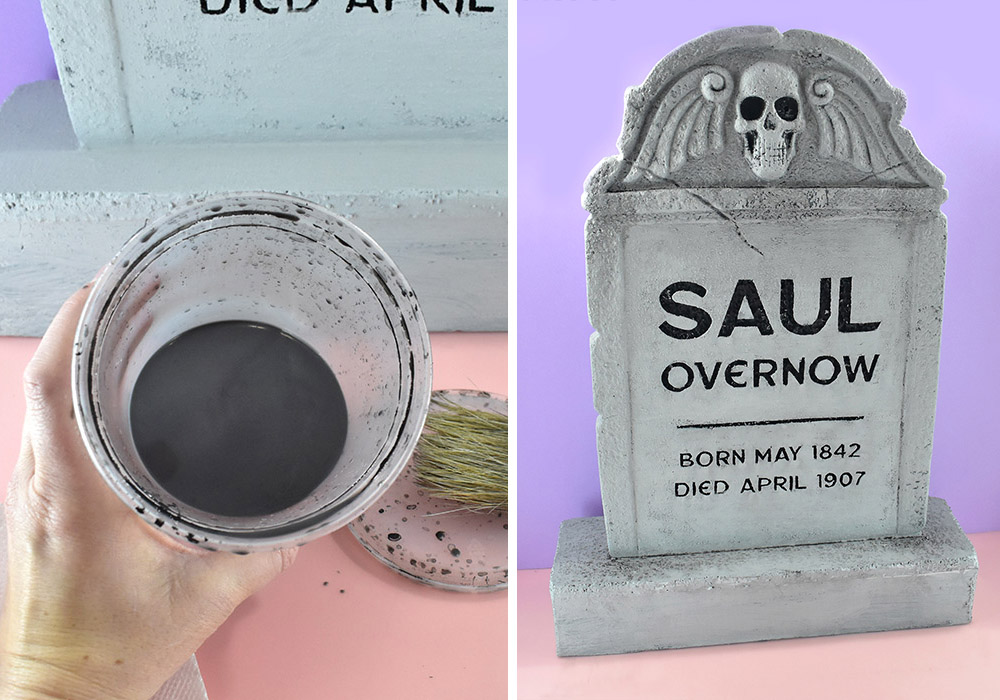
In a small container add a 2 or 3 teaspoons of black exterior paint to about a cup of water and stir until well mixed. Dip a coarse bristled paint brush barely into the colored water to load the brush. Paint a section of the stone, then take a paper towel and dab away the excess to create a splotchy look. Allow the paint to collect and pool to create an aged look. Allow the paint wash time to fully dry.
Step 20: Spray Diluted Brown and Green Paint for an Aged Look.
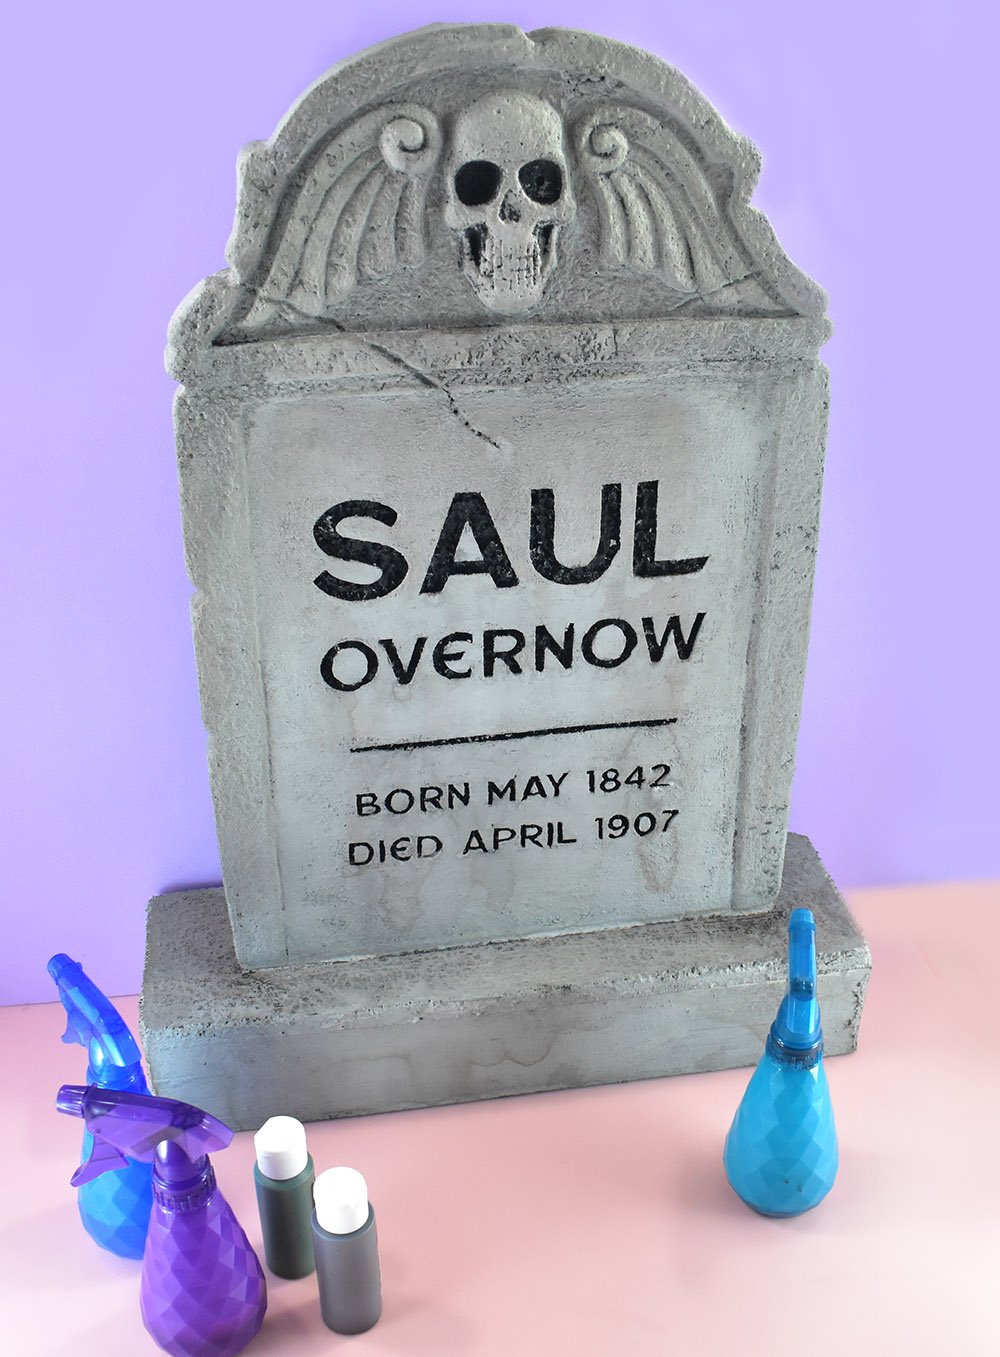
In expensive spray bottles filled with water squeeze a small amount of green or brown paint and shake until well distributed. Working with one color at a time spray the diluted paint onto the stone. Allow the paint to pool and collect but clean up any dark or obvious drips by dabbing the excess away with a paper towel. Alternate working with brown and green paints until you’re happy that your stone looks as old as it should.
Step 21: Dry Brush the Stone with White Drylok.

Just barely dip a small, coarse bristled brush into white Drylok. Brush away the excess onto a piece of scrap paper. Dry brush the white onto the stone focusing on the texture and the edges around any text or designs cut out to make them pop.
Step 22: Apply Krylon Coarse Stone Paint.

I’m going to start off by saying that stone-look spray paints are expensive. BUT they add such amazing texture and dimension making your foam really look like it’s actually stone. In order to keep supplies cost effective we’re just barely going to use the slightest kiss of this stuff to give us the benefits but keep costs down. I used the Krylon Charcoal Sand Coarse Stone Texture Paint and it was really the perfect color.
Give the can of paint a good shake and hold the can about 10 inches away from the stone. Gently and quickly press the valve down to create short bursts of paint while making a sweeping motion across the surface. Continue until from a distance the speckling is visible without being overly obvious. Practice on the back side of a stone for the best results.

Step 17: Clean Up Carved Areas with a Little More Black Paint.
After your stone paint you’re going to see light speckles inside of your carved areas. Take a tiny brush and fix these itty bitty spots and you’re done!

And that’s how you easily knock out a store-bought tombstone makeover!
All in all I made 4 tombstones using pieces or frames of store-bought gravestones and it saved me LOT of time! Hopefully the next time I visit my parents’ house I’ll remember to bring my camera. But until then, here are some pics of our DIY Halloween display I took with my phone :)
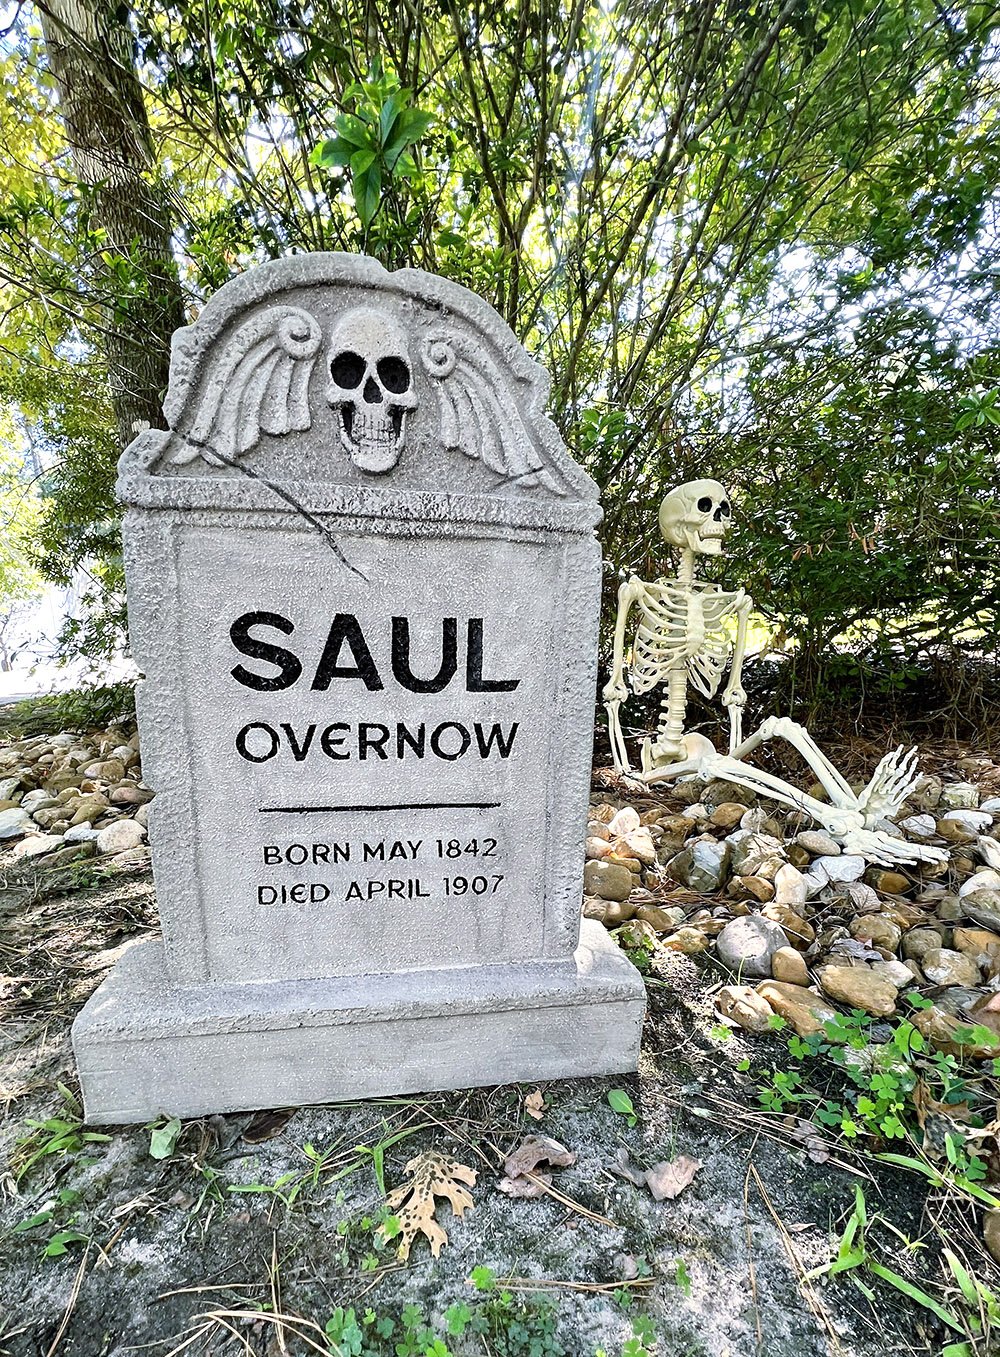
This is the tombstone makeover you saw made in the steps in this tutorial. The “frame” of the original stone was used for a cool but super quick tombstone!

Here I took the cross off of a very small store-bought stone. To match that groovy texture on the cross I used a suform rasp around the edge of the new insulation foam stone shape (and cross at the bottom of it).

And here is a pic of our dozen strong DIY foam Halloween cemetery in full (before our skeletons came out to play!)


