This post and photos may contain Amazon or other affiliate links. If you purchase something through any link I may receive a small commission at no extra charge to you.
Is your pantry a nightmare? When you’re cooking do you have to search out an ingredient you need frantically while trying to also keep the food you’re cooking from burning? Have you ever mistaken creole seasoning for cinnamon because the color is kind of the same and you were in a rush? *spoiler alert* there is no dish you can make where you can accidentally substitute Creole seasoning for cinnamon and have it work out. NONE… just in case you were wondering.
Like me, could you really do with some organization in the kitchen? Would you love to have gorgeously labeled and easy to find spices and dry goods? Want to get that mess in order? Because I finally hit a breaking point!
A week or so ago I got all excited about a steak in my recent grocery order and basically had it in the pan as soon as it arrived. There is this really good seasoning I use for steaks. But in my excitement I just threw the steak in the pan without seasoning it, first. Hearing the sizzle in the the skillet I started tearing through my spice cabinet. I dug all through that spice cabinet. And then I tore apart the pantry. Each few items I tossed around I’d run back to my cast iron pan but, it didn’t matter. I lost focus and I seriously overcooked my steak. Ugh. And the darn thing wasn’t even seasoned, to boot!
A few days later the steak spice found but no longer needed, I eyed my spice cabinet in complete disgust…
I was so irritated with myself and as I stood there and stared I took a photo with my phone to document my shame :) Now I know it’s not all that bad. I’ve definitely seen worse. But I also have this love for good organization… There’s a reason I have never in my life walked into the Container Store. Flat out, I’d spend all the money on all the things. But love of organization be darned, somehow my kitchen has gotten so messy hidden behind all of its closed wood doors.
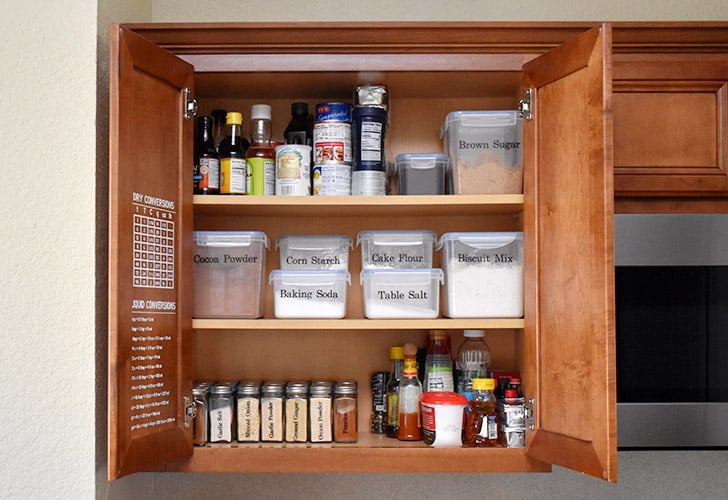
No worries, though. If you’re in my kind of pickle, we’re going to straighten this business out… With the help of your Cricut (I LOVE my Cricut Maker), a bunch of black vinyl (you can even use scraps!), and some matching jars and containers I have finally gotten my cabinet under control.
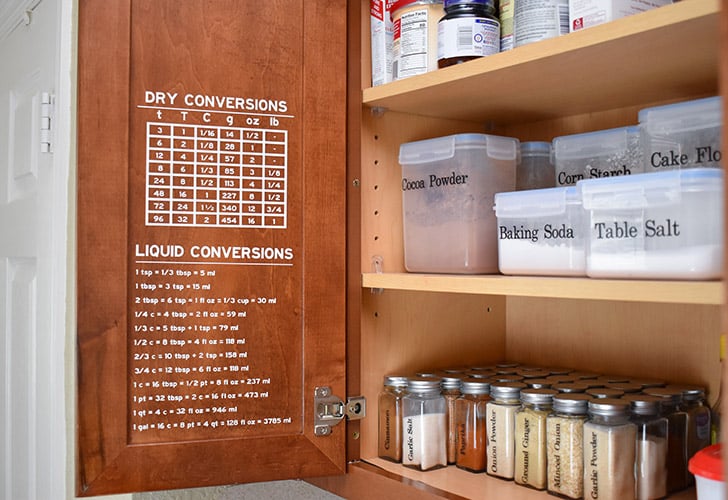
Not only do I have my most commonly used ingredients on the bottom shelf and easily accessible (I’m looking at you garlic salt, bacon grease, and hot sauce) but I also was able to consolidate multiples. Because who needs 4 vials of vanilla extract when they can all fit in just one? And I was able to move some of my other items to my pantry that now has much more space with things more streamlined. All in all, this project was a huge home organization score that has seriously made my life a lot easier.
Ooh, but wait… do you see that vinyl on the cabinet door? Isn’t that new?
Why, how nice of you to notice! It totally is!
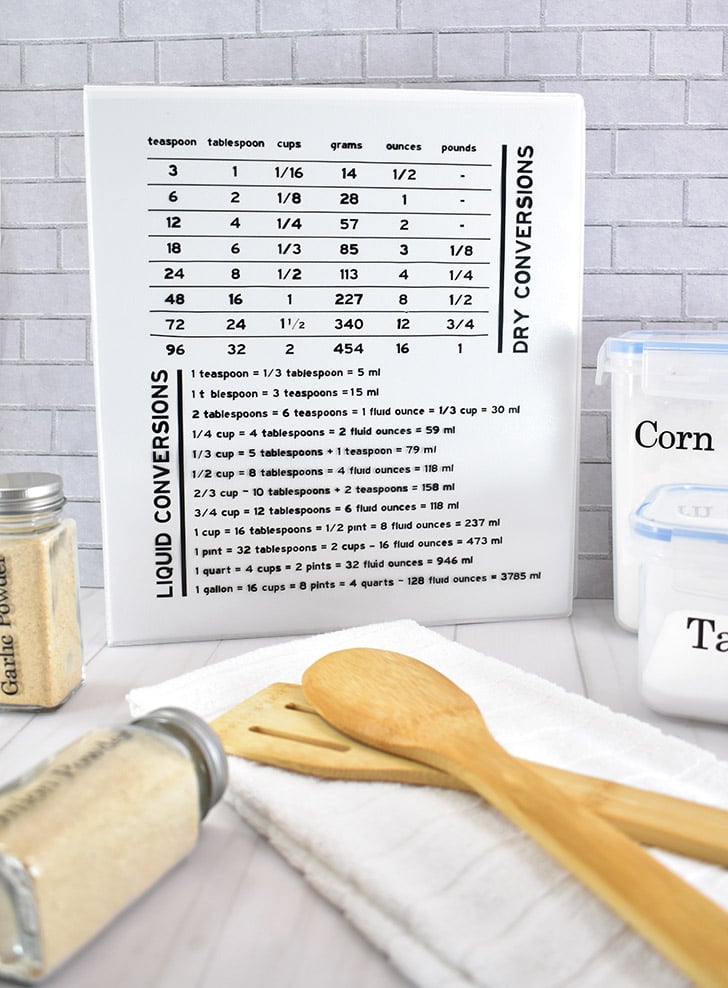
Removable vinyl makes the most perfect kitchen conversion charts so you can easily measure out dry and wet ingredients whether the recipe uses Imperial or Metric measurements! Isn’t that cool? I made a chart that shows you the equivalent dry measurements for teaspoons, tablespoons, cups, grams, ounces, and pounds out of removable vinyl. And then a list of common measurements and their equivalents using other a different method of measuring. So when I can’t find my 1/4 measuring cup but I can find a measuring tablespoon, I just count out 4T to get the same amount. And without all of that nasty math in my head!
Plus, I’ve modified the design so it perfectly fits on the single side of a 3-ring binder. It’s great because I have a whole heap of recipes printed on letter-sized paper. With a 3-hole punch and some dividers, I’ve got my very own “Allison’s Greatest Hits” cookbook! And if I print off a new recipe to try that’s, oh, say, from the Great British Baking show with ingredients in pesky grams instead of cups, I can do the math with the help of my charts and write off to the side the converted measurements!
Ready to tackle your spice cabinet and make cooking dinner a much less stressful adventure?
Craft Supplies Needed for Spice Labels for Jars and Food Containers:
Permanent vs. Removable Vinyl – Which to use?
What started as just labelling my spices to easily access while cooking turned into a much bigger project. Today I’m going to show you how to neaten your spices, but also your baking supplies. Because you’re likely to always have a container of flour and a jar of paprika, I suggest using permanent vinyl on your spice jars and dry goods containers.
We will also make a cheat sheet to convert measurements of wet and dry ingredients. Did you know that one cup of liquid is also equivalent to 16 tablespoons, half a pint, 8 fluid ounces, or 237 ml? Well, now you do and with your handy dandy chart you’ll easily be able to convert one measurement to another. Just inside of my spice cabinet door I installed a chart from removable vinyl which I can decide to take down in the next 2 years. On my recipe three-ring binder I’ve placed a conversion chart made from permanent vinyl.
Spice Jars
I chose to transfer my spices to these square jars I found at Amazon. At 4 ounces they are a good size. PLUS I was able to find spices in these same jars at Walmart, HEB, and Target so you don’t have to order a new set of empty jars for every spice you add to your collection.
Tools Needed
How to Cut Spice Labels for Your Jars and Containers:
Get the Cricut Design Space File for spice jars designed for 4 ounce glass jars (linked above).
Get the Cricut Design Space File for plastic locking lid food containers (linked above).
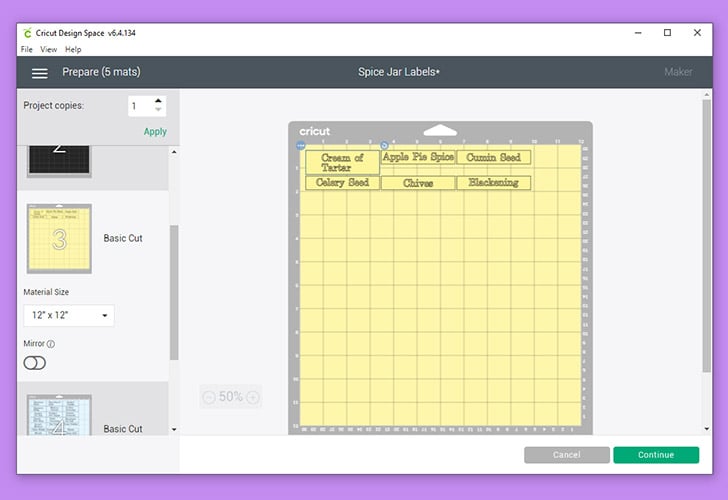
There are 92 different spice labels ready to go in this Cricut Design Space cut file. But, if you need a spice not offered, there are 2 templates (1 line or 2 lines of text) you can edit to make your own. And it’s super easy to do.
Duplicate the editable label. Select the text black text inside of the white box. (Select the box and type, right click your mouse, and select duplicate – OR select the box and type, hit the buttons Ctrl and C (to cut) at the same time followed by the buttons Ctrl and V (to paste). * Note – I used the font Century because I think it’s a system font, but you can create labels using a Cricut font, or really, any font you have on your computer.
Type the name of your spice *Quick Tip – The box is sized to fit on the 4-ounce spice jars. If using the same jars, make sure your text will fit inside of this box. If using another type of jar, resize as needed.
Select both the box and edited text. Right click your mouse and select “Slice”. Move the box to the side. Delete all instances of the text only.
Select all of the labels you wish to cut, including any you created yourself. *Quick tip – Hold down the Ctrl key on your keyboard while selecting with your mouse to grab multiple labels at once.
With the labels you wish to cut selected, click the square to the left of the Operation option in the tool bar at the top of Design Space. Select a color from the options.
Click the green “Make It’ button in the top right corner of design space. Select the mat in the same color as you chose for your spice labels to cut and cut your labels.
Place your permanent vinyl onto a green StandardGrip cutting mat, paper backing side down, smoothing out any bubbles. Cut the file.
Applying the Vinyl Labels to Your Spice Jars and Canisters
Using scissors, cut away each individual label from the vinyl and weed each label. * Quick Tip – for the tiny pieces, such as the shapes inside of the “e” and “d” – use aTrueControl craft knife to stab and remove these itty bitty bits easily.
Trim a piece of transfer tape to be slightly larger than your weeded label. Peel the paper backing and apply on top of the vinyl letters.
Using a scraper, apply pressure to each letter to transfer the vinyl onto the transfer tape. * Quick tip – you can also use something flat like an old credit card if you don’t have a scraper. The lighter plastic won’t work as quickly, but it will get the job done in a pinch.
Slowly peel the transfer tape from the vinyl backing. Place the tape back down and apply pressure as needed to ensure all letters transfer over.
Prepare the glass of your spice jar with alcohol to remove any oil that might prevent the decal from adhering. Place the transfer tape and vinyl decal onto a spice jar. Use the scraper to apply pressure to help the vinyl adhere to the glass. Slowly peel away the transfer tape, placing back down to add more pressure to any letters that need a little extra help to transfer over.
So easy but so uniform, right?
Next up, let’s knock out those conversion charts so you’ll quickly know how to measure an ounce out in teaspoons!
Supplies Needed for Wet and Dry Conversion Charts:
- Permanent Vinyl (for binder)
- Removable Vinyl (for cabinet doors)
- Transfer Tape
- 3-Ring Binder
If you will be applying vinyl right to the front or back of a 3-ring binder, as I did, I’d suggest using a binder with a smooth surface (some are sort of pebbled) so that the vinyl will adhere well. I also suggest not using a binder that has the clear view pocket on the front. While I purchased both, I applied vinyl to the windowed binder and it was an extremely difficult task as the clear plastic wasn’t perfectly flat. Since you likely won’t use the window anyway for viewing with the charts on top of it, I’d suggest using a binder that doesn’t have it.
Tools Needed
Applying Your Conversion Charts:
Get the Cricut Design Space File for on top of a 3-ring binder and/or inside of a cabinet door.
In this Cricut Design Space file, the binder cut is in blue and the cabinet cut is in pink. The binder file is welded together and should fit most (if not all) binders. The cabinet file are 2 individual welded units you can move about as needed.
Apply permanent or removable vinyl onto a green StandardGrip cutting mat. Cut the file and weed appropriately. Apply transfer tape to the top of the vinyl (here it’s white and difficult to see, but it’s there!) Use a scraper (or similar plastic item) to apply pressure to transfer the vinyl design onto the transfer tape.
* Quick Tip – If you find you are having a difficult time, you can use the back of a weeding hook to apply very targeted pressure to individual letters that don’t want to budge.
Carefully place the conversion chart as desired onto your door or binder. Use a scraper to apply pressure and transfer the vinyl onto its new surface.
Slowly peel away the transfer tape, replacing and adding more pressure to any vinyl that doesn’t transfer over. Once everything has adhered to your door or binder, you’re all set!


