
This post and photos may contain Amazon or other affiliate links. If you purchase something through any link I may receive a small commission at no extra charge to you.
There’s something about the whole grotesque Halloween thing that bothers me. I don’t like blood and guts and scary movies and so I suppose it only makes sense that these types of projects creep me out. I mean, last year I made a bloody brain jello and I was so excited because it was going to be so neat and it just creeped me out. Rob and I tried, we really, really TRIED to eat that grody thing but we just couldn’t. It was just TOO gross!
But little boys like gross, right? So I wanted to go kind of gross but not, like, totally nasty. And so that is how I stumbled upon my eyeballs obsession for Halloween 2017. Are eyeballs gross? Well, when they’re loose and just hanging around, yeah, they’re pretty darn gross BUT if done in a cute and cartoony way, it’s pretty okay, right? And since I LOVE having the whole eyes peeping out at you thing for Halloween decor, I decided to make some jumbo eyeballs to shove in my immensely overgrown front garden.
In the end, this turned out to whip up SO QUICKLY. Like 15 minute apiece fast for my first 2 and I got my second, larger set done in about 10 minutes altogether when impatient me decided to bust out the hair dryer. Boom! Want to make your own? Grab the kiddos and let’s do creepy, but not really, Halloween decor with some DIY eyeball pumpkins!
For this project you will need:
- Pair of white pumpkins
- Red paint + brush
- Iris colored + black paper (I used construction paper)
- Scissors
- Eyeball colored variety of paints
- Outdoor Mod Podge
- Hair dryer (optional)

Here are my white fake pumpkins. I got them at Michael’s for a steal, in fact, it’s pretty much the only place I’ll buy craft pumpkins these days. They’re not a true white, more of an off-white and so I decided to hit mine with a quick spray of white paint, but just on the bottom sides, a few days in advance of actually tackling this project. The off-white would be fine, and not painting them would save you some time, I just got incredibly particular :)

Now I dithered about whether to put the eyeballs on the tops or bottoms of the pumpkins. You know, stems or butts… After trying to shove these guys into my shrubbery out front I realized that having the stems on the backside really helped with anchoring these guys in the bushes. The extra weight of the stem seemed to want to tip the eyeball pumpkins forward and out of the greenery, totally ruining the look. I mean, eyeball pumpkins just lying around on the ground in front of my gardens isn’t half as neat looking so…
To start you’ll need to figure out the size of your iris, or the colored part of the eye, will need to be for your size of pumpkins. Now I had originally intended to paint my irises right onto my pumpkins, hence the ink outlines but when I realized that my hands were far too shaky for a nice, clean edge I decided to go even easier… paper. And boy, oh boy am I glad I did. This little deviation from the work out of the project in my head made this little DIY go super quickly.

Now once you’ve gotten those eyeball sizes worked out, use something like a mason jar, drinking glass, water bottle, or whatever round item you can find that is the correct approximate size and trace and cut out 2 irises. I made 2 sets of eyeballs and I went with yellow and blue so that they’d stand out from my greenery. I had even thought about doing 2 sets of red eyeballs but when I realized all of the red leaves I have with my coleus in the garden I figured they’d just get lost in the shuffle.

Paint lines across your paper cut outs in similar-ish colors and one color for pop. Here I did lots of 3 different colors of blue and neon green. Allow the paint to dry, or hit it with the blow-dryer for about 30 seconds.

Again tracing something the appropriate size and round, cut out the black part of the eyeball and using your Mod Podge glue it to the center of the painted iris.

Pumpkins have lines that go from the stem to the bottom and go inward a bit. I literally have no idea what to call these, but take your red paint and create blood-shot eyeball lines by running paint down them. Make some connect to the iris and make some lines come just short for some nice, visual play.

Using outdoor Mod Podge affix your eyeballs to the bottoms of your pumpkins. Once dry, go over the tops of the paper a few times to really seal the eyeball papers together and reinforce the attachment to the pumpkin itself.

Now, I totally used the wrong Mod Podge and only realized my error AFTER it started raining. Womp, womp. Luckily my eyeballs are fine, I’ve just got to go over and seal them a time or two before they get tossed back in the yard :)

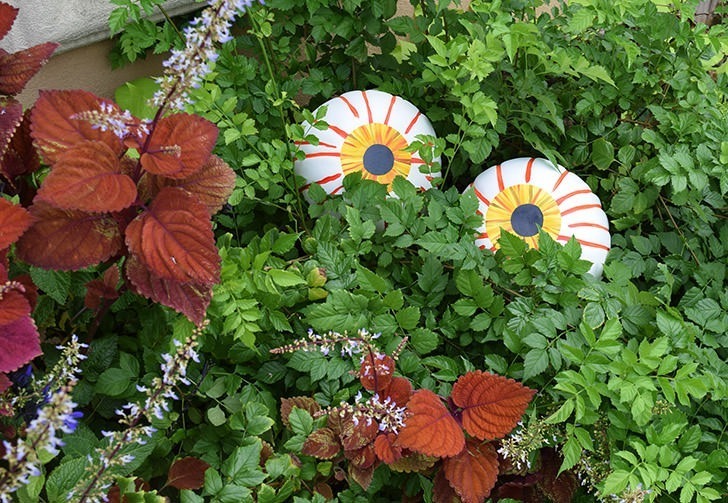
And by the way, how awesome do they look in there? Ha! I seriously was out there arranging these suckers while my neighbor did his thing where he sits in a lawn chair he moves out to the driveway while smoking and trying to pretend like he’s not being a nosy thing. I swear that guy thinks I’m absolutely nuts.

And maybe I am, but how the heck is he supposed to know that? :)
At the end of the day I’m super happy with my 2 pairs of peeping pumpkins sitting out in my overgrown greenery I call the garden. It was easy, it was fast and dang if it wasn’t super cute with just a pinch of creepy :)

