
This post and photos may contain Amazon or other affiliate links. If you purchase something through any link I may receive a small commission at no extra charge to you.
Right now I am currently in love with my new favorite food craft – decorating sugar cookies. It’s something I’ve wanted to take up for such a long time but was incredibly hesitant. Now, in all honesty, I’m still a total beginner with this craft and there are so many cookie decorators who have much better cookies than I do! But for every single craft I’ve ever shared on this site at one point in time I was a beginner. And the best way to get better is with practice, practice, practice!
You might have seen my recent post for super cute and super easy XO Decorated Sugar Cookies. And if you’re a new cookier like me, they’re a really good first time cookie project.
Valentine Love Bug Cookies, So Cute and Great for Beginners.

Today I’m sharing my new cookie obsession, these heart-shaped love bug cookies for Valentine’s Day! All you need for these fun cookies are a few different shades of red or Valentine’s Day themed colors of royal icing + black royal icing, some candy eyes, and a heart shaped cookie cutter. Want to know everything you’ll need?
Here’s a quick, basic supply list:
- Sugar Cookie Dough
- Heart Cookie Cutter
- Cookie Sheet & Cookie Cooling Rack
- Royal Icing (my recipe coming soon!)
- Disposable No Tip Piping Bags
- #2 Round Piping Tip (Optional)
- Free Printable Antennae Transfers, Edible Marker, & White Tissue Paper (All Optional)
- Cookie Stylus or Toothpicks or Popsicle Sticks
- Pink, Red, Black and White Food Color (I used Tulip Red, Super Red, Coal Black, Deep Pink, and Bright White)
- Candy Eyes
For these cookies all you need is a heart-shaped cutter. I got mine for less than $3 at Walmart but you can also find them online. This Ann Clark heart cookie cutter is a very similar size and shape to what I used for these love bug cookies. Cut out and bake your hearts and let them fully cool.
Quick Tip – You can also buy candy eyes at Walmart for a great price!

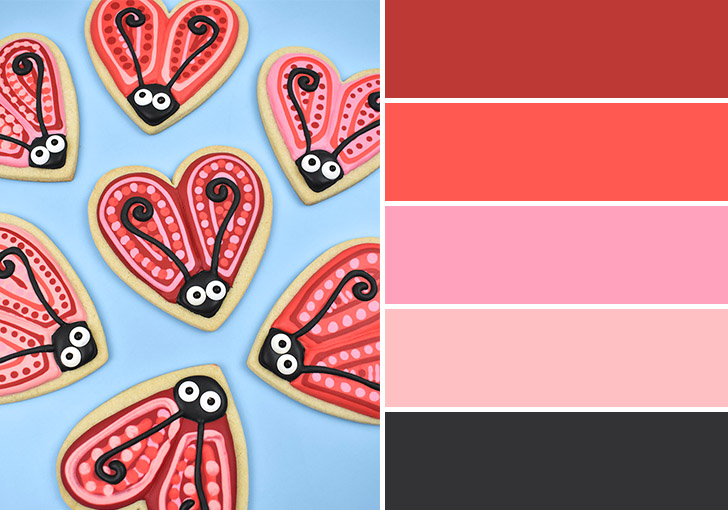
Color Palette, My Royal Icing Colors:
For each of the icing colors I tinted approximately 150 grams of icing. I use this kitchen scale for all things baking and weigh the icing in a bowl just before coloring it.
Here are the exact food colors I used Tulip Red, Super Red, Coal Black, Deep Pink, and Bright White. Royal Icing will get darker the longer it sits. That makes it easier to make dark colors, like black, by tinting the icing to a lighter shade than what you actually want and giving it time to rest and darken. I keep my tinted icing in the bowl and place plastic wrap directly on the surface. If I’m going to use it the next morning I leave it on the counter. If I’m going to use it 24 hours or more later I will put it in the fridge.
Color your icing before you thin it with water to get the right consistency.
Dark Red
- 9 drops of Super Red
- 7 drops of Tulip Red
- Let the icing rest around 12 hours or until the desired color is achieved.
Coral Red
- 7 drops of Tulip Red
- 2 drops of Super Red
Rosy Pink
- 1 drop of Super Red
Peachy Pink
- 1 drop of Tulip Red
Black
- Coal Black 20 drops.
- Let the icing rest around 24 hours or until the desired color is achieved.
If I had these cookies to do all over again I would have only mixed up one light pink, either the rosy or the peachy. I feel like once dry they aren’t different enough to make it worth the effort to tint both.
Easy Step-by-Step – How to Decorate These Love Bug Cookies:

Take an edible marker and draw guidelines on the top of a cool cookie. First create the semi-circle for the head at the tip of the heart. Next draw a line down the middle to separate the two wings. Be sure to only draw where you will actually ice the cookies. You don’t want little lines peeking out beside the design.
Quick Tip – Use another cookie cutter, like a circle or an egg shape, as a guide to make all of your love bug heads approximately the same size.

Pipe the shape of your first wing. Allow the outline to dry a few for a minute or two.

Fill in the wing’s outline by flooding the shape. Use a cookie stylus or toothpicks or popsicle stick to smooth the icing. While base color of icing is still wet draw a design using your other icing colors. Use your stylus to smooth out any uneven areas or gently tap the back of the cookie on your work surface to help level.
Set the cookie aside and allow the wing some time to dry so that your sections dry before piping on the next wing. When piping the second wing, do your best to mirror the design of the first. Set the cookie aside somewhere dry and open and allow this first layer of icing plenty of time to dry, at least 6 hours but overnight is best. My set up for drying icing is to use stacking cooling racks on the counter with a fan blowing nearby.
Time to Apply The Final Royal Icing Layer!
Before I start on the second layer of icing I like to give a gentle push on the icing of one of my uglier cookies (a.k.a. the sacrificial test tasting cookie, if need be :) If the icing can take the pressure it’s ready for the next layer of royal icing.

Print out your free antennae guide, if using. Cut small pieces of white tissue paper (like from the gift wrapping section of the store) that are just larger than each antenna. Place the tissue paper on top of the design and using an edible marker trace the design.
Quick Tip – I like to use a dotted line for my first trace so I can get 2-3 uses per transfer before the design starts to bleed and the paper is done for.

Place the template on top of the love bug cookie wing and finagle to sit just right. Gently trace the design onto the cookie by drawing on top of the tissue paper. Leave the paper alone for 30-seconds to a minute and then pull the paper straight up to prevent smudging the design.

The transfer will be faint but you can always fill the line in with the marker before icing if it makes things easier for you.

Fill a piping bag with a # 2 tip, if using, with black royal icing. Pipe the antennae using the guides. Next pipe the shape of the head.
Quick Note – I used a #3 piping tip but wish I went with a smaller #2.

Flood the head with black icing and push 2 candy eyes into the wet icing.

Allow the icing 12-24 hours to full dry before stacking.
And that’s that! Super adorable love bugs from simple heart-shaped cookies!
