
This post and photos may contain Amazon or other affiliate links. If you purchase something through any link I may receive a small commission at no extra charge to you.
When I first heard of Cricut Infusible Ink I got so excited. Like, we’re talking ridiculously excited. Reading online about this new transfer material it clicked that this was the same thing I got so stoked about as a graphic designer in my early twenties. One of the things that I designed over and over again at the beginning of my career were charity event shirts. Think a golf classic shirt that has the list of sponsors on the back of it.
At the time everybody had their professionally made tee shirts screen printed and it’s still a super popular method of shirt making today. But the thing is when you’ve got 30 sponsors that each paid 3 grand or more to have their logo on a tee-shirt, they really, really want it to be in THEIR corporate color. But screen printing isn’t made for really intricate designs or lots of colors. And every color you add adds more cost to your finished shirts. Every year, without fail, I had to talk down the same event coordinators who had promised the moon to their sponsors.
Then, low and behold, one day, I get a call from a lady who informs me that her friend bought a sublimation printer and a professional heat press. Within an hour I had gotten her rates and suddenly I was able to offer tee shirts with as many colors as anybody could hope for, including those big money spending sponsors.
The day I heard about Cricut Infusible Ink was the same epiphany filled exciting rush to learn more as it was back in my graphic designing days.

So what is Cricut Infusible Ink?
Cricut Infusible Ink uses the same method as sublimation printing. It is is the transfer of dried ink from paper onto a blank. You take the printed paper place it onto the blank, place a protective piece of paper on top and then heat the daylights out of it so the color transfers. While the printed sheets appear to be dull very washed out, applying heat to the transfer creates amazingly bright designs. This translates to amazingly professional-looking results for any project you use Infusible Ink on.
How is Infusible Ink different from HTV?
The thing I love absolutely the most about Cricut Infusible Ink is the fact that the dye sinks into your blank where heat transfer vinyl adheres to the surface of your blank. With Infusible Ink once the transfer is complete that design is A PART of your project, they are one and the same. But with HTV you have a shirt with something adhered to the top of it. That means that Infusible Ink projects can stretch a bit without damaging the image and the designs will never crack or begin to peel off with lots of use.
How do you cut Infusible Ink?

Size your design in Cricut Design Space to be smaller than the plate on your Cricut Easypress 2. Because of the nature of the transfer, it is suggested that you only apply heat 1 time to avoid damaging your materials or losing vibrancy in the transferred design.
Make sure your hands are clean with no lotion or anything on them and place the material colored/design side up on a green Standard Grip Mat. Use a brayer tool to secure the material onto the mat (this is really important because anywhere that isn’t properly attached may not cut well).

It’s time to cut your material with your Cricut, huzzah! Set your material to “Infusible Ink Transfer Sheet” and mirror your image. Load up your fine-point blade, if necessary, load your mat and cut the material.
How do you weed Infusible Ink?

When weeding your transfer sheets use your fingers only, if at all possible. These sheets are more like paper and unlike vinyl that bends really easily. As such, you can sort of roll the sheet around to help apply pressure and pop up pieces to weed it away, often without even touching the piece. This also means you can lose pieces you need to stay put so keep that in mind. Try to hold little pieces in place while doing this, but if necessary pick up anything that pops off and put it back into place on the carrier sheet. In places where things are tiny and won’t come away with your hands only, use something like a straight pin to help pop it out of place or use a pair of pointy tweezers to help remove it.
How do you transfer Infusible Ink to your project?
This kind of ink transfer requires a lot of heat. Far more than you can get from a household iron, in fact. It is highly recommended to use the Cricut EasyPress 2 when working with Infusible Ink because it gets up to 400°. If you one of the first EasyPress machines it will work but your colors won’t be as vibrant because it only heats to 350°.
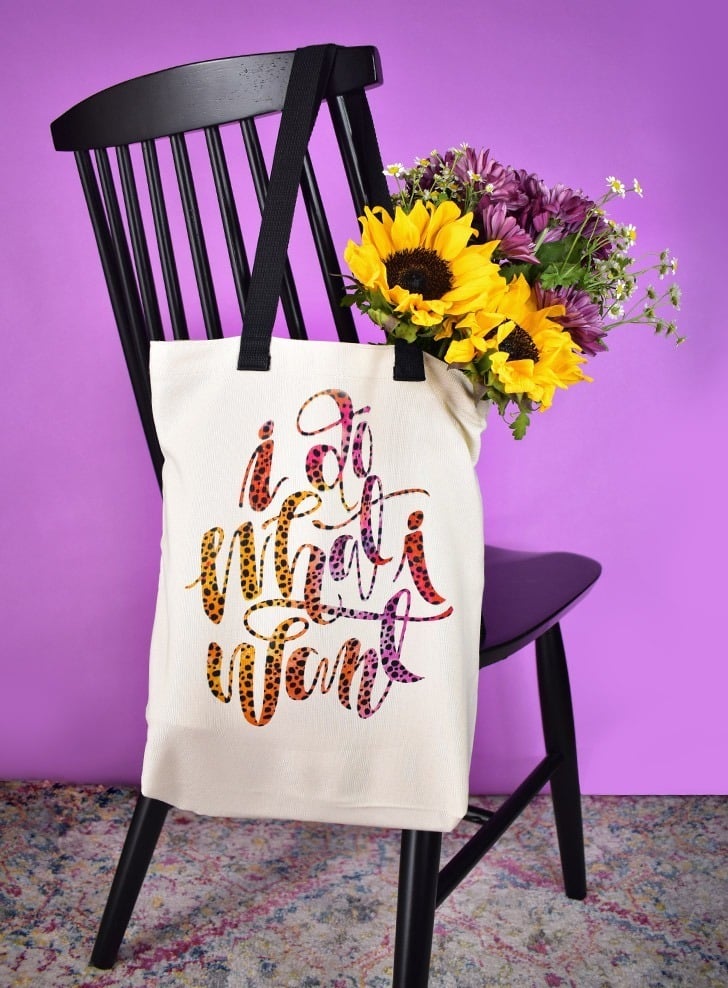
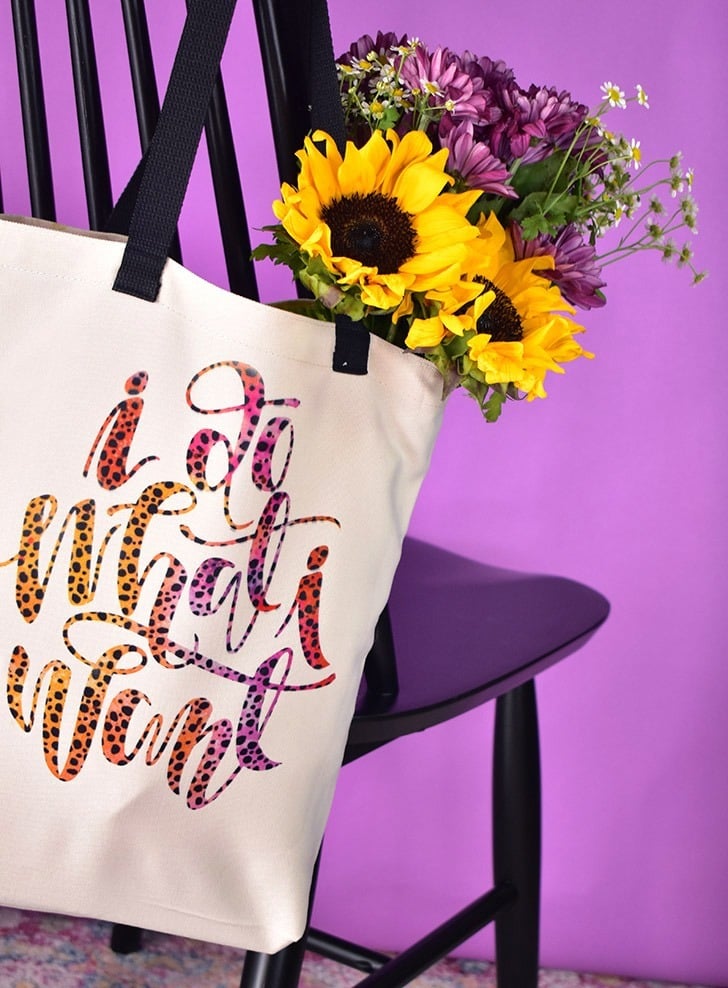
Ready to craft with Infusible Ink? Let’s rock a DIY tote bag!

What do you need to make an Infusible Ink Tote Bag?

- Cricut Infusible Ink Transfer Sheet
- Cricut Infusible Ink Tote Bag Blank
- White Cardstock (NOT color, white ONLY)
- Cricut EasyPress 2
- EasyPress Mat
- Butcher Paper
Remember that you can’t use just any tote bag, you need to use a Cricut Infusible Ink Tote Bag Blank. You’ll also need a heat source to make the transfer.
How to use Infusible Ink with a Tote Bag.

Cut and weed your Infusible Ink sheet as explained above. Place your EasyPress Mat on a solid and stable surface like a desk or table. This is SUPER IMPORTANT. I tried my first attempt on a table that kind of bows in the middle and my whole design didn’t take because it didn’t actually put pressure on the full tote and design. *sad face* Lesson learned.
To prep your tote and remove any wrinkles, preheat your EasyPress to 385°. Place your tote bag on your EasyPress mat and cover it with butcher paper. Place the press onto the tote over the butcher paper and hold in place for 15 seconds. Remove and allow the bag to cool completely before continuing.
Now take a lint roller and go over the bag to remove anything stray. This seems like overkill if you’ve just popped your tote out of the bag but it’s totally important. You might be amazed at what comes back on that lint roller.
How to Layer your Tote and Materials.
The order of your materials is super important. Layer as follows:
- EasyPress Mat.
- Cricut Infusible Ink Tote Bag Blank.
- Piece of white cardstock INSIDE of tote.
- Infusible Ink Transfer Sheet color side DOWN.
- Butcher paper that is larger than the heat plate on your EasyPress.
- Cricut EasyPress 2
How to apply Infusible Ink onto the tote.

Set the timer on your EasyPress to 40 seconds and place it onto the butcher paper making sure you’ve got heat going to all areas of your InfusibleInk transfer. Because if there’s no heat, there’s no transfer. Hold the press down with light pressure making sure you don’t move that sucker at all. Like, AT ALL. Any movement will totally mess up the design blurring it. When the timer beeps and it’s time to take off the heat, pull the EasyPress straight up (so as not to jostle the design) and set it on its base. Allow your tote to cool completely then remove the transfer.
How to care for your Infusible Ink Tote.
Machine wash using cold water and mild detergents never using fabric softener or bleach. Turn the bag inside out to protect the design. Tumble dry on low or line dry to maintain the design’s vibrancy.
Love that tote? Me, too! I bet you’ll also love these DIY coasters!

What do you need to make Infusible Ink coasters?.

- Cricut Infusible Ink Transfer Sheet
- Cricut Infusible Ink Coaster Blanks, Round or Square
- White Cardstock (NOT color, white ONLY)
- Cricut EasyPress 2
- EasyPress Mat
- Butcher Paper
Remember that you can’t use just any tote bag, you need to use a Cricut Infusible Ink Tote Bag Blank. You’ll also need a heat source to make the transfer. It is highly recommended to use the Cricut EasyPress 2 because it gets up to 400° (whereas the Cricut EasyPress 1 only gets to 350°).
How to use Infusible Ink with coasters.

There isn’t a lot of prep work for transferring to coasters. Once again, cut your Infusible Ink Transfer Sheet like shown above and place your mat and materials on a solid and sturdy work surface. To protect your mat from design transfer, place a piece of white cardstock on top of the mat.
Prep your coasters by cleaning with a clean cloth to remove any debris. Apply the weeded design onto the white side of the coaster.
How to layer your materials for coasters.
The order of your materials is super important. Layer as follows:
- EasyPress Mat.
- Piece of white cardstock (to protect from transfer design to mat).
- Cricut Infusible Ink Coaster Blanks.
- Place coasters bottom side up and facing you (transfer sheet on the cardstock. It seems weird, but the heat will go all of the way through the coasters to imprint the design. I promise.
- Butcher paper that is larger than the heat plate on your EasyPress.
- Cricut EasyPress 2
How to apply Infusible Ink to coasters.

Preheat your EasyPress to 400° and timer to 240 seconds. Nope, that’s not a typo. It takes a full 4 minutes for the transfer to actually transfer.
Set the EasyPress on top of your butcher paper taking care not to jostle or shake the designs. Walk away until your EasyPress beeps, then carefully pull it straight up and off of the coasters.
NOW LEAVE THIS BUSINESS ALONE IF YOU VALUE YOUR FINGERPRINTS. These suckers get wickedly hot.
Once totally cool, carefully and slowly remove the butcher paper and transfer sheets. Unveil your incredibly brilliant and professional-looking designs, give yourself a high five and maybe test out your new coasters with a glass of something you love! :)

How to care for your coasters.
Only wash with warm water or gentle glass cleaner. Never use abrasive materials or cleansers and never anything with strong colors.

Where do you find designs for DIY totes and coasters?

I was super pleased when I started up Cricut Design Space and searching for images found lots of designs that I loved for both of these projects. When looking for coasters just search for “square coaster” or “round coaster” and you’ll see lots of already perfectly sized options available. When looking for tote bag designs I actually just scrolled through the poplar designs and found several options I loved. I also loved some of the designs I found when I searched for “badge” inside of images. There were lots of sports and hobby themed badges (like embroidery!) that would make an awesome tote!
