This post and photos may contain Amazon or other affiliate links. If you purchase something through any link I may receive a small commission at no extra charge to you.
Once I get into something I totally get into it. I’ve been whipping up bangles with resin left and right. I figure soon enough I’ll start to play around with other ways of using resin but right now I’m quite content with a bazillion unique bangles!
Just think about it. The possibilities are endless with anything and everything you could embed in the resin. And coloring it is a whole ‘nother ball of wax bringing together even more possibilities.
But a resin piece is only as good as it can be if your raw side is finished well. I’ve been sanding down a lot of raw edges lately and I’m going to show you how to get the best results. Sure you’ll need to practice a bit but these days I am more than happy with my gorgeous smooth edges!

For this project you will need:
- Bowl of water your item will fit inside of
- Wet or dry surface sandpaper – I prefer 200 grit
- Dremel tool (optional but very, very fast) – I have this cordless micro Dremel.

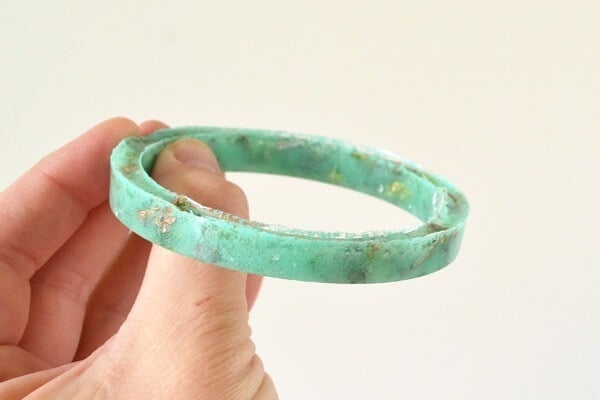
When taken from the mold the edges can be funky. There can be strange grooves and sharp edges.

It doesn’t look fabulous and it can scratch the dickens out of you too.

You’ll need to get a bowl of water. This is actually a fishbowl like globe from the dollar store. Dip your piece in the water

The wet or dry sandpaper is pretty dang important. You can try using a decent sandpaper and it will work for a while, but this stuff is going to last for ages. Don’t even bother with the discount dollar store stuff. You’ll shred it in seconds.

In a circular motion rub your resin piece with the “bad” side around in circles. You can use force and push or just sort of lazily swirl it around. I go with lazily and watch TV or something to keep myself occupied.

A Dremel will really speed things up. Continually dipping your resin piece in water, use the tool on one of the slower settings and remove the sharp edges to even the surface with the lowest part of the groove.
When doing this you NEED TO WEAR GLASSES to protect your eyes. Also it’s going to make a terrible mess with this stuff flying absolutely everywhere but, did I mention it’s crazy fast? :)

To round of edges, take a small piece of sandpaper and rub along the edges while under water.

This does require a bit of patience in my experience but you can get really great results consistently once you get the technique down. Using the Dremel is super fast but there is a learning curve. Practice on pieces you wouldn’t mind messing up. The biggest issue I think is getting the side you are working on nice and level. It’s easy to take a bit too much off here or there and have a wonky, uneven edge or a sloping edge.

And even if they aren’t 100% perfect right away, they’re still totally useable/wearable! Have any tips for cleaning up that rough side on your resin pieces? I’d LOVE to hear them!

Great instructions! I also love the way you wrote this piece!
Great tips! Can I ask one off topic question? Where did you find that particular mold? I would love to find one like it and only ever seem to find beveled or curved edges (which I find harder to get a decent edge). Thanks soo much :)
Hi, Ashley! It’s been some time, now, but I purchased my mold at Hobby Lobby. It looks like now they are silicone instead of plastic, but they appear to have the same shape. You can get it here: https://www.hobbylobby.com/Beads-Jewelry/Jewelry-Findings/Cuffs-Bangles-Rings/Bangle-Silicone-Mold/p/80982739
I was wondering where you got the molds for the bangles in the pictures? Thank you
I got these at Hobby Lobby some time ago, but I think they still sell similar molds in the resin/clay area!
Hi I just started using clear resin your tip worked a treat for the few edges I had thanks but do you know how to make it really rigid mine is still kinda squishy and can be squeezed pls help resin noob
It sounds like you don’t have enough of the activator/hardener stuff. Maybe check to see if your ratio is right?
Eye protection is important, as you say BUT Dont forget to wear a mask. Resin is no good for your lungs!!
Very true!
hello :) can i sand crystal resin coated polymer clay pendant?
I would think so but I’d do a test in an inconspicuous area first, maybe the back?
If you use Clear resin is it still gonna be clear if I sandpaper it under water? i just started making clear resin jewellery with moss and flowers.
If you sand under water it should remain clear. If you do it in open air it will start to turn cloudy.
Can this be done on transparent resin projects. I accidentally put cling film on top while the resin was curing and now there is a dent otherwise the project looks fine. Any advice would be great thanks!
Yes! For clear resin I might actually keep it submerged under water to be sure there are no scuff marks to cloud the clearness!
You might also want to try after you do the wet sanding to use Carnuba car wax to buff it out.