
This post and photos may contain Amazon or other affiliate links. If you purchase something through any link I may receive a small commission at no extra charge to you.
I very fondly remember doing puzzles with my grandparents on the kitchen table. We didn’t have a mat or anything to move it away from the kitchen table, so when one was in progress it meant it was stuck there until it was finished. That also meant that we got to eat in the living room off of a tray for breakfast, lunch, and dinner. Normally eating in front of the TV was reserved for important football games and Saturday morning cartoons. And I remember thinking that was pretty cool because that meant television EVERY meal! And with everybody look at the boob tube, there was nobody staring me down during meals telling me I had to eat this or that! Huzzah!
As an adult I loved puzzles UNTIL I got cats. Then it was just far too frustrating because cats WILL walk off with a piece. Or maybe, two. Or they might jump across the table and slide everything onto the floor. Or if you have an exceptionally catty feline she might just sit on the table swatting pieces onto the floor while staring you down with a look that says “I could not give one flip about this, I’m just bored.” when you know she’s LOVING knocking that business in the floor.

And so it seemed kind of funny to me when I thought about it after the fact, that the moment I found out there was a cut file in Cricut Design Space my mind instantly went to, and got my hands ‘a movin’ to make a puzzle with, you guessed it, a cat on it :)
As I put together my very first DIY puzzle I did notice one thing… being only 8″ square and just 90 pieces it was a really quick little puzzle to put together. And that’s all good and well but sometimes you want a bit more of a challenge. I looked around and didn’t find a larger puzzle cut file and I wasn’t feeling drawing up my own in Illustrator, so I decided to get a little bit creative to make a puzzle the same size and the same number of pieces but with a higher level of difficulty.
My first thought was to go with a more detailed image. I went through a lot of photos of my trip to Puerto Rico because, just like kitty cats, it’s something I truly love. But as I pulled images over I found that I couldn’t crop them into the square shape like my cut file in any way that I was happy with. So that eliminated that possibility (at least for me at this time) to make a more difficult puzzle with the same cut file.
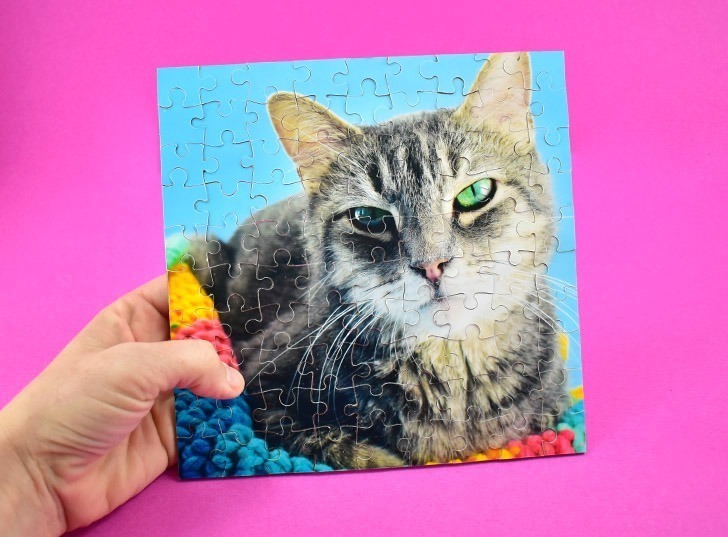
After some time I decided to just make a puzzle with one of my favorite pictures of my girl Marla. See her up there? She’s really a gorgeous cat. Her body may be everyday grey tabby but she’s itty bitty. Like, people are always amazed at her size. And she’s got these BIG and totally gorgeous eyes that look green in some lights and aqua in others. And she is just about the sweetest darn thing. I truly love this little gal so much and making a puzzle of her was like a no-brainer (even if this WAS the SECOND Marla puzzle I made this week).

But I was still a bit plagued by the fact that it was just a little too easy to be enjoyable. But, boy howdy did I fix that! While I was tackling some PC cleanup I again saw the photo of my lovely little Carly the Boshih (50% Boston Terrier, 50% Shih Tzu, 100% sass) and I thought, I’d like a puzzle of that image, too. And then, BAM! It hit me just like that super old commercial with the country-dressed guy and gal who bump into each other “Hey, you got peanut butter on my chocolate!” “Hey, you got chocolate in my peanut butter.” and then they both go “delicious!” Yup, I had Peanut Butter cup epiphany… I could have one image on one side of the puzzle and another image on the other side of the puzzle and that would make it more difficult because you have to figure out which side goes with the picture you’re working on. Awesome, right?
Now I went with 2 fairly simple images on both sides and I’d like to think I’m not a total ding-dong, but it took me a decent amount of time to put my puzzle together. It was a pleasant kind of difficult and making the images have 2 different backgrounds made things a bit easier. But if I decide to up the skill-level again, I’d probably go with 2 images with similar colors in them. OMG would that be hard, or what? But fun, right?

In the last few weeks I’ve used a bunch of glues and tried out a bunch of different techniques for a DIY puzzle and today I’m going to share with you my favorites. What do you say? Let’s get after it?
Today I’m finally going to show you how to make a double-sided puzzle that’s not super easy nor crazy hard.

For this project you will need:
- Cricut Maker
- Cricut Design Space Cut File
- Cricut 2mm Chipboard
- Cricut StrongGrip Mat
- Cricut brayer
- Cricut Knife Blade + Housing
- Painter’s Tape (blue masking tape)
- Photo Paper <–I like this soft-gloss the best
- Printer (I am in LOVE with my HP Envy 4520)
- Mod Podge & a small brush

While I do offer hand cutting alternatives when available for my projects, this is not one of those times. This project absolutely requires a fancy cutting machine and if you don’t have one, but are in the market I love my Cricut Maker best. I’ve had both Silhouette and Cricut and, hands down, I’m happiest with my Cricut in the following reasons (roll that bullet list):
- The availability of Cricut materials, tools, supplies, blades, etc. at local stores (Walmart, Michael’s, etc.) is hands down better. With a Silhouette, you might have to mail order everything from materials to blades because they just don’t have a good presence in brick and mortar stores and that means delaying a project and waiting. Which REALLY stinks when you just want to nip out to grab a replacement blade or something to finish out a project.
- There are presets for a bazillion materials with Cricut and they are all right on the money. No guessing and no wasting materials trying to figure out cut settings yourself using test cuts.
- Cricut mats are hands down superior to Silhouette mats. Even when I was running a Silhouette, I used Cricut mats whenever I could.
- Cricut has LOTS of their own branded materials and I can’t recall having problem with cutting something when I used the recommended settings in Cricut Design Space. And that means less waste for bad cuts.
- Customer service is amazing with Cricut. If you go to the site and go through one of the channels to ask for help you will hear back and that’s NOT something I had when I was experiencing problems with a brand new Silhouette right out of the box.
Okay… got a Cricut? Great… let’s move on! Grab your Cricut 2mm chipboard and a Cricut StrongGrip Mat. Place your chipboard right in the middle of your mat. (it is 11″ x 11″ where the mat is 12″ x 12″).
Use a brayer to roll the chipboard securely in place on the mat’s adhesive. Is a brayer absolutely necessary? Eh. I mean, you can make it work with just your hands but there is a very, very big improvement because materials are far less likely to go sliding around on the mat when you use a brayer to help keep it down. You know how sometimes you’ll cut something a bit heavy duty and after several passes, it starts to pull away from the mat and then the next round of cuts aren’t quite in the right place? If your material stays put in the first place, that’s far less of a concern. Now, I waited for a long time to buy a brayer and when I did I was kind of kicking myself because it really is a helpful little tool ESPECIALLY when your mats are not quite as sticky as they once were.
Go around the edge of your chipboard with a round of blue masking tape to really make sure that chipboard goes nowhere.

If you haven’t already gotten the Cricut Design Space Cut File, you can get that here. On that cut file is the same puzzle shape THREE times. Two of them have a brown border and one has a red border. Cut through your chipboard using the BROWN mat/color cut.
Once your chipboard is cut through remove the outer, unused part of the chipboard and pull away the puzzle in one piece (it’s really easy, it totally wants to stay together). Next, print your photo as an 8 x 8″ square, OR cut it to be 8″ wide and then just finagle placement on your mat and cut the photo (use the photo paper setting) with the second BROWN mat/color cut. LEAVE YOUR PHOTO ON THE MAT.
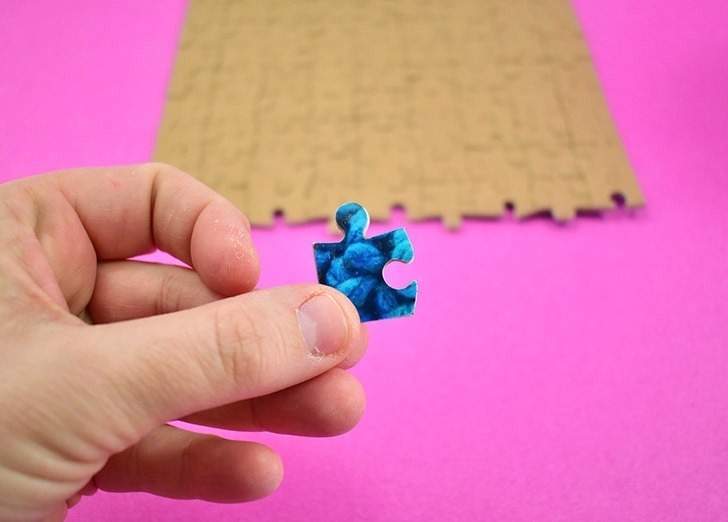
Now remove one row of puzzle pieces and place them out side by side. Take care when punching them apart for the first time so that you don’t separate the layers of chipboard (just like on a storebought puzzle). Remove that SAME ROW from you photo and place each piece as you remove it by its match.
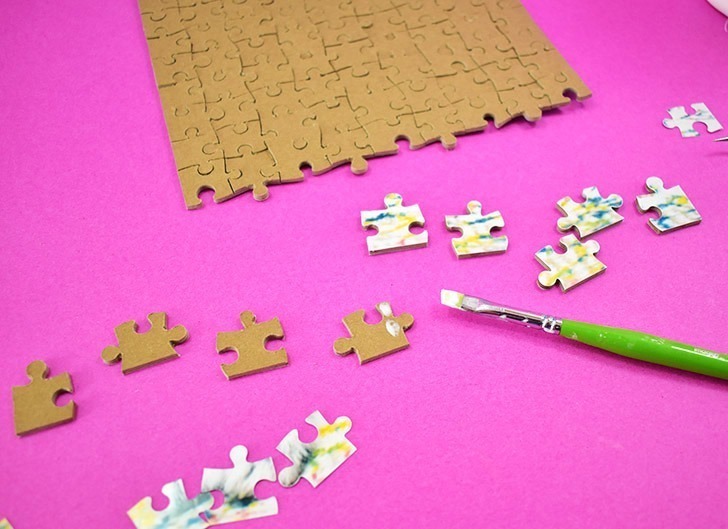
Brush a healthy amount of Mod Podge onto each piece individually and then place the photo on top. Gently push the photo into the adhesive making sure it “takes” all over the piece, especially the little nubs that might stick out. Double check that you don’t have a lot of photo hanging off of any one area or any beads of Mod Podge that will dry and ruin the puzzle’s fit. As you work, place each piece off to the side, flat and able to dry completely (overnight is best).
And just so you know, straight the heck up, since we’re gluing each piece individually, this is a time-hog of a project. I truly feel this gives the best results, but feel free to test cutting your chipboard WITH the photos glued on first for a MUCH FASTER project. And if you do, let us know? I just haven’t tested this cutting 2-sided with photos already attached, yet, and would love to know how it goes!

Continue until you have side one of the entire puzzle glued together. Leave your puzzle to fully dry, overnight or as much time as you can and then piece the puzzle back together. Use your brayer to roll over the puzzle and help push the pieces fully together. This will also help round out any weird edges.

Flip the puzzle over and cut your second photo using the RED rimmed puzzle cut shape. This puzzle shape is flipped, though it really doesn’t look like it, does it? I PROMISE IT IS.
Repeat the process adhering the photo to the pieces, working one row at a time so that you don’t get confused and have a real bear of a time figuring out what goes to what. I LEARNED FROM EXPERIENCE that going one row at a time is definitely the BEST way to do this because it’s like a whole ‘nother freaking puzzle trying to figure out which photo to attach to which piece. Haha! It’s a TOTAL mess!
After all of the pieces have dried, piece the puzzle together and get back at it with that brayer action, flipping to puzzle over several times to ensure that all of the pieces fit together well and the puzzle will lay totally flat once put together.

Ah! Isn’t that side so much fun?!?

But this one is, too! I just can’t pick which one I love more! :)
If giving as a gift you might explain to the recipient that the pieces are really very snug and to take care when taking the puzzle apart to not fray the pieces, but other than that I think this makes an EXCELLENT GIFT. Don’t you?
What will you put on the 2 sides of YOUR DIY double-sided puzzle?
