
This post and photos may contain Amazon or other affiliate links. If you purchase something through any link I may receive a small commission at no extra charge to you.
I’m super excited because today I’m updating a post from way back in 2015. Almost 5 years ago I decided to start making my own alcohol inks. But I’m always working to improve things. So over the past 5 years I’ve tried all sorts of markers and bottles and methods and I’ve made a lot of mistakes along the way. But I’ve also sort of streamlined the process. I’ve figured out how use less tools and make more vibrant and saturated colors. And I’m really happy to share with you a new and improved way to make alcohol inks at home… (original Alcohol Inks post can be found here)
But first, what are alcohol inks used for?
Alcohol inks are a lot of fun! You can use them to add super bright and saturated colors to things like white coffee mugs or clear acrylic trays or bangles. You can even set them on fire to make some gorgeous abstract art. And alcohol inks are also used by fine artists and can be made into some truly stunning pieces. For more information on using alcohol inks to make your own DIY gorgeous alcohol ink paintings, check out this very informative post at acrylgiessen that covers all things about painting with alcohol inks.
Why DIY when you can buy alcohol inks?
Straight UP to save money. BIG money, in fact. I was needing a new set of alcohol inks and I wanted to have sort of a rainbow assortment. Because I was feeling supremely lazy I figured I’d just buy a set. On Amazon I found this Ranger Favorites Alcohol Ink Set and it had most but not all of the bright and cheerful colors I was hoping for. Plus each bottle was only half an ounce. At $60 for the set, that means each half an ounce costs $4 apiece. Now think about it this way… at $8 an ounce and with 128 ounces in a gallon, do you have any idea what the cost is per gallon?

First let’s think of a few gallons to compare this astronomical price I’m about to show you… In my part of Texas I can get a gallon of milk for around $2.50. I filled up my car yesterday and paid $2.29 a gallon for regular grade gasoline. But if I wanted to order enough of these little bottles of alcohol ink to equal one gallon it would cost me $1,024. Wowzers, right? Ooh, and I didn’t even add tax. Silly me! That would be another $84.15 for a total of roughly $1108 per gallon of store bought alcohol ink. That’s about my grocery budget for 2 weeks spent on nothing but TAX.
Now this was kind of silly, I grant you because who would ever BUY a gallon of alcohol inks? But I just wanted to bring home just how expensive this little craft medium is. And alcohol inks are a really FUN craft medium to work with. Unfortunately because of the cost a lot of crafters can’t afford them. That’s why I went DIY 7 years ago and never looked back.
But first…
Did you know I wrote a book about Alcohol Inks?
 I did, I totally wrote a book on Crafting with Alcohol Inks titled Crafting with Alcohol Inks which is soooo original, I know :) Quick plug, get your very own copy of Crafting with Alcohol Inks by Allison Murray (yours truly) online at either Amazon or Barnes and Noble!
Back when I wrote this book in 2016, my publisher wanted me to use alcohol inks in the projects that others could purchase and so I did. Except for my very first use of alcohol inks when I purchased a little 3 pack that is the only other time I’ve ever spent money alcohol inks. Every single other use has been DIY.
And, as I said, through the years I’ve managed to come up with much more vibrant and saturated inks to use than I did way back in 2015. In a nutshell, these DIY alcohol inks are amazing and, in my honest opinion, rival store-bought alcohol inks at a fraction of the cost. And also in my honest opinion, blow my previous version of alcohol inks out of the water.
Supplies Needed for DIY Alcohol Inks
- Chisel Tip Sharpie Markers
- Strong Isopropyl Alcohol (91% or 99%)
- Precision Tip Applicator Bottles
- Glass Jars
- Paper Towels
- Disposable Gloves
- Craft Knife
- Protection for Work Surface
- Goo Gone for Clean Up

The supplies list to make DIY super strong alcohol inks is really small. Gather strong Isopropyl Alcohol (91 or 99%) and really good permanent markers. As of today, Isopropyl Alcohol is a straight up nightmare to find because of the current global health situation. Right now I’m not going to link to the alcohol because online there’s rampant price gouging.
I’ll admit the timing of this post isn’t exactly perfect but I’ve been working on it since way before the shortages. Please PIN THIS POST for future reference. This will be the perfect project when things settle down and rubbing alcohol isn’t being sold at a crazy premium.
The Markers You Use Affect the Quality
For this batch of super strong DIY alcohol inks I used Sharpie brand chisel tip markers. I initially purchased this set from Amazon but then was disappointed when I received them and realized there was no pink marker. Because I wanted a pink alcohol ink, as well, I purchased 2 fine point Sharpies individually from the craft store Michael’s. Later I found that Target carries a 4-count chisel tip Sharpie set that includes pink, lime green, bright aqua ,and purple.
Flat out, there’s just A LOT more ink inside of the chisel tip Sharpies giving you a much stronger alcohol ink. I’d strongly suggest picking up your fat Sharpies from Target. They’re cheaper than online and you can get all of the basic alcohol ink colors you’d want. But if you cannot find a chisel tip in the color you want, you’ll need TWO fine point Sharpies instead of one chisel tip.
If you’re not down with Sharpie, you can most certainly try to use any markers you please. Just make sure they aren’t eraser board markers because those won’t work. Washable markers will not work, either. Be sure that any markers you use state PERMANENT somewhere on them. And just know, I’ve used very cheap and very expensive markers in my journey and I think Sharpies produce the best results hands down.

Want to Use Up Old, Spent Markers?
You can absolutely get ink out of markers that appear to be all used up. Because just because they won’t write on paper doesn’t mean there isn’t anything left inside the pen. It’s just like expensive beauty products. There’s always SOMETHING left behind (so frustrating, right? :)
Follow this tutorial and whether your markers are new or old you’ll be able to eke out all of the color. But you won’t get a full ounce of good, vibrant colors when using old markers. Instead you’ll need to save up a couple of old markers to add up to about the same amount of ink in an original. Or you’ll need to reduce the amount of alcohol ink you make. Maybe instead of a full ounce, you’ll get a quarter of an ounce. If you try to use a single old marker and get a full ounce out like the tutorial below shows, just know your inks are going to be super faint.
Choosing Bottles to Hold and Dispense Your Homemade Alcohol Inks

These 1 ounce precision applicator bottles are the perfect little vessel for your DIY alcohol inks. After many years of making my own and using lots of bottles I will always, always use these precision tipped dispensers from now on. Though they come with a little funnel you don’t even need them with that needle tip (more on that in the tutorial below). Plus they’ve got a great screw on cap that you can really get nice and tight. And the silicone lid/drip stoppers work really, really well.
Learn Better by Seeing the Action? Check out our Homemade Alcohol Inks Tutorial Video:
Making Alcohol Inks, Step by Step:
At 1 ounce they’re the perfect size for a super strong alcohol ink like we’re making today.

With the cap on your Sharpie Marker, twist back and forth the cap. Slowly but surely the tip of the marker will pull away from the rest of the marker’s cartridge.

Slice open the tube that contains the ink. Cut all of the way from one end to the other.

Place the tube in a small glass jar and squeeze rubbing alcohol onto it. To begin with, start with just a very small amount of alcohol. The strength in our homemade alcohol inks comes from a high ratio of marker pigment to Isopropyl alcohol so go easy.
Place the lid on the jar and allow to sit or stir the tube around in the alcohol to help the ink seep out.

Once the top portion of your tube has turned mostly white squeeze downward onto the tube into the jar to release the ink still inside. Squeeze the tube like this a few times, adding a little squeeze of alcohol onto the tube to resaturate to help push the ink out.
This is a GREAT time to wear gloves, by the way.

Really great… Exhibit A in favor of wearing gloves… This strong alcohol ink literally took me 4 days to completely scrub/wear off. Cruddy-dud but lesson learned!

Getting your homemade alcohol ink into these precision applicators is a snap, no extra tools required! Simply squeeze the applicator bottle to push out all of the air.

Flip the applicator over and try to place just the needle portion of the lid into the alcohol ink. Release the pressure and the liquid will begin sucking up into the bottle as the pressure normalizes or whatever. I’m not a scientist but it’s just like when you put your finger on the end of a straw to suck up the coke from your glass.
Despite best efforts I did get ink onto the white screw on cap of my applicator bottles. I did clean them up just a little bit with alcohol in a fingertip spray bottle and a paper towel. Know, however, that once used in earnest, the outside of these alcohol ink bottles are going to become just as colorful as the inside. Alcohol ink runs and drips and that’s what makes it so much fun to craft with!

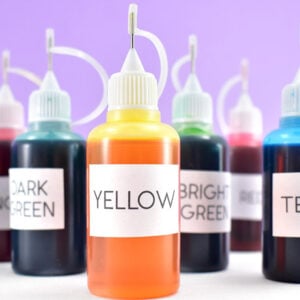
There are lots of Sharpie colors so if you have several that are quite similar in shade, it would be a good idea to label each color. In all honesty, I had planned just to put a little paper circle onto each bottle and dab it with the color inside. But since this was for a post I decided to print up some Avery 5160 labels I already had on hand.
How much money can you save making homemade alcohol inks?

For this project I did use quite a few things in my stash which brings the price down even lower, but let’s cover how much it would cost to make exactly what I did. I made a total of 10 colors and a full ounce of each.
- 32 ounces of 91% Isopropyl Alcohol from Walmart = $2.50
- Chisel Tip Sharpies from Amazon (current price) = $7.74
- Additional Colors, 2 Individual Fine-Tip Sharpies from Michael’s at $1.69 apiece x 40% off coupon for online purchase = $4.06
- Precision Tip Squeeze Applicator Bottles (quantity 24) = $9.99
- Add in sales tax (from my research no state exceeds 10% so we’ll go with that) = $2.43

For a grand total of $26.72 for 10 colors, a full ounce each of really vibrant or a total of $2.67 per ounce. And don’t forget, you’ll still have 14 applicator bottles and approximately 22 ounces of alcohol remaining for other uses. And since I did the whole dramatic thing with gallons that’s $341.76 per gallon of homemade alcohol ink vs. $1,108 per gall on of store bought. Proof is in the pudding, my friends.
Why BUY when you can DIY alcohol inks and save an amazing amount of $? :)
DIY Alcohol Inks
Instructions
- With the cap on your Sharpie Marker, twist back and forth the cap to open the plastic case and retrieve the ink tube inside.

- Slice open the tube that contains the ink with a sharp craft knife. Cut all of the way from one end to the other. Place the tube in a small glass jar and squeeze a small amount rubbing alcohol onto it. Place the lid on the jar and allow to sit or stir the tube around in the alcohol to help the ink seep out.

- Once the top portion of your tube has turned mostly white, using gloved hands, squeeze downward onto the tube into the jar to release the pigment. Add more alcohol to equal approximately 1 ounce of total liquid.

- Squeeze the air out of a new precision tip squeeze bottle. Flip the applicator over and try to place just the needle portion of the lid into the alcohol ink. Release the bottle and suction will begin pulling the ink into the bottle. Continue until your squeeze bottle is full.


Click here to see the original Homemade Alcohol Inks post from November 3, 2015.
I make watercolor paints for my students to use. I save up the “dried out” water-based markers and small amounts of water. The pigments are rich and vibrant. They can be diluted.
I will definitely try the same technique with my sharpies and alcohol!
Thanks!
Hi! So excited to try making these! My question is am I able to make the alcohol ink using metallic chisel tip sharpies?!
Thank you, I appreciate your info AND knowledge!!
Dana
Hi! Unfortunately the metallic sharpies separate into with this dark, black almost oily substance that doesn’t work. I haven’t been able to figure out a way to DIY metallic alcohol inks just yet. Sorry!
As a watercolor artist, I have been wanting to try alcohol inks but so far have shied away because of the cost. You have the most incredible website and now I want to try more of your projects. Thanks for the printable dragonfly wings (my favorite), I am a”Murray” by marriage – husband James born in Louisiana. I wonder if we could be related. We have found “Dozens of Cuzzins” all over the US. God Bless. LORI
Can I use other sharpies beside chisel
Absolutely!
This is great, thank you :*
I do not know how to thank you for this information….I am so going to make my own…Being on an aged pension and wanting to do stuff totally sucks. You have given me an opportunity to craft my brains out…Thanks again.
Yay! I’m so glad. Crafting gets really expensive. I’m glad we could stretch your budget and hope you make some lovely projects :)
Thank you
Thanks for sharing this. I have wanted to try something with alcohol inks for a while but couldn’t justify the cost for just wanting to play with something. I’ll be trying this soon.
Sounds like fun. Very helpful. Thanks for sharing.
Thank you for sharing will certainly be trying to make my own.
I am so glad I found you and your words of wisdom you shared. Thank you so much. I make custom christmas ornaments and I have had Christmas ofr my kids because of them. I think these would be beautiful. My name is Nicci and I am sure you will get tired of me….just kidding. I love the name of your site, Mine is Dreamful Things……in my head for twenty years so once again I am trying to do what I need to doI enjoy your wording and the way you just lay it out thee. Tells me you are the real deal as a prson and that is so needed in this world. I am nowa follower. Thank for the wisdom
Hoi
Heel duidelijke uitleg maar wat is een beitelpunt in het Nederlands ken ik dit niet, groetjes
Gerrie
You can see a chisel tip marker here. Good luck!
You have just saved my craft budget 🤗
Thanks so much!!!!👍😃
Perfect thanks 😘💕
I wanted to make a pop up card with a carnation inside, and decided to try and color the edges of the white paper of the carnation. But I’m at work, and decided to see if I could do some DIY ink. I had a red ball point pen, which I scribbled over and over onto a piece of backing paper from vinyl – it’s kind of like freezer paper, with a coating on the back. I then sprayed alcohol (we just have 70% at work) onto the paper and it dissolved all the red ink. I held it over a bowl and had a nice little bit (maybe a few spoonfuls) of ink. I tried it on the paper and was shocked to see it worked! Then I googled DIY alcohol ink and found your post. I’ll definitely be doing this at home with all the sharpies I have! Thank you so much for sharing. My paper carnation turned out really nice by the way!
Have you been able to use the metallics like gold and silver markers to make ink?
Unfortunately I haven’t managed to figure out white or metallic alcohol ink. I suggest purchasing those colors. If I figure out the method for either metallics or white, I’ll post it here to this page.
How would you make white? Not sure I know of any white markers with the exception of chalk markers.
Unfortunately I still haven’t succeeded in making white or metallic alcohol inks. I suggest buying those but I will update this post if I ever get it figured out!
This is so fantastic. My red Sharpie turned into orange ink for some reason, but the purples and greens are gorgeous! I steeped them in pint canning jars a few days before decanting into a couple 1oz bottles each. Worked fantastically! Thanks !!
Yay! So happy it worked well for you.
I’m so happy to have found your blog; this information is great! Thanks so much for sharing it. I love AIs;- even a creatively challenged gal like me, can produce something beautiful using tham. However, they’re expensive. I’ve subscribed to your blog and am looking forward to learning lots. Thanks from Australia.
I have a question if you don’t mind. I tried this recipe today and started with black. It turned out awesome. My goal however was to do metallic colors. They did not turn out so well. Do I need to do something different or it just doesn’t work?
I have not been able to successfully make any metallic alcohol inks. Something separates and it just doesn’t work. I’d strongly suggest purchasing metallic inks. I’ll keep trying to make it work and will update the post if I manage it. Best of luck!
Hi are these alcohol inks good for resin projects? They always say everything else besides resin. Ty
I’ve used them many times to color resin. I’d suggest starting small and making sure that the saturation you’re looking for cures right. If you need to use a ton of alcohol ink it often will prevent the resin from hardening all of the way.
I am looking forward to trying this…. wish me luck !
Thanks so much for sharing this magic!
Sharing this information without charging for it: wonderful, generous, kind! Thank you!!
Love this, I can’t wait to save some money. Thank You BIG 💋
will this work with metallic markers?thanks
Hi, Gayle. I’m afraid the metallic markers separate into a little bit of metallic pigment but mostly a black color. I’ve not found a way to make metallic (or white) alcohol inks, yet. I suggest buying these colors.
Have you tried it with the silver and gold metallic sharpies?
I have. For some reason it separates with a weird black sediment that just never looks right. I’d suggest purchasing white and metallic alcohol inks and I haven’t found any way, yet, to make them myself.
Great tutorial. Just getting interested in alcohol ink for art and yes, the store bought alcohol inks are quite expensive. Thanks for sharing the idea of making alcohol ink, at home & much cheaper. Would like to ask as to the why is the “chisel tip” Sharpie of importance as against a normal point Sharpie
Hey, Harjith… I feel like the chisel tip has a lot more ink inside of it. But that could just totally be my mind playing tricks on me!
Allison, I always prefer making what I can versus overpaying when I can. A sign of a true crafter I say! I have placed my order with Amazon and will enjoy this DIY with my granddaughter! Thank you very much, I appreciate you sharing! Have a good weekend!
Thanks for this DIY. Going to try in glass ornaments. Doing it with my LO so don’t want to spend a fortune.
Do the glass jars get stained when making the ink or does it wash off easily?
The jars do get stained and washing them in a dishwasher doesn’t remove everything. You can clean them with a small amount of isopropyl alcohol on a paper towel to wipe what doesn’t wash off away.
With rubbing alcohol at ridiculous prices I was lucky to find 70% which I know isn’t as good as 90% but it was at the dollar store so I got it while I could. I am planning to try this with liquid food coloring soon and hope it works since those sprays are too pricey for my blood also! I’ve seen this done on YT with gel food coloring so I hope it’s basically the same. We shall see 👍😊🤞
Should the pigments settle to the bottom of the bottle? Just purchased a set and some of them look like the alcohol separated.
If they settle just shake the daylights out of them prior to use. It really shouldn’t settle but if it does shake that business.
This is BLOODY BRILLIANT!!! THANK YOU SO MUCH!!! From the UK.
You’re so welcome :)
I noticed there’s a lot more colors in the regular sharpies…is there something special about the chisel tips???
Nope. Nothing special. I’ve always felt I’ve gotten more ink from the chisel tips but perhaps it’s all in my mind. You can use any sharpies you please! Best of luck!
Fabulous tutorial. I subscribed to your newsletter as well. I am so looking forward to making these. All the Ranger products are crazy expensive. This will be a great project to do while sequestered at home. Check out Lindsay the Frugal Crafter for more ideas.
You are very kind to share this! Stay safe.
What about white alcohol ink? Its hard to find white markers, what would you use?
I’ve not had any luck with making white alcohol ink. I have no idea what the secret it is but I’ve had to purchase white and metallic inks because I just can’t figure them out!
When something affects the supply of rubbing alcohol the liquor store has Everclear or a similar brand of grain alcohol that is 95% . I prefer it to rubbing alcohol & denatured alcohol which are toxic ; grain alcohol isn’t other, than it’s *alcohol*.
Great ideas. I love this diy. Saves me a hell of a lot of money.and. I can make custom colors by blending the inks thank you very much
Thank you so much for these instructions.
I have an Epson laser jet printer and although the printer said I was out of ink, being the skeptic I had to check and I wasn’t. I had approximately 3/4 of an ounce of ink left so I diluted it in a 2 ounce bottle with 91% to get the color I wanted. With it being so saturated the 2 ounce was a definite necessity.
Thanks to you I can now create colors With my sharpies that I can’t seem to find or they come in a three pack with one color I want and two colors I don’t at the craft stores.
Keep up the wonderful ideas. Thank you very much
I made my inks with sharpies. I had also purchased sharpies matalics, don’t try to make alcohol ink with then, it turns into I gloppy mess. The ink does not dissolve in the alcohol. If you want matalics in your project you have to spring for the professional manufactured inks. Also to get more ink out of the ink tube, after soaking in alcohol I used tape to secure to a straw (boba size) and put about 1/2 tsp alcohol in the straw and blew it through the ink wadding.
I have lots of boba straws, that’s brilliant! Yes, I also thought I could get some amazing metallic inks using gold Sharpies but mine was a weird blackish with like a gold oil floating on top. Very odd!
What is the purpose of making it yourself. Is it better or cheaper?
I would say store bought alcohol inks are better but making them yourself is insanely cheaper. If you’re crafting on a budget or if you’re wanting to play around with alcohol inks I’d say make them yourself.
so i watched what you did but if I want the ink darker or just more depth of color, do i keep the colored alcohol liquid and just put in another ink cartridge thingie? Seems like that would be the case, but i’m just finding out about this fun craft and want to try my hand at it. THANK YOU! :-)
Yes! Adding more of the ink will make them darker/more saturated! You’re welcome :)
Thank you so much for this informative tutorial. I am certainly going to create my own alcohol ink. They are more expensive that I want to pay for them at the store, especially because I want so many different colors.
Thank you again!
Blessings~
Brenda G Ellison
I’ve been crafting about 2 years. And like you, I cant sit still.Ive got my hands in so many projects. Too many. How do you keep up with your mind? Lol.I want to try every diy there is,it seems.Thanks for the tips on how to make your own. Craft supplies can sometimes be overpriced so anytime I can make my own that’s another diy. Does it ever end? Lol.Again,thanks. And happy crafting
Now that the smelling salts have revived me after seeing the prices for alcohol ink….!! I do acrylic pouring and saw a video where the lady used alcohol inks dropped on her base coat of white acrylic paint….add a drop of alcohol and silicone and watch the fractals develop….so cool!! Have you any experience on doing this on canvas with a wet paint surface?
I do not but that sounds AMAZING!
Thank you for sharing this idea. I think I’m going to try it in some capacity; you know how creative minds work. I’ll let you know how it turns out.
Could you use ink pads used from stamping?
I don’t see why not. Let us know how it works for you?
wow what a brilliant idea for using up the grandchildren’s sharpies I have a lot of grandchildren and a lot of sharpies that somehow the lids are not on, cause they must of fallen off nana, now I wont mind as much as I can make inks with them
Thank you for the tutorial
Thanx
I am loving this!I’m a 1st time user w/AI &so didn’t want to pay the price for them? I’m going to have all my family & friends save their markers *permanent 1s* for me I just wish I had some alcohol right now. Thank you for sharing this?
GENIUS!!!! I am going to try this! THANK YOU!!!!!!
Does it matter what percent alcohol is used?
The higher the alcohol content the better your results. I tend to go with 91% because I can pick that up at the grocery store, but they sell even stronger rubbing alcohols online.
Does the alcohol need to be a certain percentage or will and percent work?
The higher the alcohol content the better your results. I tend to go with 91% because I can pick that up at the grocery store, but they sell even stronger rubbing alcohols online.
Do whiteboard/expo-markers work?
I think probably not. You know when you wipe away dry erase marker from a board it leaves sort of “stuff” that’s like sort of gritty and kind of moist behind that balls up? I’m thinking whatever additive that does that so you can wipe the ink away would probably gum up the works. But if you have some on hand to try, let me know how the experiment turns out?
Hey just wondering that can we use vinegar instead of alcohol …plz reply
I’m sorry but, no. Alcohol inks work because of how quickly the alcohol evaporates. Best of luck!
I’ve been doing my own as well. I found Amazon had the same droppers that Tim Holtz does, big bag of 50 to 100 for not much. I’m trying to get more saturated color, and noticed that Adirondack alcohol inks have propylene glycol, which can also be purchased through Amazon. I’m gonna doing some testing and see if color improves. I also tried Rit liquid dye and didn’t love the color, but hey, pastels do come in handy at times. Love your suggestions, and thanks!
Hey can you use the ink from printer ink cartridge? I have a bunch left over after buying a new printer. Going to try it
Hmm. This is an interesting idea and if it’s a liquid like ink jet rather than powdered toner I’d think it would work just fine… Let us know if you try!
Thank you I ran out of green and my local Michaels has no alcohol ink at all This is perfect I have lots of markers ??
Found this post earlier this evening. I needed colors fast but had no rubbing alcohol in the house so I used Tito’s Vodka! It worked great-my husband is appalled that I’d want to use it for such a thing instead of drinking it-but it did the crafting trick! Thank you so much for this post!
That what I call alchol abuse! But awesome make do idea.
How about using sharpies or other permanent markers? Would they work?
Permanent markers will actually work better than these. You’ll get better colors in the end.
Dollar Tree has permanent ink markers similar to Sharpies. They have several colors and they’re either 8 or 6 for a dollar
Boom! Look at you. Thanks for the tip!
I use bingo dobbers the same way, lots of ink, try it
That’s genius. There is definitely a ton of in those things! Thanks :)
Does the marker need to be dry before doing this process? Or can you use the marker as it comes right out of the box? Thanks.
The colors will be a bit stronger straight out of the box!
Hi Allison. I love this idea. I want to try this on the bottom of wine glass and their stems. Will this ink work on that. Also can you dishwasher with this homemade alcohol inks or hand wash only.
To be honest this works best on paper and is more faint than store-bought sets. I’d strongly suggest buying the colors you’d like for significantly more vibrancy. Also, you’ll need to seal them, dishwasher safe Mod Podge works well but, despite the name, does best with hand-washing for longevity :)
Hey Allison. Just wanted to say such a big thank you. My name is Lee-Ann I live in New Zealand. Trying to find alcohol inks here is just impossible. So being able to make my own is just great. So again thank you. My husband and my daughter are very happy to as they are so over hearing me moan and whinge about not being able to find it. Cheers all the way from New Zealand. ??????
Hey Allison!! As soon as I saw this post I ordered your book! AMAZING! Although I need more time to go through it! Also,Mthank you cuz I ordered the heat responsive pigment powders from. Solar thing lol too! So many thanks!
Hi, I made the alcohol ink and some of my colors had little thingys (grains I guess, but really really really small) And I squirted the ink onto paper and it had blotches in it. Is there any way I can remedy that?
You can always filter them with a coffee filter. Works great!
Can tube water colors be used to make the alcohol ink? Just curious, I have many tubes of watercolors and would like to try this. Thanks
I think that the paint would leave behind a sediment in the inks but perhaps if you strained them it could work. If you have a tube that you don’t mind wasting, if it comes to it, you might give it a shot as an experiment. My gut instinct is that it wouldn’t work well but I have been very wrong before :)
I am just going to have to try this and see what happens. I love experimenting with paints. Thanks for the info.. I just have to try alcohol ink. It looks amazing.
RIT, PAASCHE dyes? Very cheap just after Easter egg rush at Dollar General, Family Dollar, Walgreens, CVS…
Thank you for sharing ❤
HI,
Question can these be used on metal?
I know the ones bought in the stores can be. Thanks
Hi, Nina! My homemade alcohol inks aren’t quite as potent as the ones bought in stores. I think that for the maximum vibrancy on metal crafts I’d probably stick with name brand.
Do you have to remove the ink cartridges from the bottle or could you leave them in the bottle to continue to darken the color?
You know I think you could probably leave them if you want to. The cartridge’s nature is to stay moist so it will suck up the liquid. When you get to the end you’ll still have some in that cartridge.
You’re my kind of creative artist plus you’re willing to share! If I had a nickel for every marker I’ve thrown away I could take a vacation. Thanks again for your blog.
I have been using AI for about a year I have made lots of coasters and then I started on YUPO paper, but it’s expensive. I now use the reverse side of glossy photo paper and it has worked great. You can use the glossy side, but it doesn’t give the same effect. I prep the reverse with 91% alcohol and then add the inks and more alcohol. Just a preference. I love AI and like you, I want to try a less expensive alternative. Thanks for the TUT.
Great tutorial!!! I have artist’s markers that have dried out and now I can use them BUT I would like to use the Al inks made here on wine glasses. …..I have a few questions….will this ink work on glass?
How long does it take to dry?
Will it be permanent enough not to smear off with hand-washing only of these wineglasses?
Would vinegar help the inks to dry better??
Should I use a fixative by Krylon to protect my work??
Sorry for the numerous questions…..BUT I loved your commentary and the tutorial how-to!!!
Thanks!
Definitely use a fixative to protect your work. These tend to not be as saturated as store-bought inks. On something transparent, like glass, I think I’d go with store-bought for a more vibrant look. If sealed and hand washed with care your work should last a long time!
I have an issue with the ink not drying well. I am using them on ceramic tiles and after the alcohol evaporates the ink is still wet and doesn’t completely dry. Any advice?
It sounds like it is an issue with the original ink source. What brand/kind did you use? Perhaps a change to a different brand would yield different results? So far I’ve only really used my homemade versions on paper as I can’t seem to get saturation I’m happy with for other mediums…
Can you use the homemade ink on glass beads? I have seen it done with the commercial ink, but that is too expensive to use with kids at camp.
My ink does well on paper but not as well on hard surfaces as a commercial ink.
Can this ink be use to write on paper? My daughter needs to make a pen for a project at school.
If you make the ink highly concentrated I would think you could. As it stands what I have is very thin and I think that might be an issue for leaking. They do sell ink that she could put into a pen and India Ink might be the way to go with that if she wants a pretty color.
Thanks for the great tip!
For less mess I just thread the top of the ink barrel with thread and then I use the thread to pull the ink barrel out of the bottle.
Thanks for the wonderful money saving ideas. Is it just rubbing alcohol that you use??
Yes, grab some rubbing alcohol from the first aid kit and you’re set!
To make less mess when pulling out the ink from the bottles I use twizers.
Hi, just wondering whether you can use food coloring instead of markers? Seems a bit easier, not sure if effective.
I haven’t tried food coloring, if you do let me know how it goes? If I do I’ll post the results here!
Hi..Great tutorial…I tried it…But…The alcohol smell was so strong…Did I do something wrong??
Unfortunately the alcohol ink is very strong.
thank you so much for the tutorial, I love to re purpose things specially if it has to do with art, but now I am curious… what do you use alcohol inks for?
Here are a few projects I have made: acrylic bangles, to dye resin (also to make bangles :)), to make a gorgeous tray and coasters! I hear paper crafters use them, too :)
Love this idea, thanks for the great tutorial. Pinning now :)
What a good idea,( who would have thunk it—(thought it?) what sort of alcohol do you use, and would you be able to stamp with it if you put some of it on a sponge? Cheers and thankyou, Marilyn.xx.
Yes! You should be able to stamp with it. That could be quite lovely, I’m sure! I used 91% Isopropyl Alcohol I got from the first aid section of the grocery store!
This is an interesting tutorial and please don’t think me stupid but what projects can you use alcohol inks for?
No! You’re not stupid at all! I had a blog for YEARS and I crafted daily before I ever messed with them myself! Here are a few projects I have made: acrylic bangles, to dye resin (also to make bangles :)), to make a gorgeous tray and coasters! I hear paper crafters use them, too :)
I was really happy when I ran across your tutorial! I work with polymer clay and loved the AI effect. I also belong to a group that works with AI on face book. Just wanted to tell you I ran across those little bottles at the Dollar Tree – there were 2 of those bottles and one pump bottle per package for a dollar. I bought 3 packages giving me 6 of the bottles I need for only $3! I wish I’d gotten my markers at Walmart. Instead I was at Michael’s and they only have a million different kinds of markers. I’ll just get some more. Got some that look like they might be pastel but that’s okay. I’ve opened 4 markers (have to get more alcohol – I was low anyway) by squeezing the markers just below the point until it’s almost flat (these are a very bendable plastic). Then I cut with wire snipers from my husband’s toolbox. I pulled the color thing out with tweezers, held it with the tweezers and made a slit with my Exact-o-blade. Since either my markers were smaller or the bottles bigger but I was able to put them all the way in the bottle, put the tops on and lay it on it’s side to get all the ink out. Anyway, just wanted to share. Thanks again for the tut!
Thank you so much for this great idea! I have a professional 100 piece marker set, and half are almost completely dried out. I had been dropping alcohol on the points when I used them, but now I have a money-saving way to use the ink left in them. I have learned a lesson over the years: Artists should never throw any mediums away. Someone will eventually come up with a great idea for using them in a new way. ?
Did you use water based markers like Crayola brand?
As long as they aren’t ‘washable’ I don’t think you’ll have a problem.
Hi..great idea, but how do you apply them to your pallette or project? Brush or squirt it on?
Yes you absolutely can use a brush or dribble them straight from the bottle. I’m sure you could find squirt bottles similar to the ones the store bought alcohol inks come in if you prefer.
I set my work on a tile outside to dry and it rained and washed it all off!!
Oh, that stinks! Luckily it’s easy and fun to do. I hate redoing anything but I’ve done so many of these coasters over again because I love it :)
What about using a saline bottle top… Ones used for contacts? That would limit the amount that dribbles out, and you could have more control. Just a thought.
Great Idea. I’m trying this as soon as I round up all the markers around here
Hi I am new to this and was wondering where I would buy this alcohol I have a lot of markers and thought this would be a great idea
Thanks Pat
I got mine at either CVS or Walmart!
Thanks for the tutorial,Allison! I may have to try this! I had attempted making my own alcohol inks once, using koolaid, but it never dissolved well.
I’d love to see your inks in action!
I’ve never heard of using koolaid. I had considered using powdered dye from a tie dye kit but worried about having grit in it. I’ll definitely be using these soon :)
You can use the sugar free kool aid and the powdered dye and then just run them through a coffee filter then pour back into a bottle. but be careful those aren’t acid free so they can damage your papers
I have been trying to get a formula right using alchohol as my liquid base and powdered pigment, and had some trouble at first with the pigment weight, and also sediment/clumping, and I am using this resin and didn’t want fleckles. So I measured 3 grams of pigment to 15 ML of alchohol, and then used a plastic cup with polyill and a syringe without a sharp on it to “mooch” and filter the liquid, from there I started collecting Vape Liquid bottles, in 15 and 30 ml size, so I boiled those out and let dry, then with another larger syringe, made matches to pull up and add into the bottles! The vape liquid bottles are perfect to use as the tip allows for individual drops, and they are upcycled and free is meee!!! While I noticed with the first batch that the weight of the pigment does settle, the alchohol allows for no clumping, so just give it a good shake and it blends all the way through for some vibrant lovely and sleek colors!!! And no bendy resin pieces or freckles to have to pick out either!
I have done this. I used Procion powdered dyes from Jacquard. They need separate soda ash as a mordant so I thought it might work. It did. But I was using 99% isopropyl alcohol so to get the colour to be vivid I needed to add a bit of water to the mix too.
It might also work with Wilton gel food colours, but I haven’t tried that yet.
I’ve not tried this with sharpies as they are so very expensive here in the UK that you might just as well buy Adirondak inks after all. But I already had the Procion dyes for something else.
Cool! That’s good to know. I’m going to give those a shot myself. Thanks!
You could filter it through a fine sieve (not for food use). Worth try!
I’m new to all these particular crafts. Reading a lot of great ideas atm.
This one is brilliant for me!! I have some knock off Pearl Ex type powder, a really tight budget, old kids markers by the dozen! So I just need alcohol and containers I think! (Sharpies aren’t that cheap here in Australia, either… Like I said, BUDGET!)
*** Coffee filter paper can be invaluable in crafting… it’s great for straining pretty much anything. I hope that helps! Probably even got a couple in your cupboard! ***
Also, there are literally thousands of straining devices and materials of various types available!
We use a Nut Milk Bag to strain a lot of random things. Again, trial and error. We have several.
Because of it’s make up, the way they draw fluid, (remember your basic school science??) coffee filters would be fantastic for testing your newly made alcohol ink colours, also experimenting, watching how colours pull together, which travel further, which colour draws fastest? They’ll blend naturally as they draw together, into, and across the paper! Make your own beautiful, bespoke “colour wheel”, simply letting the colours you’ve laid out near each other, draw and mix together.
Done. Finished. Complete.
You’ve just strained your new inks, tested them, mixed and combined them, as well as created a beautiful, one of a kind, piece of “Reference Art”!! 🎨 Happy crafting!
✌️💜🌈
I use a Epson printer that has a ink tank system that I can refill the ink. They are archival inks with high intensity colors. It saves an enormous amount of money over cartridges. I will be trying this ink out over the used markers and think it will work really well. I’ll let you know how it works out. Just need to find something cheaper than the Yupo paper. Tuff doing things on a school budget.
That sounds like a genius idea! I’m always interested other inks or dyes that work so please do share your findings with us!
Does it have to be 91% can it be 99%? Would you then need to add water?
99% is even better than 91%! No need to add water, your inks will just dry a bit faster than if you had used 91%. Good luck!
Will 50/ alcohol work, my husband got it?
Not really. I’d suggest waiting until you can get a higher concentration of alcohol.
I’m looking for a recommendation on the best way to make white alcohol ink. Any suggestions?
I have not found a way to make metallic or white alcohol ink. The pigments always separate from the alcohol and it’s just a waste of materials and money. I’d strongly suggest purchasing white alcohol ink.
Wow thanks!! I was just about to go through 3 HUGE containers of old markers and chuch out a HUGE wack of them (cause they are a few years old, and school end i take all the kids school supplies and dump them into large ice cream buckets to do drawings/ colouring, and colouring for bordem busters when kids/ teens are bord or breaks from comp/ tab etc or rainy days etc) anyways, my plan was to sit down and dread the time going through these huge containers..now doong this gives a second life to them and extends the use !! And my teens/ myself can use this to make a whole new extention to bordom busters!! Thanks!! – now I am looking forward to my kids’s end of year supplies even more so lol ?
Great tip and thank you for doing the work to allow us to see how to do this. You sound the same as I am and do…enjoy your life always and have fun creating
Would these be ok to use in resin?
Yes the would. I’ve actually had a reader reach out that they worked very well and didn’t negatively impact her curing time. Best of luck!
How do you go about making the white and can you use the metallics for the pearls
Unfortunately I haven’t found a way for metallic or white homemade alcohol ink that doesn’t badly separate. I recommend purchasing white or metallic for the best results.