
This post and photos may contain Amazon or other affiliate links. If you purchase something through any link I may receive a small commission at no extra charge to you.
I have had a tendency in the past to catch a bit of guff over the fact that I have no problems making with my cats around. I really can’t blame them for wanting to get involved. There are often feathers wafting around me, strings bouncing and dangling and other incredibly cat enticing activities going on around here and, more often than not, I have a cat within arm’s reach of me. That means kitties GET INVOLVED when I make.
As far as I can see it, that’s not a problem, save the obvious ones like I encountered last night. While finishing up a crochet piece in bed around midnight, because I’m stupid stubborn and I was going to finish it before I went to bed, with 2 cats very keenly watching every move of the dangling ends yet to be woven in, I said out loud “this could wind up being very bad for me if I do something stupid.” Wouldn’t you know, not 5 minutes later I drag that thing across my stomach and Maybe LATCHES ON and it just so happens she gets a paw full of belly, too. I let out a screech and fling the thing away from me, hoping she will detach and chase the thing and it turns out, she’s faster than me and latches ONTO MY HAND. Now I’m bleeding at my belly and my hand and cursing that I didn’t just go to bed like a normal person and finish this darn thing up in the morning. (Which I wound up doing anyway because Maybe was super tail twitchy and kept wiggling her butt so it was only going to get worse for me if I kept on.)

Even though that time ended poorly for me, I really have no problems with the cats getting all up in my business as long as it’s not something that can burn them or hurt them or something. I figure their whole world is this house and any kind of excitement is good for them. Far be it from me to put them outside a closed door so I can craft in peace when it makes them so happy and very rarely ends in blood. As with the example above, it sometimes it does, but not often. :)
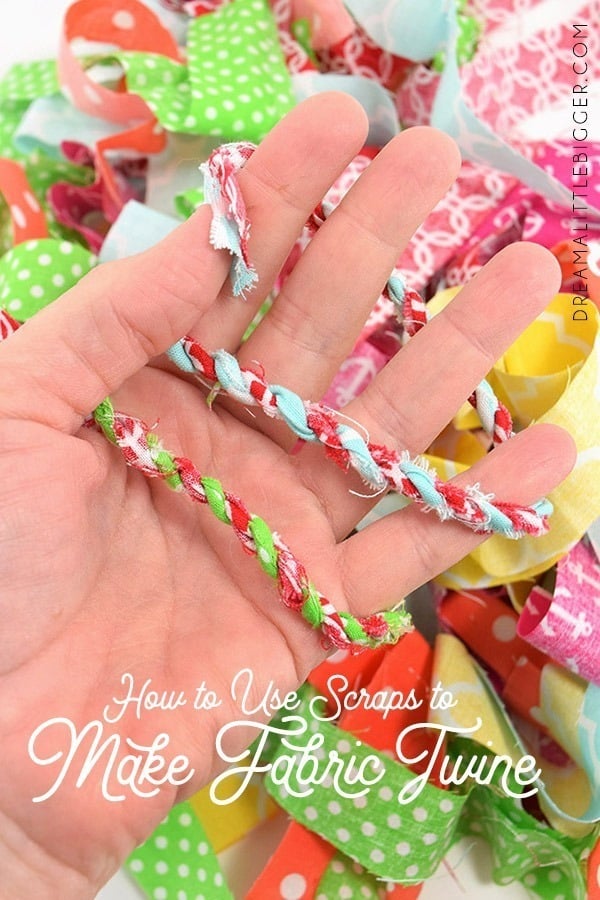
So one day when I noticed a bag of fabric scraps I had hung on the door to throw away, I decided I could use those up to make some fabric scrap twine and put them to good use instead. And when Maybe my cat wanted to get involved I just worked next to my cat craft assistant getting business done. We made a picture tutorial and a video for how to make fabric twine and hopefully she’s not too distracting :)
Want to learn how to make fabric twine while stash busting your scrap material bits otherwise destined for the garbage?
For this project you will need:
- Fabric
- Scissors or rotary cutting set
- Wood spools (optional and pricey online – snag them at Michael’s)
Well, as it just so happens I was worried my words would fail me on describing properly how to twist up the fabric and wrap it around, so I made a little video that will only take up about a minute of your time. AND it stars that cat craft sensation Maybe so you’re gonna not only learn a new craft but also get your daily dose of cuteness, haha! :)
Still have questions? Want to see the process for making fabric twine in photos? Here we go:

Because I’m a perfectionist, which is what I call it when I decide I am over having O.C.D., I decided to cut my strips with a rotary cutter so that they are perfectly 1 inch wide. You can also use scissors and eyeball it, though your twine might be slightly different thicknesses down the length of it from inconsistently sized pieces. This uneven size will definitely happen if your fabric is different weights throughout your twine, too, just FYI.
Any way you slice it (haha!) you’ll need a big stash of 1″, or approximately 1″, fabric strips.

As you go through your fabric scraps, you can either stash bust everything and get a really boho fabric twine, or you can be more selective to get a cord that has more consistent results. I decided to use only my brightest fabrics that was a single color with white and above is a good sample of my end result.

To start your twine grab 2 strips of varying length (so that the ends don’t meet up at the same time) and tie them together with a knot. Take the topmost fabric strip and hold tight. Twist, twist, twist, the fabric around your pointer finger and bring it in front of and beneath the strip on the bottom. You’ve now traded the top and bottom strips.
Twist, twist, twist the new top piece and bright it down and under the previous strip. It’s slow going to start, and the very first twists might be kind of loose, but it will quickly take shape.

There are 2 options for how to add strips once one runs out of length. You can grab the new piece and twist it together, pinching it tightly with your fingers until both ends are worked in. If you get the join nice and tight there will only be a slight bulge from the added bulk of the overlap. If you have pain in your hands, it can be difficult to continue this on for many turns but you can space out making your twine if that becomes too much of an issue. Or…

…you can tack together your 2 strips with as little overlap as possible with thread and a needle. In the spirit of stash busting, I used my embroidery floss offcuts and extras from splitting the thread for embroidery to tack the pieces together. You don’t need to sew it down very much at all, in fact, 2 little stitches, no knots necessary, is perfectly enough to keep your strips together without having to pinch them with your fingers. This quite honestly is my preferred way of doing this, and if you cut a little arrow in the fabric as it overlaps, you’ll have no corners sticking out of the twine.

But if you decide not to cut the edges on your strips, you can gently trim this away once your cord is all good and twisted. In the pic above, you can see here in the middle of my cord is a flap where the fabric corner of the strip is sticking up out of the twine. A quick snip and it’s all fixed!

As you work, every 6 inches or so, take your string and twist, twist, twist it together a little down the length.
Twisting the cord frequently helps the cord keep its shape and not easily unravel. This is especially helpful when creating very long lengths of fabric scrap twine.
Once you’ve got the length you desire from your twine, knot the end and trim away the excess.

Though it’s not perfectly necessary, storing your twine is so adorable when you use wooden spools :)

Pinch an end of your twine into the center of a spool…

And begin wrapping the twine around the spool and over that initial first inch or 2 of twine running along it.

Tuck just a bit of the other end under the twine wrapped around the spool to keep it secured.

Though absolutely adorable, my spools are small and only comfortably hold a few feet at a time but larger spools, like recycled ones left over from used up ribbon will hold lots and lots more length. And there you have a perfectly adorable and totally doable use for your scrap material fabrics… fabric twine!
I love this suggestion for using up leftovers. I pulled some old t-shirts out of the Goodwill bag and plan to cut them up. My question is: What do you do with the fabric twine once it’s made? I can imagine some applications in jewelry, but do you have another way you use it? Thanks!
My favorite way to use it is for gifts. It’s so cute when wrapped around a simple single color gift wrap or kraft paper. I also use it to attach gift tags to bigger items that can’t be wrapped.