
This post and photos may contain Amazon or other affiliate links. If you purchase something through any link I may receive a small commission at no extra charge to you.
Is it too soon to be thinking about Halloween? Obviously I don’t think so! I love the idea of Halloween! And though I’ve shared a handful of DIY Halloween costumes here on the blog, I have a bit of an aversion to dressing up for the holiday. And that’s exactly how this lighted galaxy skirt came to be. Let me explain…
With the idea of a Halloween party looming over me and I needed a costume. Brainstorming for a costume in the spirit of Halloween I knew I didn’t want to stand out TOO much. And that especially included on my way to and from said Halloween party. Because I can be terribly self-conscious sometimes. And I dreaded the idea of being in full-on costume makeup in the car or a restaurant.

With all of my thought into how to accomplish a fun and unique Halloween costume that checked all of the above boxes, I decided to make a skirt that would light up and, in the spirit of one of my absolute FAVORITE craft trends, prominently feature a painted galaxy. Boom! Lighted Galaxy Skirt created!
Want to create your own? Let’s talk about what you’re going to need.
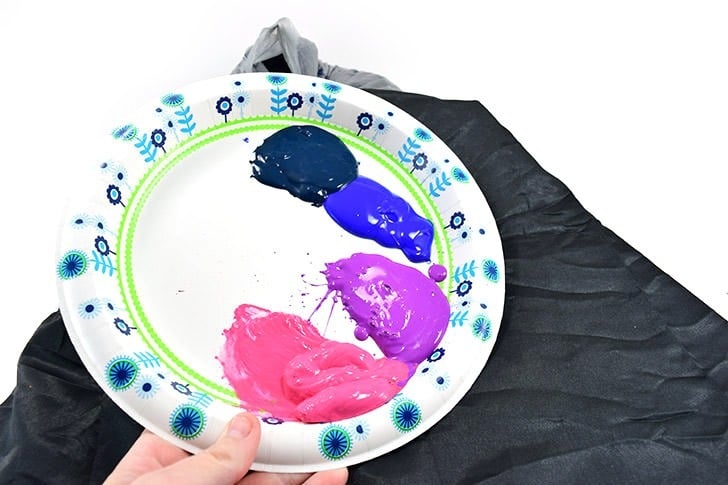
Supplies needed to make a DIY Light Up Galaxy Skirt.
- Black Tulle Skirt
- Acrylic Paint (bright blue, baby blue, pink, purple, gold, and white)
- Battery operated LED lights
- Black thread & needle
- Plastic bags (trash or shopping bags will work)

To create your own lighted galaxy skirt you’ll need to find the right skirt to begin with. The skirt that we used for this project and have linked to has 3 layers of tulle. It works well for a design you see when lit, but not when the lights are off. There are versions of this skirt with more tulle that are poofier and a bit pricier that look nice. But, unfortunately, they don’t work well for this project. Save the cash and get a cheaper skirt with less layers. Because with every layer of tulle your galaxy design becomes less and less visible. Honestly, I’d use the exact skirt we did time and again for this project.

How to prepare for painting.
Underneath the 3 layers of tulle, the skirt has an opaque and shiny fabric layer that we’re going to paint our galaxy on. To protect the tulle layers, gather them up and place them in a plastic bag. Tie the bag nice and tightly to ensure that the tulle doesn’t wiggle free as you work.
Next, cut a piece of cardboard to fit inside of the skirt and line it with aluminum foil. The foil prevents the paint from bleeding through to other parts of the skirt. It will also prevent the skirt from drying and getting stuck to the board. (So you don’t have itchy paper stuck on the inside of your skirt).
Since this skirt will have electronics in it you will not be able to wash it. Simply put, water and electronics just don’t mix! And since you cannot wash the skirt it doesn’t really matter if you use everyday bargain acrylics or more expensive fabric paints. I went with bargain acrylics for $0.50 a color from the craft section at Walmart and it worked well. The colors dried to be nice and vibrant and, again, I don’t need to worry about the paint being wash resistant.
Squeeze out a small amount of each paint onto a disposable surface, like a paper plate, or a reusable paint palette. We used a bright blue, baby blue, sharp violet and pretty dark pink for the colorful aspects of our design, almost the same we used in our out of this world Galaxy Easter eggs Tutorial :) Above you’ll see a dark teal in place of the baby blue in my color palette, and that is simply because as I worked I realized the dark teal wouldn’t show up well enough on a black background of the skirt and swapped the colors out!

How to paint a galaxy.
If you haven’t yet done it decide on the order of the colors as you would like them to appear on your skirt. I’d like to suggest going in order as they would naturally blend from one to the other. I went with blue, lighter blue, purple, pink because if you add blue to pink you’d get purple.
With the color, you decided to use first (we used royal blue) paint a large splotch. This is seriously just a straight-up odd shape. You can totally mimic our design or you can get inspiration from a Google Image search of galaxies.

While still wet, continue adding your colors in the order you have decided on top of one other to create a layered and still totally oddly shaped splotch.
Once you’re happy with your design allow the paint to fully dry. If you’re impatient, a hairdryer will be your best friend with this project! You can see in mine Ithat the bright blue, the first color applied has started to dry and looks much fainter than it did when wet. Once totally dry, feel free to add a second or third layer of paint as necessary for a more saturated, more opaque layer that will stand out better through the layers of tulle. In all, I went over my designs just once more for color that I was very happy with.
If painting more than one design on the skirt (we created 2, one front and one back) create it in the same manner and allow it to fully dry, also.

To finish we’re going to add some dimension to the galaxy and it’s really super simple. Using a sponge-type of paintbrush pounce some gold around your colorful galaxy designs. Also apply some onto the designs themselves, though sparingly.
FYI – I also used black on my skirt initially but wound up going back over those sections with color because you simply couldn’t tell anything was going on in those areas when the tulle was in place over them. Though you see some black in the image above, I’d strongly suggest not using anything but metallic paint for this step.
Now it’s time for the most fun part, the stars! Grab a stiff-bristled brush, an old toothbrush works wonders but a stiff paintbrush works well, too. Load your stiff brush up with white paint and run your finger over the bristles to flick the paint forward. This will make splotches similar to stars and galaxies. You might find you need to water your paint down to get a good spray, but only add a small amount of water at a time. You want your white to be a very strong and opaque layer so that it will show up through the tulle. Once your skirt is fully dry it’s time to bring out the twinkle lights. Yay for twinkle lights, am I right? :)

Now you might not need this little tidbit of advice, but then again you just might… pop some batteries into your lights and make sure that they are operational. Working? Great. Let’s move on.
How to attach lights to a skirt.
The best way to attach lights to your lighted galaxy skirt is by using black sewing thread or embroidery floss. Begin to tack your battery-operated twinkle lights onto the painted layer of your skirt. All you need is a stitch on either side of each light to hold each in place.
A quick note on the lights, these are mini LED lights and they’re really too big but this was my first ever light-up skirt and so I didn’t really know better. I certainly did after sitting around in this guy for a few hours, oops! What you want to get are WIRE style LED lights. The wire lights work better for 2 reasons. First, they are much smaller and you don’t even notice them when you sit on them. Second, they are smaller bulbs and require less power which means fewer batteries weighing down your skirt.

As you tack down your lights you can just go nuts and place them wherever or you can be more mindful and cluster some together to be like constellations. I just went nuts because that is what my cat craft assistant commanded. Well, that and I don’t have TONS of patience :)

As you start to near the end of your lights be sure you have enough slack so that the battery box will reach the elastic waistband of your skirt. Once there, you’ll find a nice loop on the battery pack itself. Using that loop and your thread and needle, attach the battery pack to the waistband. I placed my battery pack on the on top of the opaque black fabric part of the skirt and under the tulle layers. If you really look hard for it you can spot it through the tulle, but overall it’s hardly noticeable.
You can also place the battery pack inside of the skirt but you’ll still need to attach it to the elastic so the weight of it doesn’t pull the skirt down around your knees. Because we want to show off galaxies and not full moons, right? Get it? That was a bare bottom joke :)

Lights on and, oh my gosh, how pretty, right? I have to admit that there is a bit of cat hair in the mix, but what do you expect when you have a cat sitting on your craft for half of the time? :) But no worries, it’s nothing a lint roller can’t handle!
How to wear a lighted galaxy skirt.

For a simple and not totally in your face Halloween costume, this DIY galaxy skirt is JUST the ticket. Paired with a simple black tee and pair of black flats this outfit reminds me of some sort of a galactic ballerina!

This skirt looks totally normal in regular light with the batteries turned off. But one flick of the switch and the battery-operated lights that hide within shining, suddenly there’s an amazing galaxy of color to see! Now that is one heck of a lighted galaxy skirt, amIright?!?

Remember, all you need to do is lift the tulle and push that button on your battery pack. Lights on, the party started!
