This post and photos may contain Amazon or other affiliate links. If you purchase something through any link I may receive a small commission at no extra charge to you.
Here lately I’ve been having a redo on a lot of things in life. And at first, it was kind of a difficult thing because I’m the absolute WORST about change. I hate it, hate it, HATE IT! But having change thrust upon me, I’m finding myself more accepting of change in general and I’m actually actively changing all sorts of things in my life from mild to spicy.
I moved almost 400 miles and I’m currently looking to buy a new home and I think I’ve found the subdivision I want to look in. That’s a spicy change, right there. I have big plans to chop off all of my hair, which is currently just past my shoulders, which is a BIG change we’re going to mark as a medium on the good old salsa comparison of my life. And I’ve decided to make over some of my favorite content because I currently favor more colorful photography and because, well, they were FUN projects to do and I really kind of wanted a reason to craft them up again!
First on my list to makeover was my “GALAXY EASTER EGGS”. These suckers took OFF when I first shared them almost 4 years ago to the day… and by taking off I mean they were featured over at IFLoveScience which was stinking cool… Oh, and they were also on Gizmodo and Laughing Squid to name a couple more. They were socially popular, too, and pinned on Pinterest over 137,000 times and shared on Facebook over 41,000 times. And my original galaxy eggs have inspired some similar but different and totally cool galaxy eggs. AND one year the income off of the eggs sent me on a trip to Puerto Rico where I learned that I LOVE PUERTO RICO. And now totally want to live there someday, like when I retire because apparently nobody wants to fly there to visit me :) Ooh, and I absorb every episode of Caribbean Life shot in Puerto Rico because I want to live there so badly. And that’s pretty freaking cool, too…
But, womp-womp, my space inspired eggs have also been ripped off by lots of other sites and Youtubers. But, you know they say imitation is the biggest sign of flattery, right? My space eggs have been THE most popular thing I have ever, ever made. And to think I almost didn’t share them because I worried they were too dark and too non-Easter-y and maybe even a little bit ugly?
So this past week when I was at the craft store and I saw some JUMBO dyeable plastic eggs just like the smaller ones I used back in the day for my galaxy eggs, I was super freaking excited because I knew that I needed to make some EPIC GALAXY EASTER EGGS. And, if you’re wondering, they’re epic simply because of the size :) Some things are pretty much the same, but some things are totally different.
Also, my eggs this go ’round are also brighter, with more saturated colors and that was totally on purpose, too. Because color has totally become my game, y’all. Like, I LOVE color.
If you dig the old style, no sweat, seriously go check that post out…
But if you’re still hanging around and in the mood to check out the NEW galaxy eggs, let’s get on it already, shall we?
Let’s make some space inspired, totally epic Galaxy Easter Eggs!
Want the short version? Check out our video tutorial!
Need a little more info? Check out the full photo tutorial below!
For this project you will need:
- Dyeable plastic eggs
- Martha Stewart Acrylic Paints (color list below)
- Paintbrush
- Sponges (just hack a regular old kitchen sponge into smaller pieces)
- Stiff brush (a toothbrush works well)
First thing’s first, you’ll need black eggs to make galaxy eggs. They sell chalkboard eggs at Walmart that are already black, but they are the smaller size. I got these gigantic Easter eggs (big as my hand, y’all!) at Michael’s but this is the first year I have ever seen them and they’re only rocking white. But that’s easy enough to fix with a little bit of black paint. I used chalk paint, which is why they’re kind of mat beneath the galaxy design and I think that gives the slightly shinier satin paint I used a little extra “pop”. Depending on your quality of black paint, your eggs will need 2 or 3 coats of black paint, dried between each coat before you can proceed.
Now that we’ve got black eggs as a space base, let’s talk colors. In my first galaxy eggs post, I went with whatever paints I had on hand. Most of them were going to be the cheapest paints I could find, just because I’m cheap. But as I’ve aged and as I’ve crafted a lot over the last SEVEN years as a craft blogger (holy guacamole, right?) I’ve come to be a stickler for quality and a brand loyalist. So, for this round of galaxy eggs I used only Martha Stewart Craft Satin Paints and in these colors:
- Indigo (blue)
- Peacock Feather (teal)
- Pacific Iris (purple)
- Party Streamer (pink)
- Beetle Black
- Wedding Cake (white)
- Yellow Gold
Last time, I used sponge paint brushes but though I’m buying more expensive paints, I’m cheaper when it comes to brushes :) Instead of using up a bunch of sponge brushes, I just hacked up an old kitchen sponge to something fairly similar in size to a makeup sponge applicator thingie. They worked perfectly well and cost me zero dollars and zero cents. Boom!
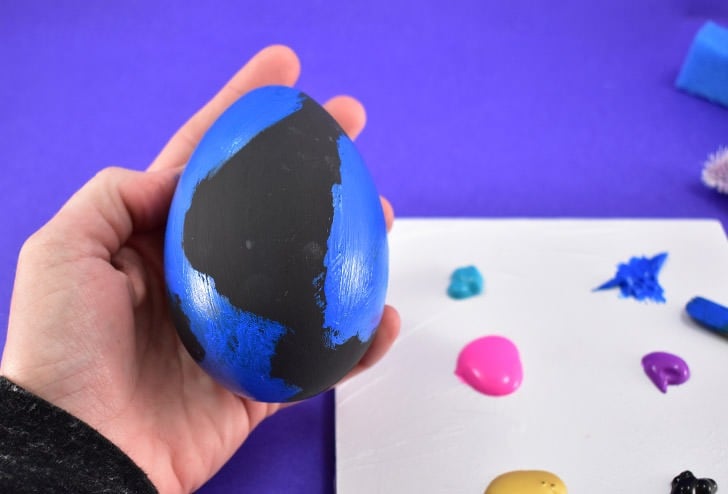
So you’ve got that black egg and all of your paints and sponges ready to go, right? First up you’ll make a base layer of blue paint using a paintbrush. You want this to be a large-ish shape that is super interesting. Feel free to do one big shape and one smaller one nearby, to cover just the top of the egg, to make an “X” shape, really feel free to go nuts with each of your eggs for some super unique designs.
While the blue is STILL WET daub on some teal on top of the blue paint, mostly within the blue shape but sometimes straying beyond the lines. Set this egg aside and allow the blue and teal paint to dry.
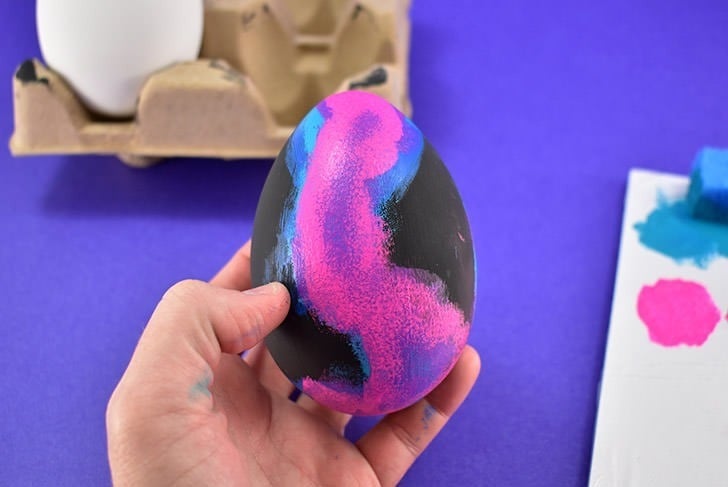
Now sponge on some purple paint again using the previous layers as a guide and allow to dry.
Next, apply some pink. Since this is the most visible of all of the layers, be sure it’s an interesting or eye-catching shape. While the paint is still wet, take a clean area of your sponge and dab to remove some of the paint. This will give some nice dimension and will help the previous colors peek through! Allow your paint to dry.
Now apply daubs of gold paint around your design. This color can be a little more avant-garde… go off the design completely, make shapes over top of the existing shape, do whatever you think looks nice. I’ve become especially fond of lines running through the galaxy design. Allow the gold paint to dry.
Now we’re on to our last sponge application of paint, the black paint. For this layer, you want just the slightest bit of paint on the sponge. So dab that sucker into the paint and then dab, dab, dab, the paint away onto your pallet or onto a piece of scrap paper so that you just get a tiny hint of black with each daub. Now apply small areas of the black paint on top of your current design. This adds something really neat to the design for a little extra pop and helps to bring all of the layers together.
Now in a small bowl put a tiny dollop of paint and a few drops of water. Mix them together well and using a stiff brush, like an old toothbrush, run your thumb across the bristles flicking the paint onto the egg. This is kind of tricky, so I’d really suggest practicing this technique on scrap paper so you don’t get a bunch of crazy runs and drips. You might also find you need to tweak your paint to water ratio for more “dots” than runs that look more like the stars we are shooting for, so practice until you’re happy with the consistency of the paint for best results!
And if you do get the occasional huge blob of paint of drippy run, don’t sweat it… these galaxy eggs are each unique and different and as a whole, they’ll look just lovely together. Trust me, this is my second time making this craft :)
After everything has dried you can arrange them, hide, them do whatever you darn well please with your galaxy Easter eggs!


