
This post and photos may contain Amazon or other affiliate links. If you purchase something through any link I may receive a small commission at no extra charge to you.
Sometimes things just go missing. Does this happen to you, too? One day somebody emailed me because they made some honeycomb cardboard wall pockets many years ago and they wanted to make them again. But they couldn’t find the post on the blog. Well, that’s because the post has freaking disappeared. Where did it go? I have no clue.
Surely I can’t be the only one that has things just disappear. And like kind of frequently? In fact, just the other day I noticed that my new bush I planted in the front hard was gone. Like, I planted it in the flower bed and somebody has made off with it. It is just GONE. What the heck, people? I KNOW I didn’t misplace a planted bush so somebody TOOK THAT BUSINESS.
But the organizer post? Now that’s something I must have done by accident.
And since I’m still getting my office/craft room set up for a good workflow, I realized that these organizers would be super handy. It took a while to remember how I made them but, huzzah! I have. Back when I first made these in 2013 I cut them out by hand and I’ve got directions to make them that way again. But I’ve also made a handy-dandy SVG file so you can make these with a Cricut Maker. Because I LOVE my Maker.
Cutting time for the chipboard is a bit lengthy, running about 8 minutes per piece. But as long as you can stay nearby to make sure nothing goes awry, you can still work on something else as the machine runs. And anything I can multi-task is a win-win for me!

Choosing your decorative paper for this project:

I have this thing where I really want things to be matchy-matchy. By purchasing a 12×12″ scrapbooking paper pad you’ll have several designs to choose from that should all work well together. I am using paper from a Martha Stewart paper pad, which I don’t think they’re making anymore. Visit any craft store and you’ll find lots of these paper pads.
I’m especially fond of the Michael’s “Hot Buy” paper pads you can often get for only $5 apiece, so keep your eyes peeled for that!
Free Printable Files Are Available to Our Newsletter Subscribers
Newsletter subscribers get this and other files at Dream a Little Bigger for free. (Yay!) Not a member? Signing up is easy and costs nothing. Enter your information in the form below below to join our growing community of makers. You’ll get this freebie emailed to you. As a member you’ll also get post updates, tips and tricks, craft & DIY inspiration, and more sent right to your email a few times a week. Questions or download issues?
Chipboard Wall Pockets Printable Pattern
Sign up for our newsletter and you’ll get an email to download your free file.
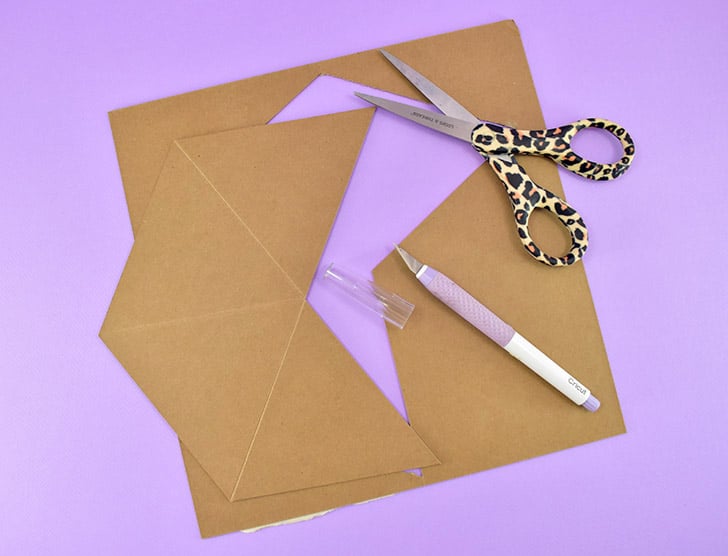
To make your own chipboard wall organizer by hand you will need:
- 1.5 mm Chipboard (2 pieces per wall pocket)
- 12 x 12 Patterned Cardstock
- Craft Knife with a Very Sharp Blade
- Straight Edge
- Cut-Resistant Gloves (optional but recommended)
- Tape
- Adhesive
- Hot Glue Gun
Prepare your pieces to assemble:
Each wall pocket consists of 2 pieces of chipboard and 2 pieces of patterned paper. Print out your PDF and tape together the 4 patterns using the dashed lines to help match them up. Trim out the shape of each piece, trace onto chipboard or decorative paper. Cut each paper piece out using scissors. Chipboard pieces can be cut using a straight edge and craft knife.
To make your own chipboard wall organizer using your Cricut Maker you will need:
- Cricut Maker (Amazon | Cricut)
- StrongGrip Cutting Mat (Amazon | Cricut)
- LightGrip Cutting Mat (Amazon | Cricut)
- 2 x 12″ x 12″ 1.5 mm Chipboard (Amazon | Cricut)
- 12 x 12 Patterned Cardstock
- Brayer
- Craft Knife
- Straight Edge
- Tape
- Adhesive
- Hot Glue Gun
- Cricut Scoring Wheel OR Cricut Pen
- Cricut Knife Blade & Housing
Prepare your pieces to assemble:
Each wall pocket consists of 2 pieces of chipboard and 2 pieces of patterned paper. Your SVG has all 4 files you need to cut for each piece of 1 wall pocket. Upload the SVG file into Cricut Design Space.
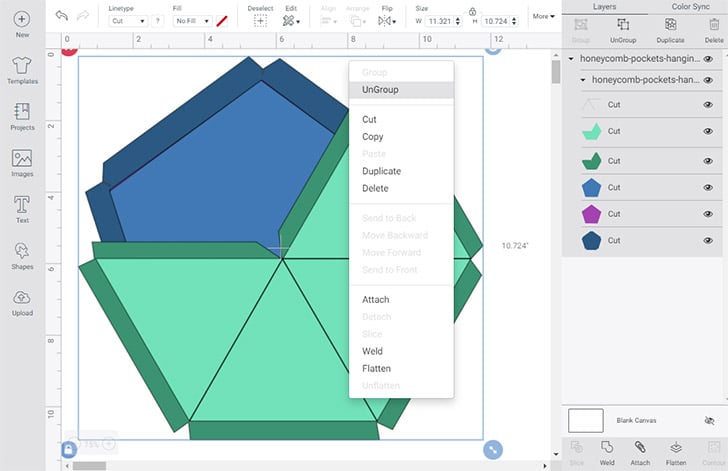
Select the shapes in Design Space and right-click on them. Click “UnGroup”.
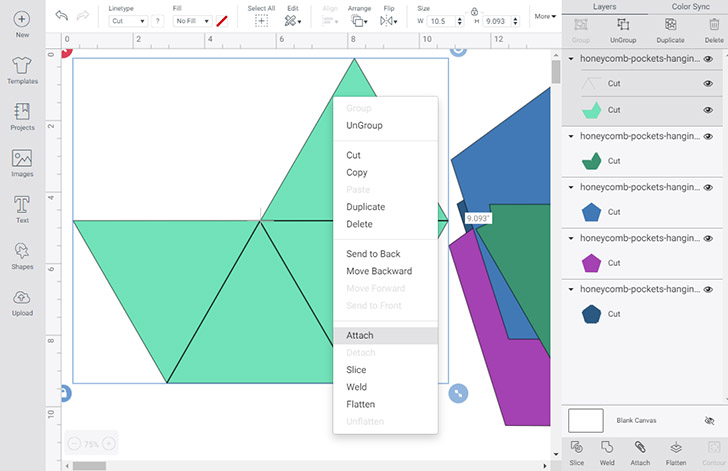
The front piece of each pocket has lines that need to be either scored or drawn onto the chipboard. Select the light green shape with the lines on top of it and isolate it from the other shapes. Right click and select “Attach”.

The right panel in Design Space shows your layers. Select just the layer containing 3 lines on top. In the “Linetype” drop down at the top of design space select “Score” if you have a scoring wheel or “Draw” if you have Cricut pens.
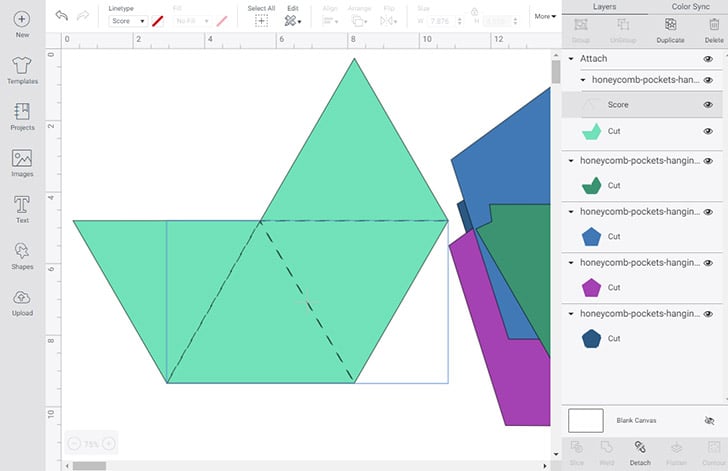
Place either your Cricut Pen or Scoring Wheel into your Maker’s tool holder and follow along to cut out each piece.
Paper or Cardstock goes on a LightGrip mat. Use the appropriate setting for your thickness/type of decorative paper.

Chipboard goes on a StrongGrip Mat. Use masking tape on all 4 sides to hold the board firmly in place. If you have a brayer, it will help keep the material well secured to the mat as it cuts. Cut Settings: for 1.5mm Chipboard use the “Damask Chipboard” setting.
Always keep an eye on your Maker as it cuts to ensure no damage is done to your machine.
Sometimes the cut might not go all of the way through the chipboard in some areas. Use a sharp craft knife to finish the cut. Pop the piece out of the chipboard.
Covering Your Wall Pockets with Decorative Paper

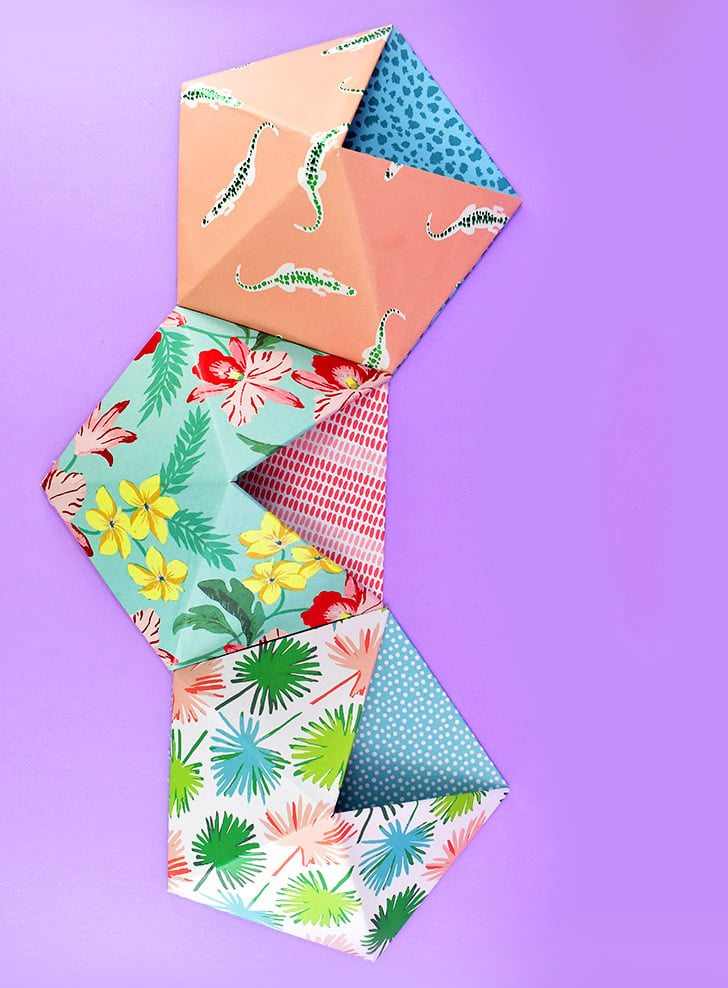
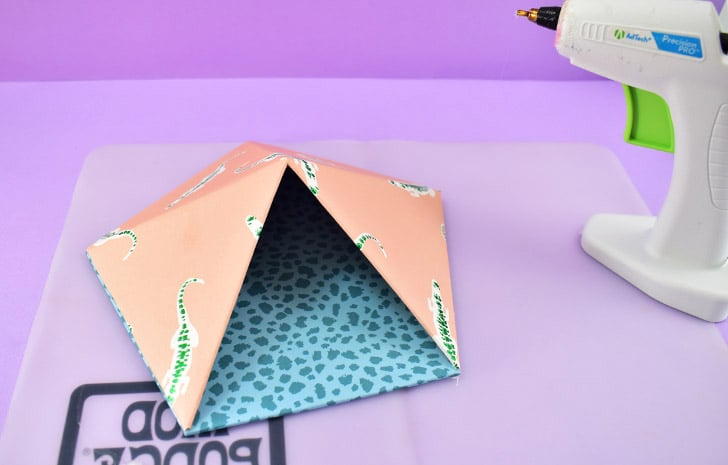
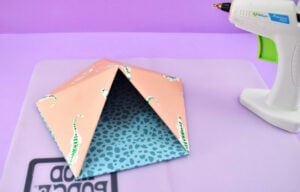
Using a sharp craft knife and straight edge, score the top piece of chipboard according to the dashed lines on the pattern, or the drawn or scored lines made by the Cricut. This isn’t a deep cut. Make light cuts until each section can be bent to form a 3d shape as seen above. Place on top of the pentagon and finagle as needed so the sides match up.
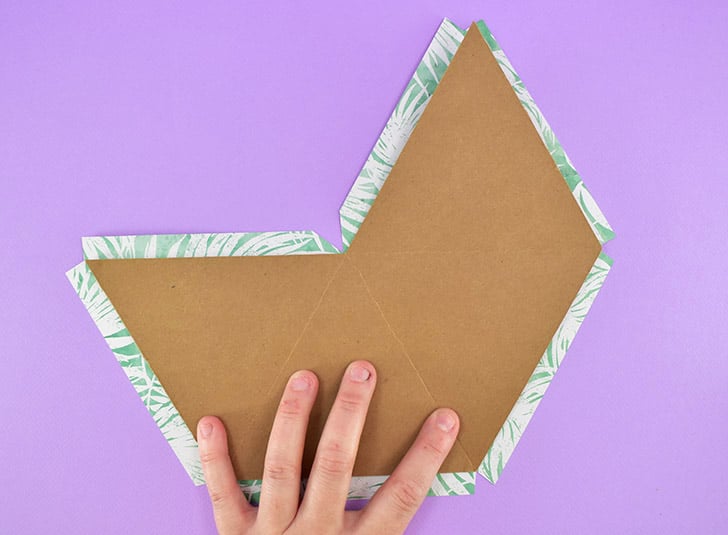
Flatten your top chipboard piece back out and lay on the backside of your printed paper. Be sure to match the corners of the paper well to ensure the entire chipboard piece is covered by the design.

Working one section at a time, apply adhesive and allow it a moment to become tacky.

Fold the piece into its 3d form and place the glued section to the patterned paper. Before the glue sets, be sure that the piece has been well placed and the full front will be covered by the paper.
Fold the scored sides of the piece you just glued down and apply pressure along it. Fold until the chipboard meets itself.

Continue gluing the decorative paper to each section, folding and creasing as you go, making sure the piece retains its 3d shape.

Wrap the extra paper over the edge onto the back of the chipboard. Glue down and/or use tape to secure in place.
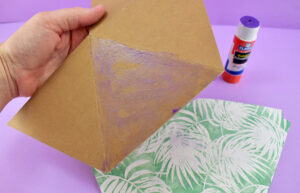
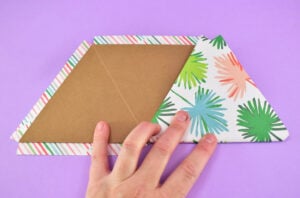
Glue the decorative paper to your flat pentagon piece, wrapping the edges over to the back, securing with glue and/or tape.
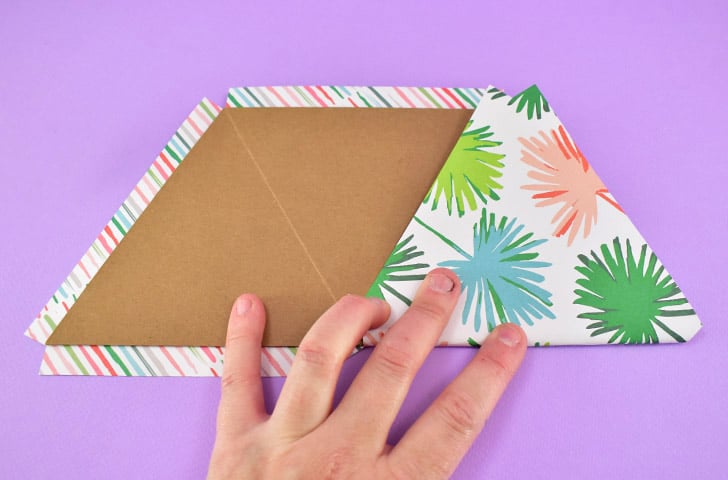
Assembling Your Chipboard Wall Pockets

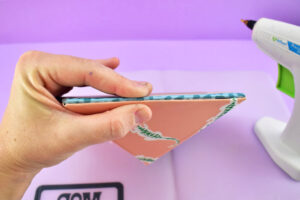
Apply a line of hot glue to one side of the pentagon flat piece. Place the 3d top piece in place and hold until the glue fully cools and sets.
Repeat for the remaining 3 connected sides. Once fully attached, use hot glue like caulk around the edge to make sure the 2 pieces are completely glued together.
*Note – this part is kind of a bear but after your first pocket the others will be much easier. If you find that it is difficult to glue the 2 pieces and get a nice clean finish skip applying the decorative paper to the top chipboard piece. You can then hand cut a piece to fit and wrap it around the glued sides securing it to the back of the piece. This will hide your glued edges.
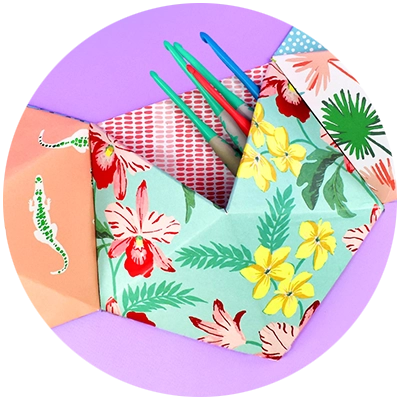
Hanging your Honeycomb Pockets

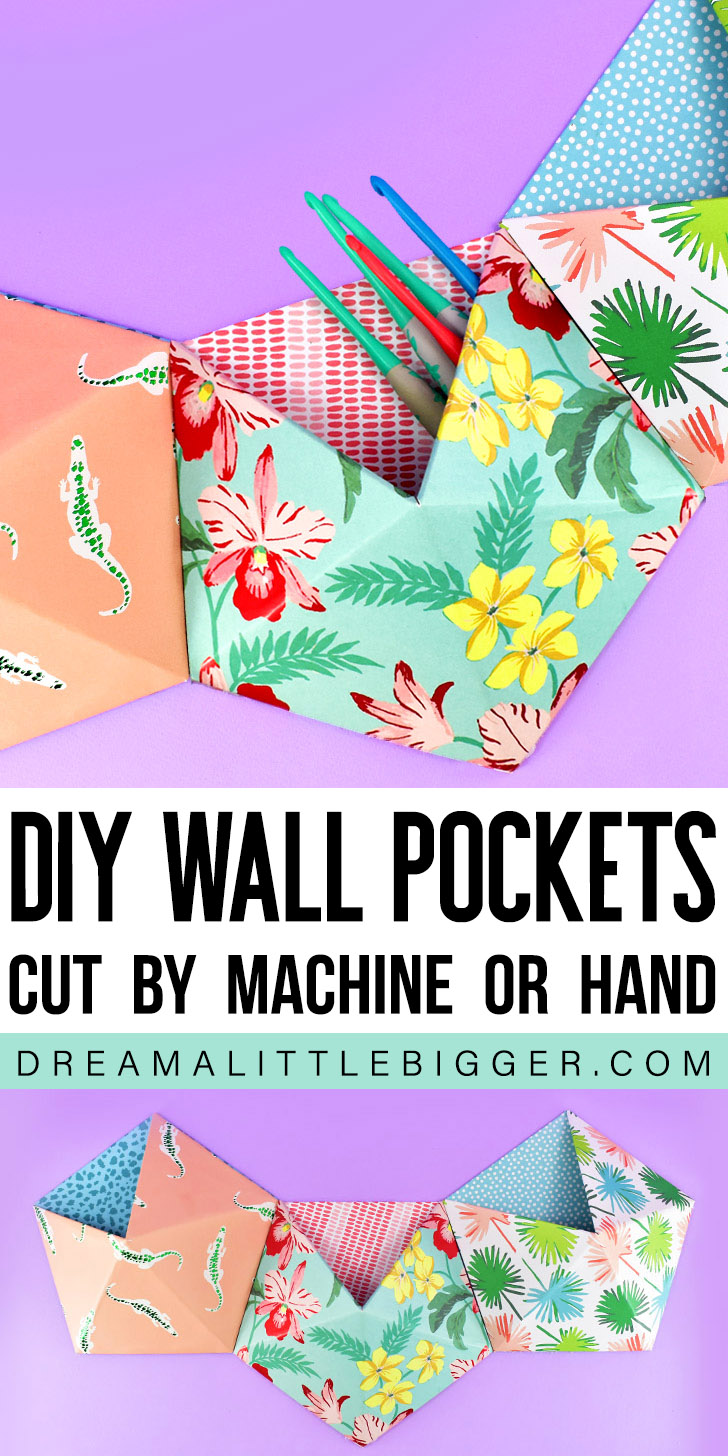
Because of their shape, I think these pentagon shaped wall pockets look best in sets of 3. You can stack them vertically or horizontally, whichever your space will allow.
Mounting Tabs by Loctite work well if you don’t want to damage your walls. If that’s not an issue, you can always hammer through the back of the pocket into the wall.
Honeycomb Chipboard Wall Organizers

Equipment
Ingredients
Instructions
- Chipboard goes on a StrongGrip Mat and Paper or Cardstock on a LightGrip mat. Cut Settings: for 1.5mm Chipboard use the "Damask Chipboard" setting. Use the appropriate setting for your thickness/type of decorative paper. Always keep an eye on your Maker as it cuts to ensure no damage is done to your machine.

- Using a sharp craft knife and straight edge, score the top piece of chipboard according to the dashed lines on the pattern, or the drawn or scored lines made by the Cricut.

- Flatten your top chipboard piece back out and lay on the backside of your printed paper.

- Working one section at a time, apply adhesive and allow it a moment to become tacky.

- Fold the piece into its 3d form and place the glued section to the patterned paper. Before the glue sets, be sure that the piece has been well placed and the full front will be covered by the paper.

- Fold the scored sides of the piece you just glued down and apply pressure along it. Fold until the chipboard meets itself.

- Continue gluing the decorative paper to each section, folding and creasing as you go, making sure the piece retains its 3d shape.
- Wrap the extra paper over the edge onto the back of the chipboard. Glue down and/or use tape to secure in place.

- Apply a line of hot glue to one side of the pentagon flat piece. Place the 3d top piece in place and hold until the glue fully cools and sets.

- Repeat for the 3 other connected sides. Once fully attached, use hot glue like caulk around the edge to make sure the 2 pieces are completely glued together.


These are sooo cute!!! They remind me of origami.
And yep, all of time I’m misplacing my pens, paper clips and other mini stationary supplies, so these would be ideal.
And whaaat?!?! Who would steal a bush from you???
They must have really wanted it to go through the trouble of uprooting the whole thing like that. What is wrong with people?…
I love these pockets! The colors will brighten up any space!
Thanks so much!