
This post and photos may contain Amazon or other affiliate links. If you purchase something through any link I may receive a small commission at no extra charge to you.
Oh my goodness, guys, it really feels like fall here today. With enough of a chill in the air that I have a sweatshirt on and with the leaves falling and ruining my shots while I was shooting pics outside, I could hardly feel more Autumnal. And I’m so freaking pleased.
I truly missed the chill in the air, the cool crisp smell the air takes on and the spicy, seasonal scents that fill homes and businesses. Though the colors here in Houston aren’t exactly amazing, I do spy the occasionally pretty fallen leaf.

I’ve been crocheting like the dickens preparing to keep my ears and neck warm when the temperatures dip even further. With each movement of my hook, I find myself more and more pleased. At this point, I’ve already designed 3 crochet beanie patterns I’m super excited to share here. And by the looks of it, I have no intention of stopping until I have a hat in just about every color imaginable. Ah, the cool weather, I LOVE IT!
Hunkered down on my mom’s front porch snapping photos of my DIY cement pumpkin planters was a great thing today. It wasn’t so chilly, yet that I had to don the long sleeves, but I could feel the cold front starting to come in.

And as the temperature shifted I also shifted these gargantuan planters around on the porch to get my favorite pictures. Again, it was a beautiful day for so many reasons :)
Inspired by a Project from the Past.
It’s kind of exciting because this idea of real cast jack-o-lantern planters has been with me for years. In fact, I even faked some terra cotta pumpkins with a little bit of paint back when this was a baby blog in 2013. I was super pleased with my creation back in the day and I’m still pretty proud of how well they turned out.
But now, 6 years later, my budget for crafting supplies for projects is a bit better. And so I decided it was high time I made some real, life jack-o-lantern cement pumpkins. In the end, the cost wasn’t so great. Each small pumpkin pail runs a cool dollar. The larger is only $6 at Target and $7 for one that is slightly smaller (but still massive) at Walmart. Raid the pantry and craft stash, add a little bit of cement and water and this project really isn’t a budget-buster, after all.
In fact, though to this day I still am unsure of where I could find planters such as these to purchase, I guarantee you there’s no way I could get a large one as I made for under $30 that I paid for supplies (with enough cement left over to make an additional whopping SIX smaller planters). Ready to get to casting?
Supplies needed for DIY Cement Jack-O-Lanterns:
- Rapid Set Cement All
- Plastic Pumpkin Trick or Treat Pails
- Metal Snips
- Gloves
- Plastic Paint Tubs
- Cooking Spray (like Pam)
- Black Paint & a Small, Stiff Paint Brush

To begin, remove the handles from your pumpkin pail using metal snips.

Cut along the seams on either side to open the pumpkin pail up. Next cut along one or two of the vertical segments on the BACK to open it further. Leave the front with the face intact.

Piece the pail back together using duct tape. First, apply the tape vertically along the cut seams. Attempt to match these up as they were with as little overlap of the plastic pieces as possible.

Apply tape around the pumpkin horizontally to hold everything tightly together. This will keep the cement from pushing out and oozing out of the mold.

Spray the inside lightly with cooking spray. FYI, I also tried petroleum jelly. Do NOT try petroleum jelly. What a nightmare. It makes the plastic way too slippery and the cement just continuously slips down into the lowest part of the mold.
How to work safely with cement.

The cement I am recommending you work with is Rapid Set Cement All. It starts to harden in only 15 minutes so you must work quickly. Working quickly sometimes means making little mistakes so it’s a good idea to get yourself well prepared before continuing. It’s a great idea to have 3 buckets, 1 to hold dry cement, another to hold cold water and a large one to mix your cement in. This way you have everything you need right at your fingertips without having to run around finding things.
Cement can be dangerous stuff and so you need to craft responsibly with it. Never breathe in cement or concrete powder, in fact, a protective mask is a good idea. Always wear gloves and never handle wet cement or concrete with bare hands because it can cause terrible chemical burns. Also, take care to check that it doesn’t linger in folds of clothing, etc. where it can accidentally stick around.

To protect yourself from chemical burns, I suggest wearing gloves that fit. My gloves were far too large and keeping them up with the weight of wet cement was a darn disaster.
Cement is also exothermic, meaning that after being mixed with water after it begins to set, it puts off a surprising amount of heat. If you need to move your project while the cement is still fresh, do so carefully. It’s not a bad idea to wrap a tea towel around the mold to transfer it to help keep the heat from your hands.

Working with cement is also generally a very messy business. Be sure to cover worktops, if necessary.
Safety talk done, this really is a fun project and you really shouldn’t be afraid to craft with cement when you prepare yourself well.
How to prepare your cement.
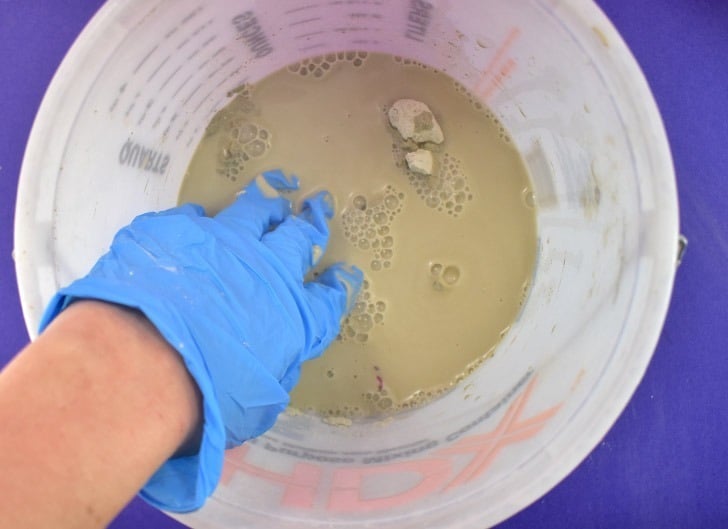
Place dry cement powder in a plastic pail. A little water goes a long way, so add it in small splashes and mix thoroughly with gloved hands. Add more water as necessary and take care to mash out any chunks or lumps.

This is an example of a good cement consistency for casting. It’s thick, like a milkshake. When dipping your gloved hand inside it easily coats the glove but slowly drips in a thick stream. Once you have reached this texture allow the cement to sit for 3-4 minutes and begin setting up. Remember, cement is exothermic and will begin getting hot after the water is added, so take care.
Mix your cement in small batches using approximately 3-4 cups of cement powder.
How to cast your cement pumpkin.

To start your cement pumpkin, pour the liquid cement into your form with it resting on its face. As the cement further sets push it up and around the sides and bottom of the pumpkin pail. Be sure to wear gloves when handling the wet cement. Roll the pumpkin on its side smoothing the cement up the sides and down into the bottom of the pumpkin. You’re shooting for a fairly even thickness around the entire pumpkin. Don’t worry if you don’t have enough the first time around, we’re going to apply several coats for optimal results.

Once you’re happy with your first spread coat of cement, press your finger into the center, the bottom of the pot to create a drainage hole. This will prevent your plants from getting root rot from sitting in too much moisture after being watered.
Wipe away any excess cement on the top/lip of the mold. Set your cement pumpkin off to the side and allow it 20-30 minutes to fully set.

You’ll notice that as your cement sets and cools it might crack a bit. I’ve only had these occur on the inside of my pots, never the outside where the surface stays nice and smooth. Don’t worry about these cracks because even if they are visible I don’t think it will be terribly noticeable.
Mix up another small batch of cement, this time using only 1.5-2 cups and allowing it to be slightly thinner than your first batch. Pour it into the pumpkin and swirl the liquid cement to fill all of the cracks and thicken the cement walls. Allow the cement to begin setting up and then remove any that is in your drainage hole using gloved hands.
Continue this for several layers or until your pumpkin feels comfortably thick all around.
How to unmold your cement pumpkin.

Remove the tape holding the pumpkin form together and discard the trash.

If necessary, you might find a pair of needlenose pliers helpful in prying the form away from the cement. Each pumpkin pail is good for only a single-use, so don’t worry about damaging it. Do whatever you need to (including cutting the mold) to remove it.
Also, you might notice the cracks along the top of the cement pumpkin. This isn’t from the cracks you saw appearing on the inside while the cement was hardening. This is actually from where it was picked up on after the first application by the lip from the inside. Take care while the cement is setting because you can crack that business all up if you’re not careful. With additional applications of thinner cement after the initial first pour, the cracks are visible but not weak.

Pull the face of the pumpkin pail away from the cement pumpkin very last.
Give your pumpkin some pop.
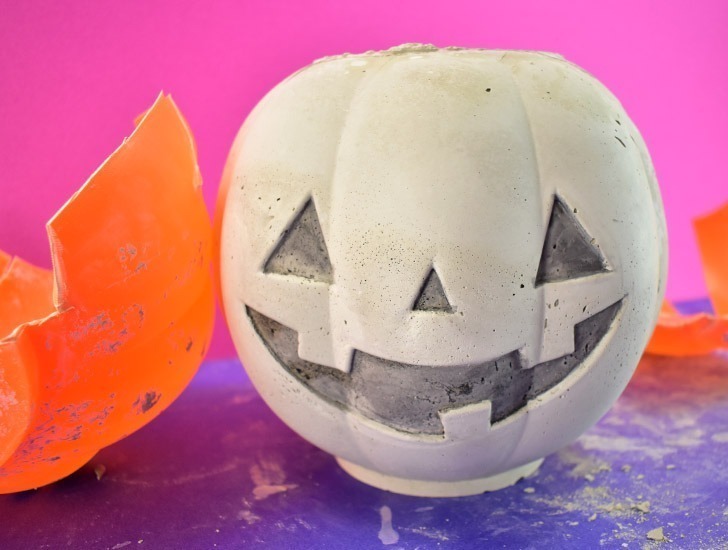
Thin down black paint with a considerable amount of water. Apply to the inset eyes, nose and mouth to help them pop.
Doesn’t that make all of the difference in the world?

Apply several watered-down coats until the face is as visible and you would like for it to be. And if you get a little bit outside the lines, just wipe it away as quick as you can, but don’t sweat it. From a distance, you can’t tell the difference.
Decorate with your DIY planters!

I like a lot of really bright colors in my decor but these pumpkin planters actually belong to my Mom. According to my dad, I need to quit giving her the things I make because they’re running out of room :) And according to my Mom I need to ignore my dad and give her all the DIYs :) Setting these guys up I took more of my mom’s more traditional style into account rather than my own very colorful style…

Now isn’t that just darling? These DIY concrete jack-o-lanterns make an adorable scene. Pop some hay bales out and DIY up your fake pumpkins to look less, well, fake and you’ve got yourself an amazing display. Want to paint your pumpkins to look real-ish? There’s a tutorial for that!
Ultimately she wanted them onto the porch and so I plonked them down on the porch along with the faux painted pumpkins that are also now hers. Seriously, guys, if it hasn’t been made specifically in my size, or something, it totally belongs to my mom right now :)
But no worries, I totally have the pumpkin pails to make a set of my own and I practiced on hers! :)

