
This post and photos may contain Amazon or other affiliate links. If you purchase something through any link I may receive a small commission at no extra charge to you.
Last week I was working on a project where I had tons of little bitty things that I needed to leave out to dry. While I was in another room Liddy came up and sat on my lap. I felt something was wrong when I was absentmindedly petting her. My little bits and pieces were stuck all in her hair. My guess is she laid down on them just like she’s laying down on this project in process in the pic above.
It made me realize that I either needed to find a better solution to my crafty drying needs or I need to get rid of my cats. Well, I went to the hardware store the very next day!

The best thing about this project is that it is totally scalable. I made mine have two levels. While I figured 99% of the time I’d only need one, it would be nice to have double the space should I be working on a big project. Another great thing is it’s small and collapsible so you can store it behind a bookshelf, in between the wall and your computer tower, wherever, really. Last of all, when you need to use it you don’t have to build anything. You hang it up and either connect the other levels or don’t. Shazam!
For this project you will need:
- furring strips (got mine for $0.88 each at Home Depot) – 56 inches per level
- saw and mitre box
- long nails & a hammer
- wood glue
- window screen material, lace or another type of mesh
- dog tie out chain (sold in pet section)
- heavy duty wire cutters and strong pliers
- smallish eye hooks (see tutorial for details on quantity)

First you’ll need to cut all of the pieces for each frame down to size. I made the length pieces 18 inches and the shorter width pieces 10 inches. You’ll need two of each for each level.

If you start cutting inside of the mitre box and after you get a good cut use the top of the box as support you’ll cut through much more quickly. I set my mitre box onto a piece of wood because I like to cut things while sitting on the floor. Check out these tool tips for the details and some other helpful ideas.

And measure your first piece and then use it to make your cutting marks for the other pieces to ensure that they are all very, very similar.

After you get your pieces cut, arrange and nail together. Use a bit of wood glue to strengthen the bond.

Next cut your window screen, lace or other mesh (I’m using window screen) and cut a piece a bit bigger than the opening of the frame. Use your staple gun to attach, tacking down frequently.
Oh, and the pic above is totally faked. I did all of this without taking a single picture, so I set this up later and apparently didn’t even pay attention to the direction of the staples. Sorry :)

For your top rack you’ll need to screw an eye hook into each corner. For each level that will have level hanging beneath it, you’ll also need to add 4 hooks to the corners on the underside.
Your very last level will only need the 4 on top since nothing will be attaching to the underside.
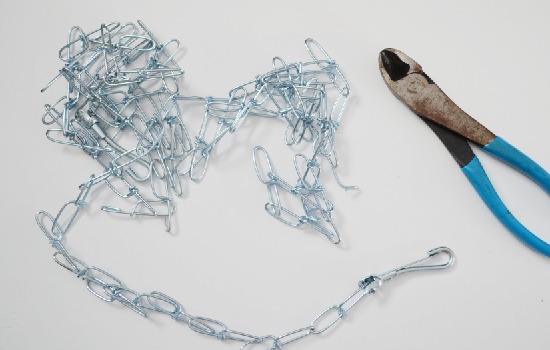
Take your dog chain and cut 4 lengths about 18 inches long. Cut 4 lengths of chain about 6 inches for each layer to connect to one above it. Count out chains so that each is exactly the same length as the other.
When you cut the chain, both ends will be left shaped like a hook, FYI.

These will be on both ends of your chain. The hook on part will be what connects to a hook in the ceiling. Make the length of this chain as long as necessary for you to comfortably access it. I made mine only two links long because mine will be hanging in the threshold where my closet doors used to be in my office.

Take your longer lengths and hook them to the last length as seen above. Use your pliers to close the chains tightly on.

Connect the chains to the eye hooks in the top of the frame and close off with pliers.

And, voila! This level is done. If you’re not making any others you’re finished up!
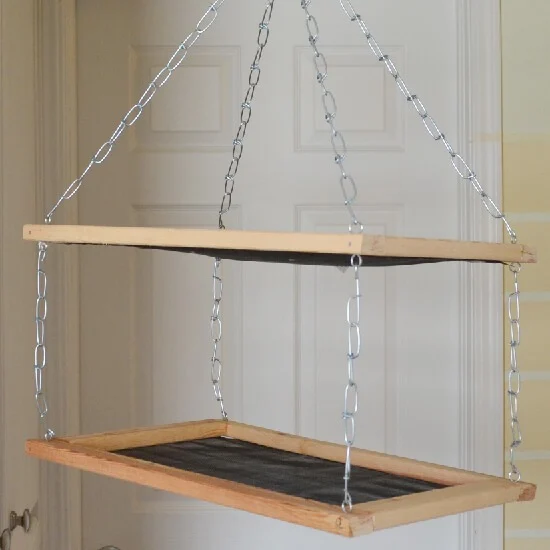
If you will have other levels, take your remaining cut lengths and attach them to the hooks on the top side of the frames and close shut.
When you are ready to use, hang up and attach as many lower levels as needed.

Toss your goodies that need to dry on and you’re all set!
Total cost for this project was about $2 for wood, $2 for eye hooks, $3.50 for chain and the screen was free (if I couldn’t dig some out of the garage I was going to use an old and mostly ruined lace table cloth) making the running total about $7.50. The fact that I won’t go to the effort to create things that get ruined in the drying process is well worth that.
Total time spent was approximately 25 minutes for both levels.
So what do you think? Will you be building your own drying rack? I’ve already used mine many, many times! Happy Friday.