
This post and photos may contain Amazon or other affiliate links. If you purchase something through any link I may receive a small commission at no extra charge to you.
This is the very first year I get to do up my Christmas decorations with only my own personal tastes in mind. Every other Christmas in my entire life I’ve always shared a home with someone else. And it’s only right to consider their feelings when putting up decorations be they seasonal or constant. But just because it was right, it didn’t necessarily sit right with me, if you know what I mean :)
It does stink coming up with a neat idea for Christmas and explaining it to the other party or parties to only have them reject it. “You can’t use blue ornaments. Blue make me feel down.” <– really happened. So this year I decided I will go ALL OUT with anything and everything Christmas décor-wise that strikes my fancy. In all honesty, it’s pretty darn awesome :)
While in the past I’ve been all about color, color, color, I’m finding that as I get older my tastes are settling down a little bit. I changed out my bright and colorful living room rug in favor of a gray and cream jobbie and my aesthetic would be more natural or boho right now.
So I decided to make a tree that would perfectly match the sort of Bohemian aesthetic that my living room has naturally gravitated to… I made up my very own DIY glam boho Christmas tree. And, spoiler alert, I LOVE IT. It’s freaking awesome with BLUE flowers and boho Christmas ornaments + tacky fantastic leopard poinsettias that I am so into! The design and colors work SO WELL with our free printable santa art so be sure to check that out and download it, too!

A Few DIY Ornaments to Fill Out Your Boho Tree.
Though I have literally a whole list of ornaments I eventually want to make for this Christmas tree, this year I tackled 4. I’ll show you how to easily add clips to lightweight feathers to make a gorgeous tree topper that stays put. Turn faux fur into fuzzy bobbles that add a little gorgeous texture to your tree. Inexpensive shatterproof ornaments get a makeover with a little bit of paint and a secret ingredient to make them look truly like terra cotta (without the weight of actual clay!) And last, but not least, turn brass rings into macramé ornaments with the simple lark’s head knot.
Also, in case you’re wondering where some of my store bought ornaments are from, here’s a list…
Leopard spotted poinsettia clips, blue peony flowers, furry deer, corrugated cardboard deer, large red gooseberries, champagne tinsel wreath, twine globe ornaments, natural tree collar – Walmart. Blue magnolias, red globes, red glitter globes, blue glitter globes, burgundy berry picks – Hobby Lobby. Navy matte globes and Christmas tree – At Home. Fat cat and cute dog, NFS.
How to Make Lightweight Faux Terra Cotta Boho Christmas Ornaments:

Supplies Needed to Make Your Own Faux Terra Cotta Ornaments:
- Matte Globe Ornaments (mine are shatterproof)
- Terra Cotta Color Paint (See Color Suggestions Below)
- Baking Soda
The terra cotta shades I got from the craft store feeling that they never quite hit the mark. And so I decided to order Behr paint samples for around $4 apiece. The terra cotta paint colors that I used for this project include Balcony Sunset (lighter shade) and Rusty Gate (darker). I also purchased the much darker Kalahari Sunset which is a fabulous terra cotta paint color, just too dark for this project.
To get the distinctive terra cotta texture in addition to the color, we’re going to add baking soda to the paint. Don’t get baking soda (what you do want) and baking powder (what you don’t want) confused. I think that the most popular baking soda brand is Arm & Hammer and is found in the baking aisle at the grocery store. Baking soda is also found in the baking aisle but it’s a finer powder meaning you have to paint and paint and paint to get good texture. It’s just not worth the effort.
Tools Needed:
- Smooth Bristled Paint Brush
- Thin Wood Dowels
- Chunk of Styrofoam
The easiest way to paint multiple terra cotta ornaments at a time is to utilize a drying system made of thin wood dowels and Styrofoam. You can purchase dowels in a package of a dozen, or so, in the craft section of stores or the baking section (used to create supports in multi-layer cakes).
If you craft a lot you can purchase a brick of Styrofoam to hold things up as they dry. If you don’t, however, keep your eyes peeled for a decent chunk out from packaging you’re throwing away.
Directions:

Place approximately 1-2 tablespoons of terra cotta colored paint in a small dish or paint palette bowl. Add 1 teaspoon of baking soda and mix together. It’s not necessary to completely incorporate the 2. Just give it a few quick swishes around with the brush.

Remove the cap from a globe ornament and brush the paint on around the top. Paint vertical stripes from the top toward the middle of the ornament. Place a dowel inside of the ornament and paint the bottom. Shove the dowel into a chunk of Styrofoam to dry.
Allow the paint to dry completely and apply 1-2 coats, or as necessary.

Once dry reattach the ornament cap and add a string or hanger.
How to DIY Macramé Brass Rings:

These macramé brass rings really stand out on my tree and I’m so pleased with how easy they were to make. I opted to keep the majority of the brass ring visible, but you can also tie cords all around the ring if you prefer.
Supplies Needed to Make These Fringed Bohemian Ornaments:
- Brass Rings (Mine are 3″)
- Macrame Cord
Tools Needed:
- Sharp Scissors
- Ruler
The easiest way to paint multiple terra cotta ornaments at a time is to utilize a drying system made of thin wood dowels and Styrofoam. You can purchase dowels in a package of a dozen, or so, in the craft section of stores or the baking section (used to create supports in multi-layer cakes).
Directions:
Cut 8x 4-inch long pieces of macramé cord per 3″ brass ring ornament. Tie each piece of cord onto the ring with a lark’s head knot.

Fold the cord in half and place the looped end inside under the hoop.
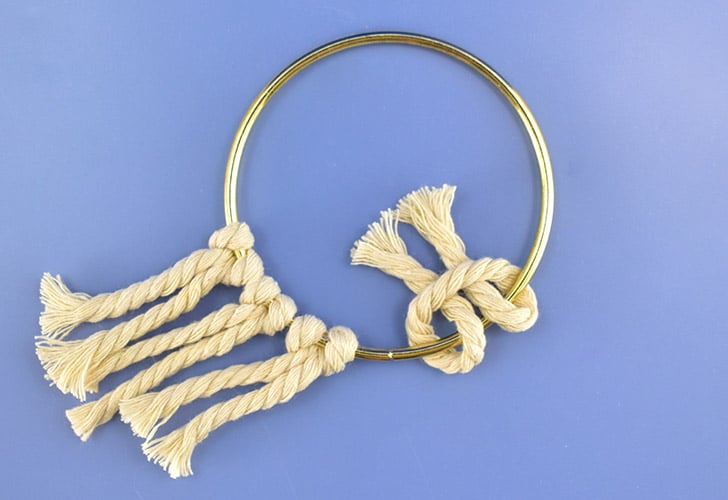
Pull the 2 legs of the cord over the brass hoop and through the curve of the cord.

Pull both legs of the cord down one at a time to tighten the knot onto the ring.

Once all pieces of macramé cord are secured, trim the cords however you please.

I opted to cut the ends of my cords about a 1 to 1.5″ from the ring. You can also cut so to form a sharp point in the middle of the cords.
Fray out the cords if you desire and toss on the tree, no ornament hanger required!
How to Make a Feathered Tree Topper:

Supplies Needed:
- Ostrich Feathers
- Steel Alligator Clips
- Christmas Floral Stems
My Christmas floral stems are burgundy berries I got from Hobby Lobby for a dollar apiece. I used 8 total.
Tools Needed:
Directions:

Slide the end of the feather into a steel alligator clip.

Use a pair of needle-nose pliers to clamp the clip shut and hold the feather firmly in place.
Open the clip and place sporadically around the top of the Christmas tree. Make sure to add feathers to the back of the tree even if it’s up against a wall. This will give the topper fullness when viewed from all angles. Fill in the empty spots, both front and back of the tree, with inexpensive Christmas Floral Stems. I’ve used 10 dark burgundy berry stems that cost me $1 each at Hobby Lobby.grjo
How to Make Faux Fur Pompom Bohemian Ornaments:
Supplies Needed to Make These:
- Faux Fur
- Ribbon (for Hangers)
- Extra Strong Upholstery Thread
- Poly-fil
I recently reupholstered a bench and had scrap faux fur I used for this project. I’m using the Snow Leopard patterned faux fur from Hobby Lobby, purchased by the yard. I’d also strongly suggest looking through the clearance cuts of fabric (cut incorrectly for customer or just a small amount left on the bolt) – you can sometimes get crazy deals on expensive fabrics and you don’t need much at all to make your own faux fur boho Christmas ornaments.
For this little craft you really need very strong thread. Anything weak is going to snap when you try to cinch up your pompom. I find the only thread that works every time is extra strong upholstery thread.
Tools Needed:
Technically it’s best to cut faux fur with a razorblade and while you can cut circles with a sharp little blade, I find it easier to just use scissors and do my darndest to only trim the fabric backing and not the fur on the front side. Use whichever method you feel is the safest for yourself. Also, check out these awesome cut resistant gloves if you do decide to go with the sharp razorblade.
Directions:

Using a ballpoint pen, race 4-5″ circles onto the backside of faux fur. Use whatever you have on hand… I’m using a cat food bowl.

Carefully trim the circle of fur out using either scissors or a razor blade. Thread a sharp needle with 24″ of upholstery thread. Double the thread and knot 3-4″ from where the 2 ends meet.

Make small stitches all around the circle of faux fur.

Once you go around the entire circle with stitches and come back to your first, cut a piece of ribbon 3-4″ long. Loop the ribbon so both ends meet up and run your needle and upholstery thread through where the ends touch.

Grab both ends of the upholstery thread and pull tightly to begin cinching up the pom. Leave a small opening and stuff with Poly-fil.

Pull both ends of the upholstery thread as tight as you can to completely cinch up the pompom. Run the needle and thread through gathered fur to secure closed. You’ll want to make 5-6 stitches, making sure a few of those go through the ribbon hanger to help secure it.
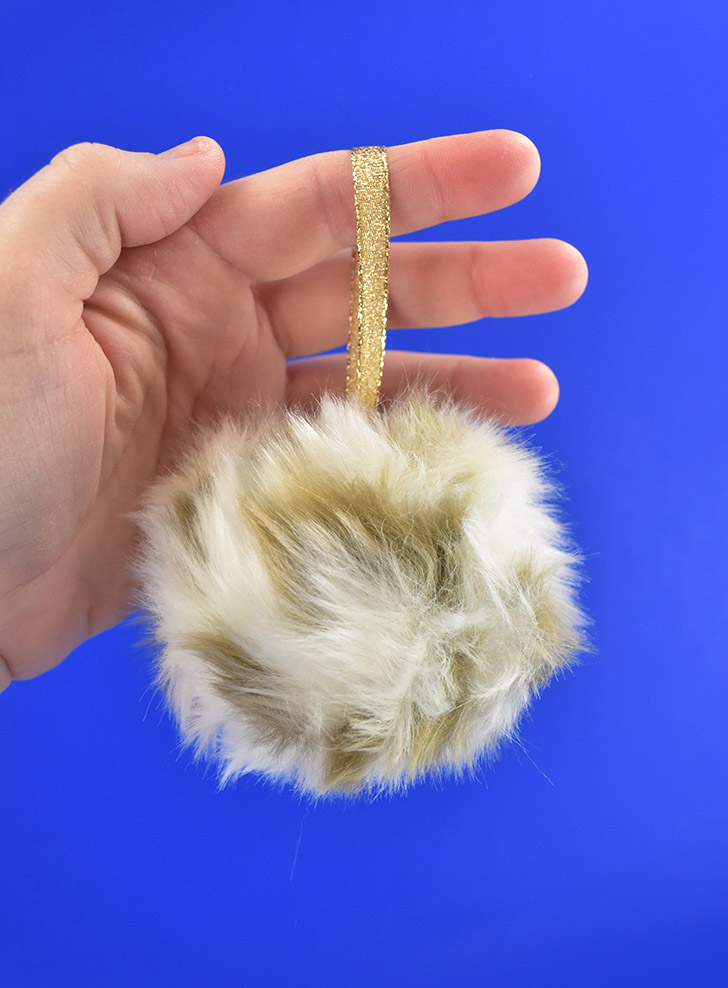
Tie off your thread and trim the tails. This boho Christmas ornament is done (and quite adorable, if I say so myself).
Whether you use a few of our DIY boho Christmas ornaments or them all, you’re sure to have the prettiest Bohemian tree around!
