
This post and photos may contain Amazon or other affiliate links. If you purchase something through any link I may receive a small commission at no extra charge to you.
Last year when I was shopping with my mom for Christmas ornaments I realized just how much I love finial ornaments. You know those delicate, long drop-like glass ornaments? They’re just so gorgeous and sophisticated. With tile floors and pets glass ornaments and my Christmas trees just don’t mix.
I did eventually stumble upon some shatterproof finial ornaments to adorn my tree but I had spent so much time thinking about them that I knew I had to come up with some sort of fun finial DIY. Also really loving these giant Christmas ornaments I made in the past, I decided to bring 2 of my favorite Christmas things together…
Giant Finial Ornaments FTW!
You might be wondering why if I made these ornaments in 2021 am I just now sharing them in 2022? Good question!
Last year when I made my ornaments I painted them each a different solid color. I used spray paint so it would be quick but my color options were limited. So when I was photographing them I HATED the colors. Then I repainted them with chalk paint and went over that with a glossy polyurethane. Meh. So then I decided to take them apart, mix the colors up so that each ornament was multi-colored. And while that looked cool in real life they were dreadful looking in the photos. Poor unphotogenic giant Christmas ornaments :)
By the time I had taken these things down twice and put them back up 3 times I was DONE. The last time I took them down they were unceremoniously hung in the garage. And I’ve got to tell you it was a few months of pulling my car in before I stopped getting irritated just at the sight of them :)
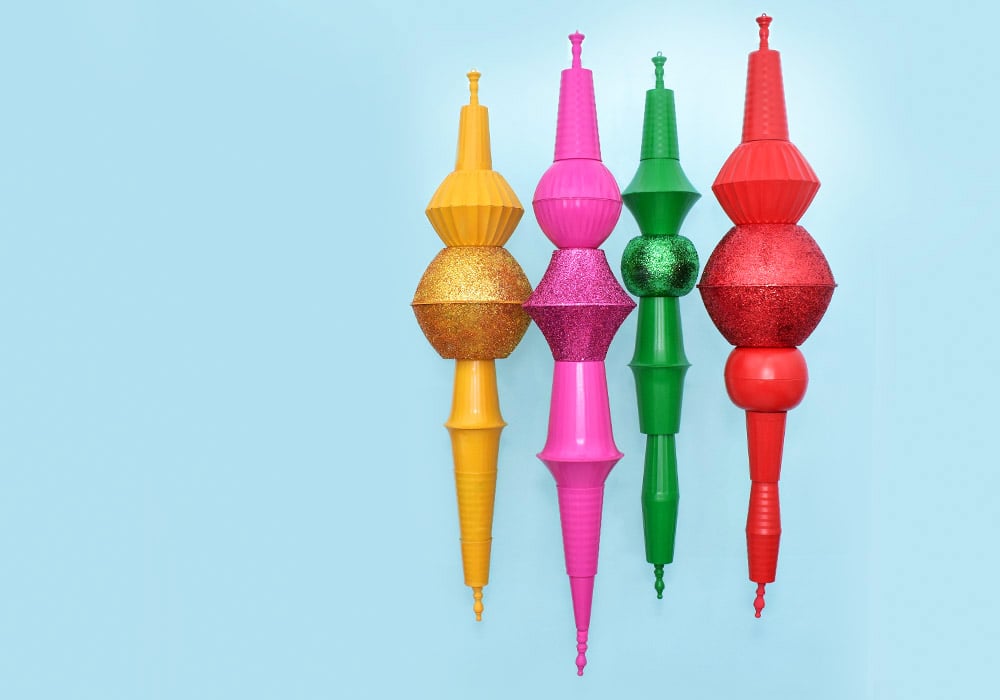
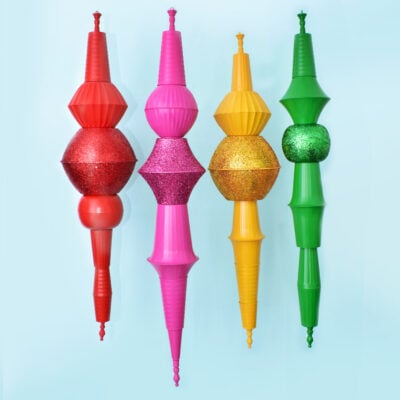
And so here I am at the end of 2022 very keen on these beautiful giant ornaments. I went back to the solid colors but used craft acrylic paints because there are literally hundreds of color options. Breaking up the single solid color I glittered one “bead” apiece for a little extra flair.
It’s about dang time that I am absolutely in love with these guys Want to make some of your own Giant Finial Christmas Ornaments?
Supplies Needed to Make Your Own Finial Giant Ornaments:
What to Build Your Giant Ornaments From.
For my giant finial Christmas ornaments I bought plastic bowls, vases, tumblers, anything that looked like it could be stacked to make a “bead” or section of a finial ornament. Because I
Use Supplies You Might Already Have On Hand.
Or thrift them. It’s amazing how many cups and bowls I had in the garage to go through for donation. I was also able to find a LOT Of items at thrift stores for less than a buck apiece. Other pieces I purchased at Walmart, the Dollar Tree, Hobby Lobby or Party Galaxy. I got a bunch of used punch bowls off of a Facebook group (for free!) that make the largest beads on the gold and red ornaments.
Honestly, if you just buy a bunch of bowls and vases you can probably look to spend $25 or more for each giant ornament. But with a little bit of effort in sourcing your materials you can make them for next to nothing.
Tools Needed:
Spade Drill Bit
This fat, pointed drill bit will be used to create the holes in the bowls, vases, etc. so that they can be strung onto a wood dowel. My 7/16″ came from my Ryobi 300 piece drill and drive kit.
Just How Big are These Giant Finial Christmas Ornaments?

At 53″ the largest of my ornaments is the pink one. The three others, red, green, and gold are all 48″. Depending on how you stack your “beads” you can have shorter or taller ornaments. You’ll only be limited by the length of your dowel. FYI – the top and bottom wood pieces or each ornament will account for about 6″ of the length .
Preparing Your Plastic Bowls, Cups, and Whatnot
Before starting this project note that spray foam insulation and spray paint are both messy. Be sure to protect your work surface and surrounding areas from overspray/damage.
At least 12-24 hours before you want to start this project in earnest, you’ll need to fill all your plastic items with spray foam insulation. This step is important for 2 reasons. Firstly, it helps prevent the thin plastic from shattering when you drill into it. Secondly, it adds just enough weight to help these ornaments hang straight down.

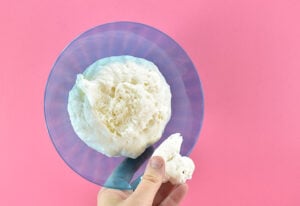
Remove the labels from the bottoms of your plastic as needed. Spray each container approximately 1/2 full of spray foam insulation. Take care not to overfill. The insulation will expand a ton and if it expands out of your plastic it WILL make a mess. I strongly suggest placing your plastic on top of freezer paper, or something similar in the event a mess does occur.
Leave the foam to dry, at least 12 hours, though 24 hours is best.
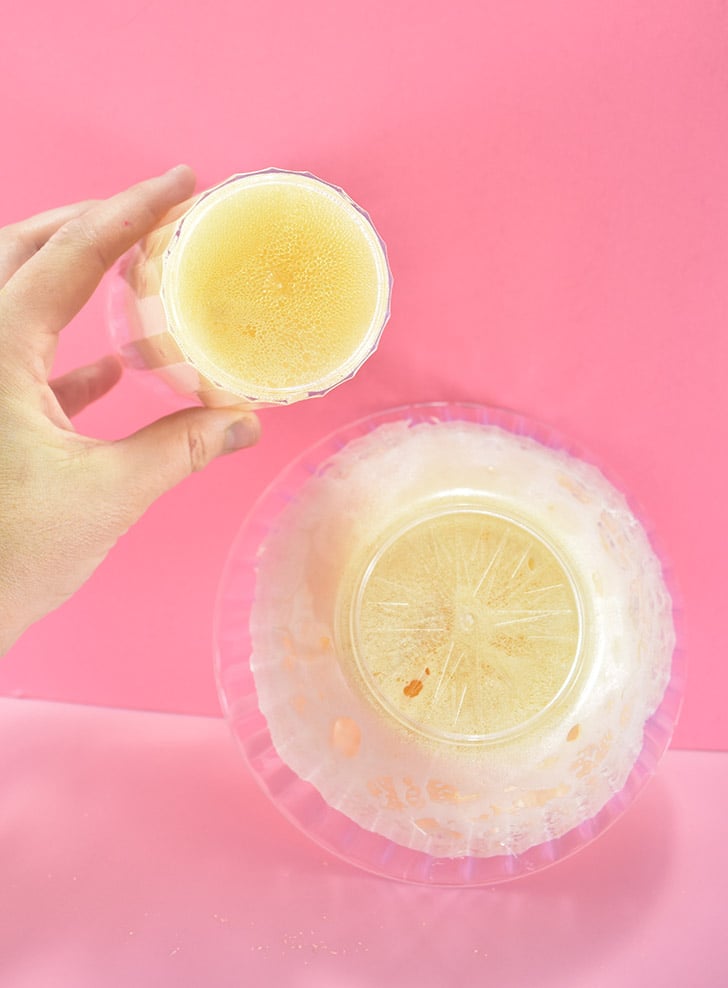
In your taller items, like drinking tumblers, it might take more time for the foam to cure. The large bowl and drinking glass were both filled at the same time. However, you can tell by the lighter color in the bowl that it has dried. The darker means it hasn’t set, yet. If you overfill you might have some trapped uncured foam at the bottom.

Lay plastic with cured foam inside upside down. Remove any foam by hand or with a utility knife until the item will lay perfectly flat on your work top.
How to Build Your Giant Finial Ornaments on a Wood Dowel.

Using a 5/64″ Wood Drill Bit drill a hole through the cap of the dowel end and a shallow hole in the center of one end of your 48″ wood dowel. Go for center but don’t stress. If they are slightly off you won’t notice it in the end..
Note * – If the hole is closer to the edge of the dowel when you screw in the eye it might crack the dowel. I stick a small strip of Black Gorilla Tape that I cut to fit around the edge of the dowel. If the pressure does cause a small crack, the super strong glue keeps everything together.d
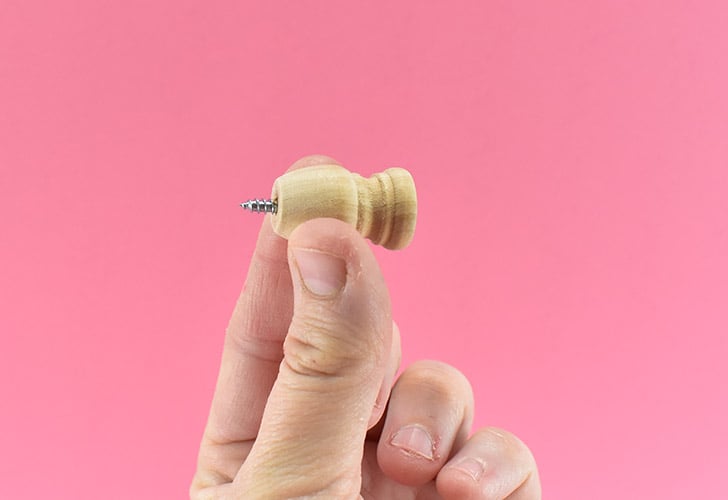
Drill your #6 1-1/4″ screw all the way into the cap of the dowel end.

Screw the dowel end onto the dowel by hand using the pre-drilled hole. *Note – you may have to apply a decent amount of pressure to get the screw started.

Hot glue a finial into the dowel cap. (This can be done now or at the end. I’ve done it both ways and it doesn’t really matter.)
Stringing Your 48″ Giant Finial Christmas Ornaments
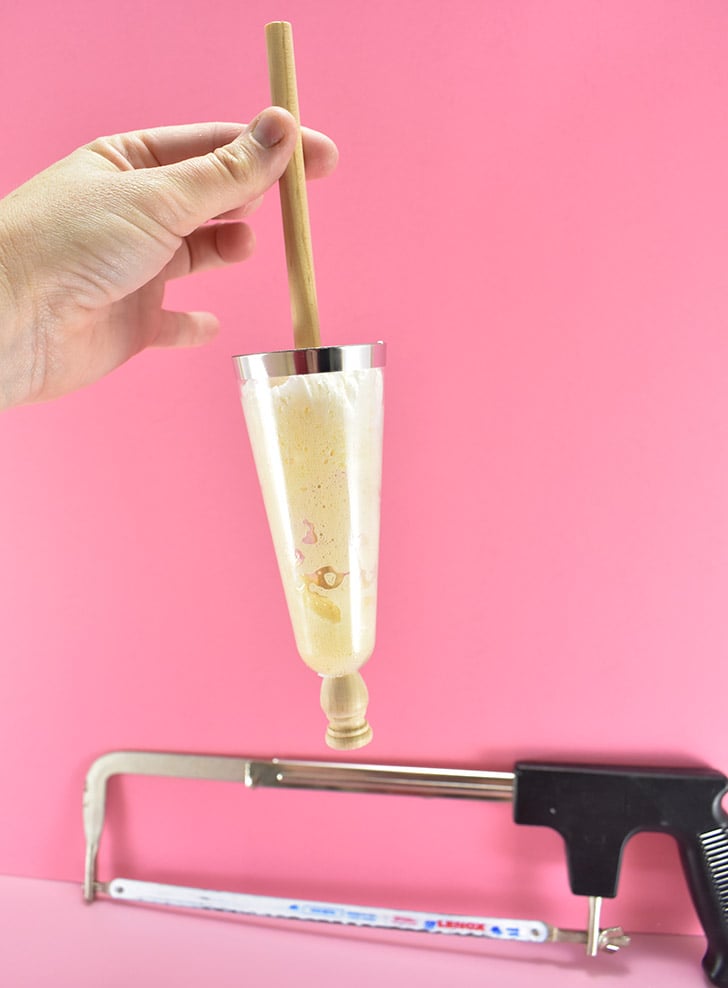
If using narrow items, like champagne flutes, saw the bottom off to accommodate the 3/8″ dowel. Using gentle pressure, push through the cut opening and into the foam. String the plastic piece all the way down to the dowel end you screwed on.

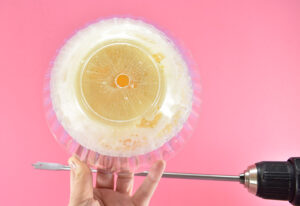
For larger items like bowls, vases, and tumblers, use a 7/16″ or 1/2″ Spade Drill Bit to create a hole straight through the bottom of your plastic. Most of your items will have a knot right in the middle of the bottom that you can use as a guide. Place the spade as close as you can to the center and apply just enough pressure to prevent the drill from skipping off of the mark. Gently and slowly drill through the plastic and the foam. Once the sides of your spade bit have made a few turns and have started to dig into the plastic, you can slightly speed up the drill. As you work you’ll have a spiral of plastic that peels away from the rather than an aggressive cracking.

Slide all of the pieces with drilled holes onto the dowel.
If you aren’t sure what pieces to use, you can always use our 4 as a guide for your own.

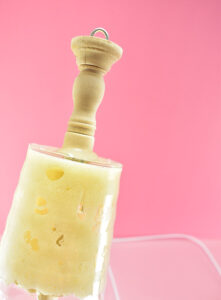
When you no longer have room enough to slide on additional pieces measure the inside of your candlestick and then cut down the dowel from the top to fit onto the dowel, the wood sitting flush onto the topmost plastic piece. Apply a good dose of hot glue into the cap of the candlestick and press firmly onto the dowel/top piece of plastic until the glue cools and sets. Apply 1-2 rings of hot glue around the wood and on the plastic, sort of like caulking, to really stick the 2 pieces together.
Using your smaller drill bit, create a hole in the top of the candlestick. Twist a screw eye into the hole. Lay the entire piece on its side and allow the glue time to cure, at least 4 hours.
Finishing Your Giant Finial Christmas Ornaments

Paint and glitter your ornaments to match your other Christmas décor. I used Anita’s All Purpose Acrylic in Fuschia, Apple Barrel Matte in Kings Gold, Apple Barrel Multi-Surface in Candy Apple, and True Green. For the pink and gold, which were matte finishes, I went over the entire ornament with a thin coat of Satin Mod Podge.

Giant Finial Christmas Ornaments
Ingredients
Instructions
- Remove the labels from the bottoms of your plastic as needed. Spray each container approximately 1/2 full of spray foam insulation. Take care not to overfill. The insulation will expand a ton.

- Leave the foam to dry, at least 12 hours, though 24 hours is best.

- Lay plastic with cured foam inside upside down. Remove any foam by hand or with a utility knife until the item will lay perfectly flat on your work top.
- Using a 5/64" Wood Drill Bit drill a hole through the cap of the dowel end and a shallow hole in the center of one end of your 48" wood dowel. Go for center but don't stress. If they are slightly off you won't notice it in the end.
- Drill your #6 1-1/4" screw all the way into the cap of the dowel end.
- Screw the dowel end onto the dowel by hand using the pre-drilled hole.
- Hot glue a finial into the dowel cap. (This can be done now or later)
- If using narrow items, like champagne flutes, saw the bottom off to accommodate the 3/8" dowel.
- Using a 1/2" Spade Drill Bit create a hole straight through the bottom of your plastic. Most of your items will have a knot right in the middle of the bottom that you can use as a guide. Place the spade bit directly in the center and apply just enough pressure to prevent the drill from skipping off of the mark. Gently and slowly drill through the plastic and the foam. Once the sides of your spade bit have made a few turns and have started to dig into the plastic, you can slightly speed up the drill. As you work you'll have a spiral of plastic that peels away from the rather than an aggressive cracking.
- Slide all of the pieces with drilled holes onto the dowel. If you aren't sure what pieces to use, you can always use our 4 as a guide for your own.
- When you no longer have room enough to slide on additional pieces measure the inside of your candlestick and then cut down the dowel from the top to fit onto the dowel, the wood sitting flush onto the topmost plastic piece.
- Paint and glitter your ornaments to match your other Christmas décor.


