
This post and photos may contain Amazon or other affiliate links. If you purchase something through any link I may receive a small commission at no extra charge to you.
Bending it to your loopy will with only a weensy stick. Maybe it’s magic! But in all honesty it isn’t magic, or difficult or anything else really. It’s a stitch like so many others and once you get it down you can conquer the world of stuffed animals and frilly baby clothes.
I happened to use the loop crochet to make myself an alternative to a traditional shower sponge or shower poof or whatever you want to call it. You see my skin gets crazy sensitive in the winter and the store bought poofs seem rough to me. And I love my crochet washcloths so much that I figured I’d try to work something out. It turns out, I’m spectacularly happy with them.
For this project you will need:
- cotton yarn
- size h crochet hook
In this stitch in order to c

First make a chain whatever count you want. For my DIY body poofs I went 30.
Turn and single crochet down the length.
Chain once and turn.

Run your hook through both loops of your first single crochet.

Make a loose loop with the yarn over your index finger of your non-dominant hand.

Take the hook over the yarn.
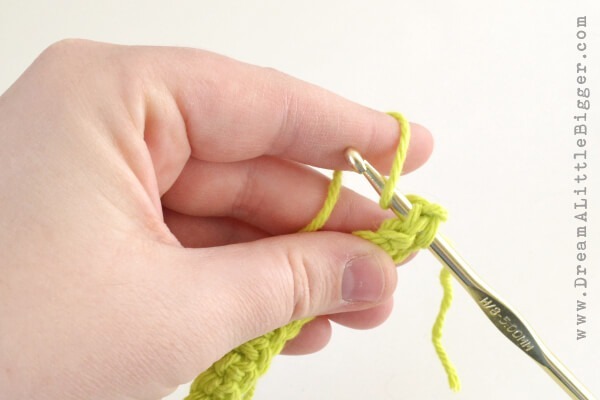
Then come up behind to wrap the hook around that piece of yarn.

And grab the yarn behind your finger (or the back end of the loop on your finger).

Pull through both of the loops from the single crochet stitch.

So that you have two loops left on your hook.

Remove your finger and hold the loop against the crocheted piece. Yarn over and take off both of the loops on your hook.

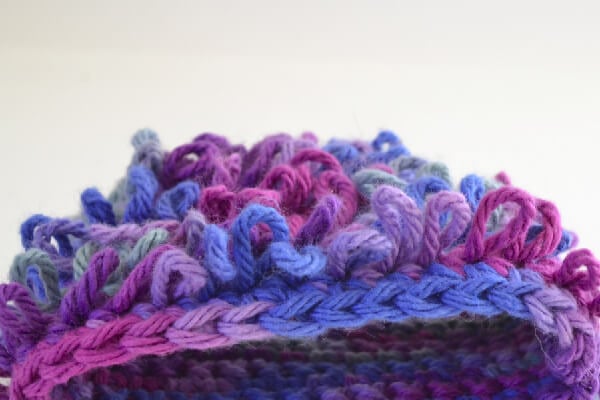
And there is your first loop!

Continue making loops until you get to the end of the piece.

Chain twice, turn and begin a single crochet stitch down the length.
Repeat your loops and then your single crochet as many times as you’d like!

I’ve been making a whole mess of shower scrubbies and I’m loving the variegated yarn look so much!
To make the DIY poof make 7 rows of loops and one last row of single crochet. Turn the loopy sides together so that the edges are straight with one another. Slip stitch down the length to close up. Turn right side out and you’re done!
Oh, and if you’re not down with the loopy look, you can snip them to have straight bits of yarn in more of a “hairy” look! What fun will you get up to with this stitch?
