Stitching plastic canvas is cheap and super easy!
This post and photos may contain Amazon or other affiliate links. If you purchase something through any link I may receive a small commission at no extra charge to you.
You are here: Crafts / Yarn and Needle Crafts / Embroidery / How to Stitch Plastic Canvas

Stitching plastic canvas is fun, it’s easy and it’s inexpensive. And you know how I dig the inexpensive crafts which is why I’m showing you how to stitch plastic canvas. The canvas comes in rectangular sheets that you can cut down as needed plus there is a fun variety of shaped canvases like hearts, circles and even purses.

Stitching it is really super simple and today I’ll show you how… and tomorrow I’ll show you a project to make when you get your stitches down!

For this project you will need:

Threading your needle can be kind of hard at first but there’s no way to get good at it than to practice. So while it may be a pain in your neck at first, you’ll get it down soon enough, I swear!

001-stitch-plastic-canvas-dreamalittlebigger

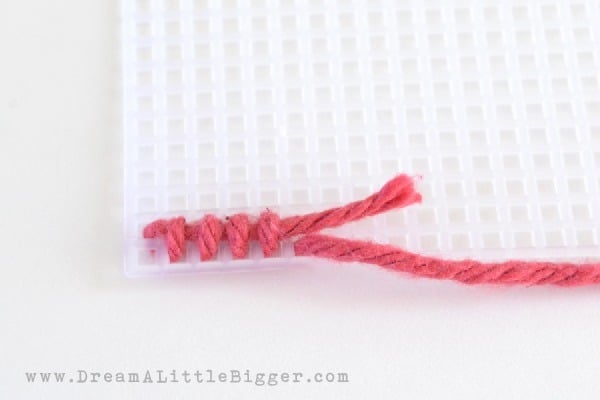
Bring your yarn up and through a hold on the canvas. Hold about an inch to 2 inches of yarn onto the backside.

002-stitch-plastic-canvas-dreamalittlebigger

Continue holding your back thread and needle through the slot diagonally below and to the left of where you started.

003-stitch-plastic-canvas-dreamalittlebigger

Continue this pattern over and over, taking care to tack down the string you’re holding behind as you go.

004-stitch-plastic-canvas-dreamalittlebigger

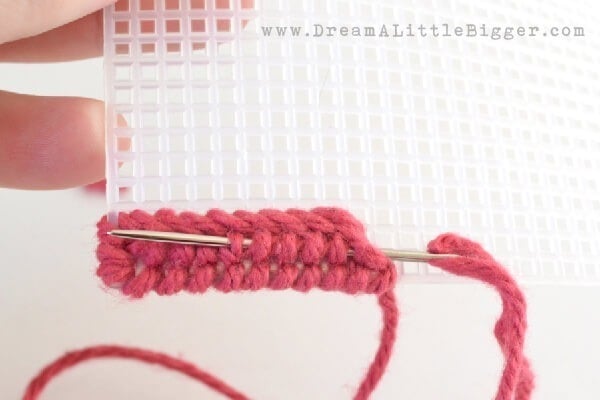
It will look like this…

005-stitch-plastic-canvas-dreamalittlebigger

When the stitches are together the canvas fills up and the plastic is no longer visible.

006-stitch-plastic-canvas-dreamalittlebigger

To finish the edges go up through the bottom of your first slot and pull though.

007-stitch-plastic-canvas-dreamalittlebigger

Go up through the very next slot and pull through.

008-stitch-plastic-canvas-dreamalittlebigger

When you get to the corners, you’ll need to do three stitches to cover each side and the corner part. It gets a bit tight but you can finagle it.

010-stitch-plastic-canvas-dreamalittlebigger

When finished, run the yarn through several of the stitches you’ve already made on the back. Pull the yarn taut and trim closely.

011-stitch-plastic-canvas-dreamalittlebigger

So that your back will look like this. See how there are no loose ends? Nifty, eh?

And that, my friends, is all there is to that. I’ll be back tomorrow with a nifty little project I made and the pattern I used to stitch it. See you soon :)

header-stitch-plastic-canvas-dreamalittlebigger

Leave a Reply

Your email address will not be published. Required fields are marked *

This site uses Akismet to reduce spam. Learn how your comment data is processed.

15 Comments

  1. Judy Bechtle says:

    Thank you for the refresher info. I have a plastic canvas tote. I’ve had it for years. Never knew what to do with it. What kind of yarn, or design it use. I now have some ideas. Thanks to your posts.

  2. Dian Hartel says:

    How do I make the front like like the back isi g plastic canvas. I am working on a project and I am making a design using X and cannot get the back to look like the front.

    1. Unfortunately, when you stitch there is a pretty side and an ugly side. I don’t know of any way to make the back and front look the same.

  3. I have been doing plastic canvas for a long time . Projects l worked on wishing well, door toppers, calendars, etc very easy relaxing and fun.

  4. Another way to thread the needle is to open a paper clip and use the smaller middle loop. Use it like a regular needle threader by putting the paper clip loop thru the eye of needle, pass yarn thru it, then pull clip out and voila, needle threaded. My girls are doing a flag on canvas for scouts and this really helped.

  5. I don’t know why no one has picked up on this yet. I’ve been doing it for 10 years. To thread the needle quickly and easily just fold a small piece of tape over the end of the yarn and press it flat. Thread through the needle and cut off with scissors. Sooooo simple!!

  6. Kristin M says:

    A few weeks ago my husband bought our 2 yo a doc mcstuffins play set. The “Doctor bag” is a hard plastic “purse” which she has much difficulty opening. About a week ago I found a plastic canvas purse template at in my local craft store’s clearance area for 99 cents. I figured, “how hard can it be?”, I had done regular cloth cross stitch in the past, so I understood the concept. I bought some lilac and sparkly pink yarns and a needle. Well I started it today with an alternating scotch pattern, and after a few VERY easily fixed mistakes, I had completed almost 5 rows in about an hour and a half. A project I thought would take a long time, I found out is very quick and extremely easy. I love it! (And now I know I will be able to finish the 15 or so, other Christmas gift projects I have lined up. I just hope they’re as fun and easy as this one)

    1. Yay! Plastic canvas is totally fun and it’s neat seeing something handmade work up so quickly and with great results to boot. Your enthusiasm makes me want to dream up a new canvas project to stitch up. I hope your daughter loves her new doctor’s bag!

  7. Renee Angelo says:

    I have never done plastic canvas before, I am going to do a Minecraft box for my grandson. But first I am going to do sone Awareness Ribbons in purple for my mother and siblings. I have some ribbon plastic canvas shapes from
    Loops & Threads. I’m having a little trouble because it is not squared . any advice?

    Thank you

    1. Just fill in the middle areas first from the bottom (not the edges basically). I know it feels awkward but a few rows in and you’ll be super comfortable with it!

  8. This is just the post I’ve been looking for! I found some little plastic canvas squares the other day, but don’t actually know how to sew on them. Now I do! Thanks :)

  9. Rhonda Carter says:

    I meant go down thru the upper right.

  10. Rhonda Carter says:

    I’ve been doing plastic canvas a long time. I do mine different, I come up thru the left bottom and go done the upper right, makes the back stitches slanted the same as the front and to me it’s easier to tuck the end piece under.

  11. Janet Potter says:

    I love Plastic Canvas, I taught 3 of my grandsons when they were 4-5-6 years old. They made the first letter of their name inside a square…..then we put Stickit and Stickit again on them so they could put them on their bedroom door and it would come off so mom wouldn’t get mad..BTW that was at least 25 years ago and I still make things today.