Granny Crochet Stitch in a Straight Line
Granny squares are traditional and awesome but as a kid I thought they looked old fashioned. What I did like were the puffy shell shaped stitches and my Mimmie tried to teach me but I had a hard time. Instead, she wound up showing me how to do the granny stitch in a straight line instead of a square. I got my shell shape but I wasn’t stuck with squares.
As an adult, I find that I like the stitch when I want to do stripes. Either bold and chunky or by alternating every row, this stitch can be versatile in spite of the fact that it is very simple.
Crochet your chain in increments of three. Add one. Now add three more to act as our first double chain.
Double crochet into the fourth chain from your hook. Then chain once.
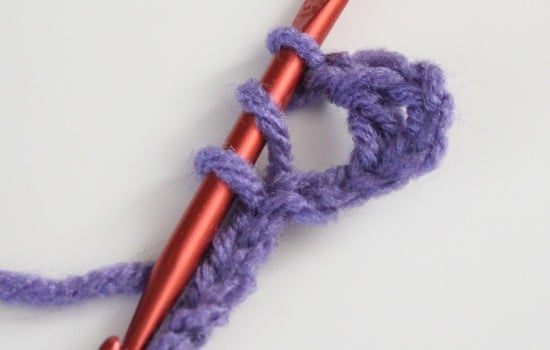
Now we’re going to form our first shell shape. Crochet in the third chain from your recent double crochet, essentially skipping two chains in the process.
Double crochet two more times in the same chain you just used. See how you can see the hole where you went through the first go?
See how your shape formed? Chain once.
Skip two chains and double crochet three times into the third. Chain once. Repeat until you reach the end.
When you get to the end, you’ll have three chains left. Double crochet once into the final chain.
Chain three times to act as your first double crochet and turn over.
Now instead of going through chains, we’re going to go through the gaps. Double crochet once through the first gap. Chain once.
Continue to double crochet three times into the gaps until you run to the end. To finish each end, double crochet once into the last slot. Chain three times and turn over.
Double crochet once into the gap. Chain once and resume your double crochets in 3s down the piece.
FYI, hen you look at your work, you’ll notice that you have one double crochet on one end and two on the other and that it alternates row per row.
The granny stitch works up pretty quickly. It has a look similar to the granny square, but you aren’t bound to the square shape. If you need a rectangular afghan you can rock it out with this stitch!
This piece was originally meant to be a bath mat to match a shower curtain I think I’m going to sell on Ebay. I’m not sure what I was thinkin of buying a colorful curtain from Ikea… I’ll stick with my white cotton waffle weave I think.
Besides, it turns out that my dog Aggie is kind of in love with this thing. Looks like somebody’s got a new mat!
If you’d like to learn other crochet stitches, including the basics like how to chain, single crochet, double crochet as well as how to make traditional granny squares, please visit my crochet project gallery.
Comments (13)
Just Me
June 11, 2013 at 7:07 AM
I was getting really frustrated trying to make a ripple afghan so I decided to try a granny square. Now I have made hundreds of granny squares and many ripple afghans over the past 40 years, so I don't know why I couldn't get it together. I think it was the directions I was following on the square. The ripple, well it had its own problem. So back to the drawing boa Ooops, the computer. I found you.
Thank you so much for this tutorial. Tomorrow I start again.
D
October 4, 2013 at 11:07 PM
How many stitches do you start with to make a small rectangle afghan? this will be my very first attempt at crochet
Allison
October 5, 2013 at 8:08 AM
The number for everyone is different which is why it is a good idea to measure your gauge. This is really simple… you make a test chain, of say 30, and then you do a stitch in those to learn how many of YOUR stitches in the yarn you’re using RIGHT NOW equals 6 inches. Double that up to get your gauge per foot.
This way you can tell better than me saying I make an afghan with a chain of 190 or my grandmother (whose stitches are so much looser than mine) only needing 160.
If you have 40 stitches in 1 foot and you want an afghan that is 5 feet inches across then you’d chain 200 + the number you need for your turn (3 for a double stitch like in the granny tutorial!)
When I was little I would try to chain to the length I wanted but that first row of stitches makes the chain longer so I was constantly pulling out my yarn and starting again! It was a happy day when my Mimmie helped me work out my gauge!
I hope that helps instead of making things more confusing :)
Gracie
April 1, 2014 at 9:33 AM
Hi! – Thank you for your tutorial. I’m working on a pattern very similar to yours. However, my blanket keeps curving on an angle instead of staying straight. How can I fix it? Also, when you say “Continue to double crochet three times into the gaps until you run to the end. To finish each end, double crochet once into the last slot.” – when you say “last slot” do you mean the last stitch or the last space (I think this is where I’m running into trouble”)? The pattern I’m using says last stitch, but this doesn’t seam (pun intended!) right. Any feedback you can give would be great.
Allison
April 1, 2014 at 2:36 PM
It sounds like my poor directions are definitely at fault! That would be the last space. After your first row you’ll only crochet in the spaces!
Laura
February 2, 2015 at 11:04 PM
I am trying to make this also and I’m getting a curved effect on the first row. It’s not ending up straight at all. It’s totally curving in. I’m get frustrated.
Allison Murray
February 3, 2015 at 8:55 AM
I bet you anything if you try a little swatch and make sure your chain is a lot looser when you begin it will straighten out. When the chain is really tight to begin with it will totally start to curve. Let me know if that helps?
Mary
November 30, 2014 at 10:53 AM
How do you do the border on the granny stitch straight line afghan?
Allison Murray
November 30, 2014 at 3:32 PM
You can border in any way you please!
poppy
June 19, 2015 at 5:49 PM
I was searching for directions for the granny stitch. I have made many granny squares, but I wanted a straight pattern. Thanks so much. I’m using it for a baby blanket and it’s so pretty. Thank you!
Jill Smith
November 18, 2015 at 7:08 AM
This pattern is just what I was looking for. I need to race through a couple of afghans for Christmas presents and I started on this one last night. It is working up beautifully.
Thank you so much!
Elaine
February 23, 2016 at 5:40 PM
Thanks so much for the easy to follow instructions
yvonne
June 20, 2016 at 2:36 PM
thank you for this tutorial,I love it and will use it for legwarmers.