
This post and photos may contain Amazon or other affiliate links. If you purchase something through any link I may receive a small commission at no extra charge to you.
I’m not sure what is going on, but my skin has been having a rough go of it, lately. My biggest problem is that soap is throwing things completely out of whack and I’ve been told that my skin is becoming more sensitive as I age meaning I shouldn’t really be using store bought soaps with a lot of fragrances. It also appears that store-bought soap is throwing off my pH balance. I was told that my skin should have pH of 5.5 and the 2 soaps that I had sitting on my shower rack, both were on the scale at a 10. No wonder things were itchy and uncomfortable.
And so as I planned on getting into the shower that evening I realized that I was completely out of any of my own homemade soaps and literally all I had were the bars in my shower, and their new mates still in packaging in the linen closet. Well, crumbs.
Just because I cannot sleep without a shower, I hopped in and did more of a warm up under the hot spray rather than a clean because, well, my soap sitting right in front was now something I really shouldn’t be using. The very next day I whipped up a whole BUNCH of homemade soaps and, while I am not sure exactly what the pH is of my new bars, I can tell you that my skin is doing MUCH better for using them.

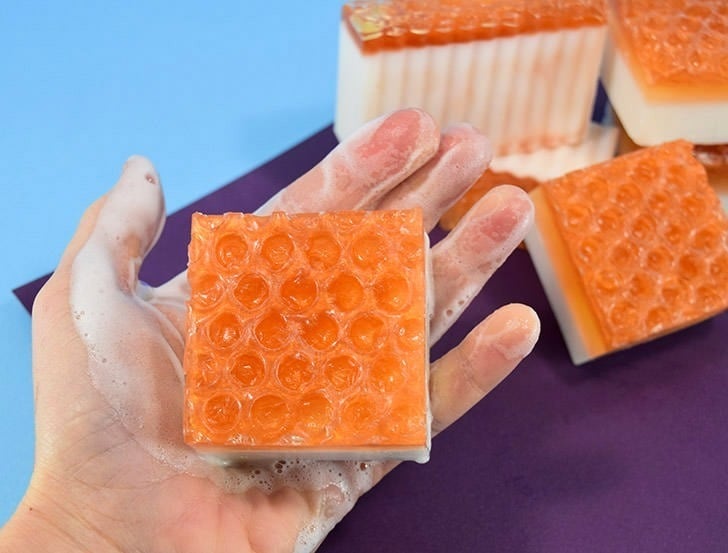
And because I couldn’t just do anything blah and plain, I decided to make a honeycomb soap with a textured, colorful honey based top. And though I’ve only lightly scented my soap, I’ve been very happy with it in the shower. It lathers up nicely, giving me that hint of scent that I love without being enough to irritate my currently angry skin.
Now, if you’re wondering, what soap has a decent pH because you can’t do DIY right now and need to grab something at the store, I was told to go with Dove bar soaps which have a pH of 6 which is much nearer that of our natural skin.

Ready to whip up some amazing looking homemade honeycomb soap bars?
For this project you will need:
- Goat’s milk melt and pour soap base
- Honey melt and pour soap base
- Bubble wrap
- Yellow soap colorant (optional)
- Fragrance or essential oils of your choosing

Using the mold of your choice, line the bottom with bubble wrap cut to fit, with the textured side facing the sky and the smooth side down.
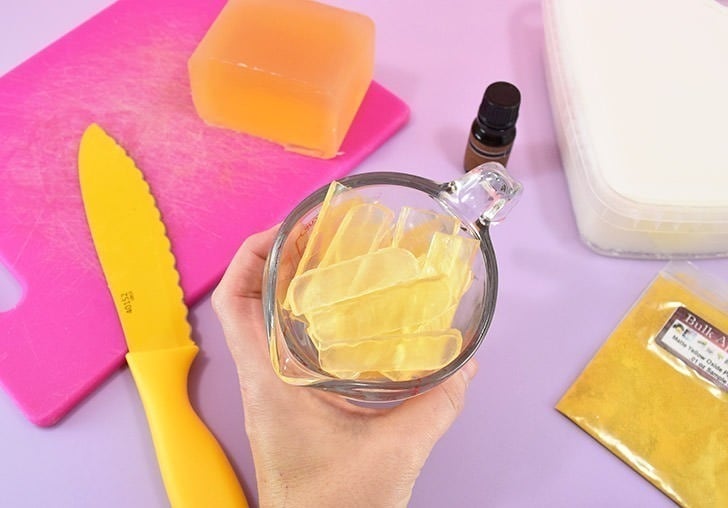
Melt your honey soap base in the microwave in 30-second increments until mostly liquid. Stir to melt any lumps remaining to melt them with the heat already in the soap. This will prevent overheating and burning of your soap base.
If adding any colorant or scent, do so after giving the soap just a little bit to cool off. If added while too hot, you’ll burn off most of your scent meaning you need to use more which is an unnecessary expense.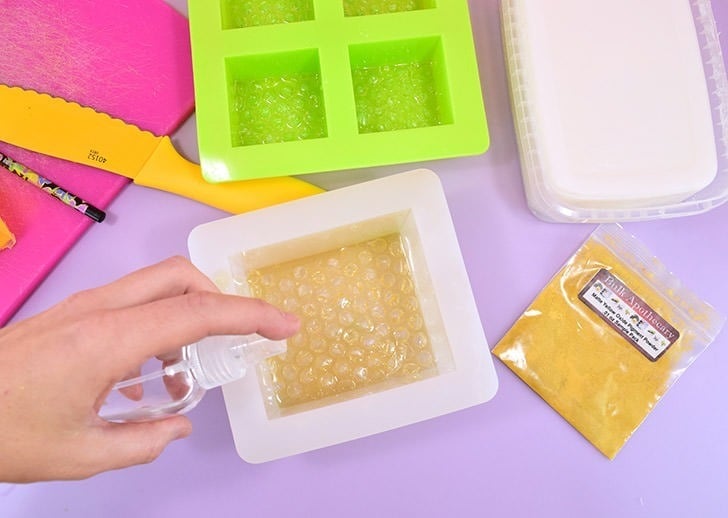
Pour the melted soap base on top of your bubble wrap and spray with alcohol to remove any bubbles. While allowing your first layer of soap to set up, begin melting your milk based soap in the microwave in 30-second increments until mostly melted and stir to finish off the remaining chunks. Allow to cool just a bit and add any scent, if using in this layer.
Spray the previous honey base layer with alcohol to allow adhesion and pour the warm (but not hot) milk base on top. Allow the soap plenty of time to set up, using the fridge or freezer to quicken the process if you’d like. Take care when using the freezer as it can make the soap sweat out your fragrance or essential if you leave it in too long, effectively ruining your soap.

When cool, pop the soap out of your mold. See here? I kind of sort of poured my first layer of soap into the mold while it was too hot and it melted the bubble wrap a little bit. I’m no scientist but I think we’d be better off NOT melting this if at all possible :)

Gently peel away the bubble wrap, removing any straggling plastic that gets stuck in the occasional pocket.
See how I have 3 visible layers in my soap up there? *sigh* that was because I was cheap and bought just a tiny amount of honey soap base and ran out. On this mold, I wound up trying to tint a regular, clear glycerine soap base to match and it didn’t quite work.
And did you happen to notice my loaf bar up there? *sigh* I just never learn some days! I was in a hurry and despite knowing better, I poured my milk base on top of my honey base while it was too hot. What happened was some of my honey base melted from the superheat and then floated up and swirled around in my milk base. It’s pretty, to be sure, but I didn’t mean to do that and it made my honeycomb layer on the top a lot thinner than I wanted it to be, and right above where I poured my soap in, it almost completely melted the pretty orange honey layer away completely, making some honestly ugly bars cut from the center of my loaf.
But, you live and you learn, right? In the end, I’m super happy with just how amazing of a honeycomb texture bubble wrap will produce when soap making, and that’s really the biggest takeaway from this DIY soaping project today. It’s also amazing that I have a good few months of soap that I know won’t mess up my skin or cause me any unnecessary pain. The fact that it looks cute, well, that’s just an extra special bonus :)