This post and photos may contain Amazon or other affiliate links. If you purchase something through any link I may receive a small commission at no extra charge to you.
It was about 5-6 years ago that I was telling everybody that would listen that I wanted to makeover my bathroom. I had decided that tile floors were EXPENSIVE but that I was tired of my laminate. I had heard of somebody who saw that someone had a penny floor or counter tops or something in a restaurant up north. I was instantly smitten with the idea and the price, literally pennies!
Everybody thought it was ridiculous idea and even my dad, who now will get behind just about any DIY (this was before I had a blog, to be fair, though) was wondering what would something do to my resale value. At the time I had no desire to move so I didn’t care. But in the end it never wound up happening because pretty quickly I thought, “what if I do want to move?”
Prior to changing my mind about it all my Mimmie decided she was all about it! She literally dropped a plastic tub of pennies on the table and said “here, looks like I just bought you a new floor!” :) There were far more than I needed for my tiny bathroom and not only did I make away with a bunch of new floor “tiles” I also got a plastic tub (lid-less, mind, but free is FREE!) See that pic below? Many years later and the pennies in the original tub because I’m lazy like that.

So now I’m renting and it looks like these poor pennies just don’t have a purpose besides currency that nobody seems to want. I mean, all money spends, right? But one day I had the idea that I wanted to make a copper roof on a birdhouse. I couldn’t find anything reasonably priced that I wouldn’t have to paint and I worried… how long would that paint hold up under the sun in a real, actually outside birdhouse? When I slid open my filing cabinet and heard the clink of the change in the tub long covered with other things I remembered them.
To be fair, I truly should have remembered them because I forgot to remove them and the poor moving guys were all “WHY IN THE WORLD IS THIS CABINET SO MUCH HEAVIER THAN THE OTHER ONE? AREN’T THEY EXACTLY THE SAME?”

Then I had to go about finding the perfect birdhouse to put these pennies on. It had to be heavy duty and okay for outside. The craft store birdhouses were a no go, often so thin that they could only survive very long when indoors. Actually building one is so far out of the scope of my capabilities that even the thought was laughable. In the end I happened to find this heavy duty sucker when I was sipping a fancy barista made coffee and checking out the craft aisle after adding clothes to my wardrobe I don’t even really need. Marimekko, hello? You KNOW that business was going into my cart.
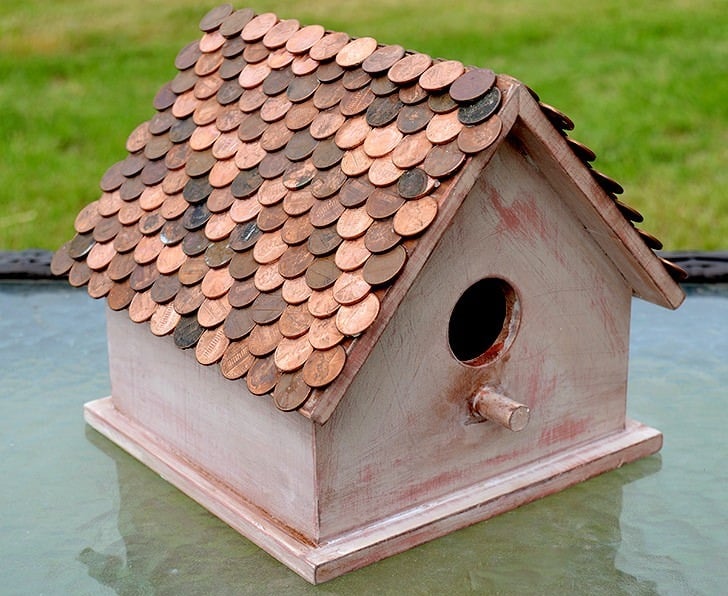
I got home with my birdhouse and wondered what I should do next. I mean, how do I decorate it and keep it from being too plain but not overshadowing the gorgeous penny roof? In the end I decided to faux age it and to use a mish mash of bright and shiny pennies with ones that looked like they’d been sitting under a rock in the lake for a few years.

A quick hit with coral paint was followed with white chalk paint.

Coarse sandpaper gave it a bit of faux “age”.

And wood stain left longer in some places than others made it “old and dirty” looking. Perfect!
Now the only problem was how was I going to glue these things on so that they STAY on. Luckily there is now DAP™ RapidFuse® All Purpose Adhesive. Now on the bottle it says “bonds virtually everything” which sounds right up my alley… because would you be searching for the perfect glue to adhere pennies to wood if it wasn’t for me putting this crazy idea out in the universe? Probably not. While it sticks on just about everything it’s especially ideal for plastic, rubber, metal, glass, wood, tile and more stuff. Because it sets in 30 seconds my ADD personality can keep working faster and that makes me happy. It’s also perfect for this project because it dries clear, it’s not messy and it won’t foam and ruin my beautiful penny roof.

Now I must admit that I tried a “different glue” prior to learning about this one and it didn’t work. At all. I only glued on a few to see how well it worked out and after letting the dry cure for a purposefully for a few weeks (oh, so what if I put it in the closet and forgot about it, like you’re on top of it all all the time) I realized that this was a no go. As I picked it up several pennies popped right off. #sigh
So when my test DID work for this go around I was beyond ecstatic and I hopped all over that business. Want to see just how well it worked?

Okay so I’m not all super safe Sally when it comes to crafting but when I read on the bottle to wear gloves, I WORE GLOVES. After about 2 minutes in and I glued the fingers of my gloves together ripping the glove apart when I tried to separate them I was immensely happy that this wasn’t my skin. Follow the directions on the packaging, please.

Starting from the bottom of the roof working up glue a straight line of pennies across. To get a pretty scalloped look you’ll want for the pennies to slightly overhang the edge of the roof.
When starting your rows above this one place the next line of pennies in between the ones below and covering up the curve at the top the last row made.

Add a small dot of glue onto the wood and two small dots on top of each of the pennies below where your current penny will make contact. Hold for a count of about 4 to 10 (seriously – this stuff is fast!) and keep on daubing on down the line applying glue and sticking on your pennies.
Now I truly thought this would take FOREVER because in my past go IT DID. I had to sit and wait and wait and WAIT for the glue to dry so I could let go of the penny. And so I’d try to get 3-4 on there and hold them steady but one (or more) would eventually slip and it was an awkward, awful mess. Yuck.

It took me about 10-15 minutes to cover this ENTIRE SIDE of the roof with pennies. Boom! SO pleased with this.

I took my birdhouse outside and showed it to Rob who seemed fairly impressed with the roof, though he didn’t care for my faux dirty/old finish. I figure you can’t win them all!

Set in the hot sun for DAYS the PENNIES STAYED ON. And with me carting the thing all over, knocking it into fence posts and whatnot trying to figure out where to put it in my tiny backyard the PENNIES STAYED ON. I’m really pretty happy that I don’t have to be stupidly careful to not mess this thing up because careful isn’t exactly my middle name. It’s more like awkward. Or maybe accident-prone. Allison Accident-Prone Murray. Yep, sounds right.

VERY CUTE 🥰Thank You FOR SHARING 👏🏼😊And Thank You FOR safety Reminder ❗️Oh My GOODNESS, my husband And I Did Put Up Headers That Came With Our Sliding Door Blinds. Glue MUST Have BEEN industrial 😳😱And There WERENT Instructions ABOUT Gloves . I WISH I would HAVE Had your Info❗️I WONT use Those Kinds Of GLues W/o Gloves NOW THAT I’ve SEEN Your Hint ❗️❗️G-d♥️Bless
Awesome. Being a bird enthusiast myself, love this idea. The weight would be helpful in the wind. Living in Oklahoma it’s a necessary evil. Lol. Plus pennies draw heat so would also help babies stay warm on chilly nights in early spring. Great idea and virtually a hundred yr roof. Thanks for sharing!!!!!! :)
I used to live in Harrah, OK on top of a hill! Ear infections were a constant as was tracking down lawn furniture :) Glad a fellow Okie found this useful!
can you send cutting instructions and the building instructions as well as a supplies list i have 10 kids and 4 adults each doing their own…
Hi, Dawn. I don’t have dimensions as I used a store bought bird house from Target and it looks like they are not currently available to purchase.
Love your penny bird house!
Are coins safe to use on bird houses? I was thinking of useing but a friend said rain or water would oxidize the coins and could be dangerous for birds.
I know that houses can have a copper roof I’ve never heard of them being a danger to birds. Lots and lots of people have read this post and this is the first time I’ve heard of this potentially being an issue. I will research it and if it seems like a reasonable concern will include that in the post.
So where did you get the bird house? The store name if possible . I make these house also but have been unable to find a heavy duty house for outside thank you
If memory serves I got it at Target. They have some super heavy duty ready to decorate wood items in their craft section.
Great article, thank you for all the details.
I often use vinyl fence posts for my bird and butterfly houses. Can make several from one post. Or better, find someone installing a fence and willing to give you their scrap ends. Can’t wait to try your penny roof.
Would hot glue gun work?
Not really. Hot glue doesn’t work well with metal. Once the pennies get hot or cold they will likely pop right off.
Would the E6000 glue work?
It very well could. I’d give it a test and let it dry over night to a few days. I liked this glue because even when I knock it into things (I’m clumsy) the pennies stayed put. It took about 3/4 of the bottle to attach all of the pennies but e6000 would go a lot further. Let me know if it works for you!
This was so funny and informative, thank you for sharing, and now I know
What to do with all the pennies that in Canada have no more value. Love your wee birdhouse, very creative.