
This post and photos may contain Amazon or other affiliate links. If you purchase something through any link I may receive a small commission at no extra charge to you.
It may seem silly that it all started with a set of knives, but I’ve decided to kit out my kitchen in colorful accessories and what nots. And to be honest, an awful lot of this is going to have to be DIY. I’m looking at a kitchen remodel on a budget and lots and lots of colorful things for in there are just too expensive. And though I’d LOVE to have it Fiestaware but I just can’t see myself spending that kind of money on dishes when I have a tendency to break 1-2 pieces a month!

But I’m getting off course, here. I decided that since this whole thing started with KNIVES it would be a good idea to move onto cutting boards. Makes sense, right? And since food poisoning really bites the big one, I made them labeled and color coded for super kitchen safety!
I got my first bamboo boards a few years ago and they are my favorites! I have some go to plastic jobbies that work well but if I had a choice, they’d all be bamboo, baby.
But, while pretty in its own way, bamboo does not fit into my wild and colorful scheme. So I got together my supplies from Darby Smart and got after it!

For this project you will need:
- Bamboo cutting boards
- Wood burning tool
- Letter wood cutting tool stamps (these suckers are awesome! plan to see these quite a few more times on the blog soon!)
- Martha Stewart colorful paints in Satin
- pliers
- metal bowl or container
- masking tape
Now this burning tool can burn the living you know what out of you so it’s a good idea to exercise extreme caution. Now since it just doesn’t make sense to let this fella’ cool down between every letter, you’ve got to get creative.
I’d HIGHLY recommend practicing this technique while the pen is still COOL so that you can change tips easily during the process without burning yourself.
First, lay the letter you need face down on a protective surface. I’m using compressed type of board over my desk because I don’t need random letters all over my workspace from now to eternity.
Begin rotating the pen SLIGHTLY to get it to start to take hold. Spinning too many times will cause the cord to get all wound up and when it starts spinning in the other direction it’s absolutely nuts. And painful.
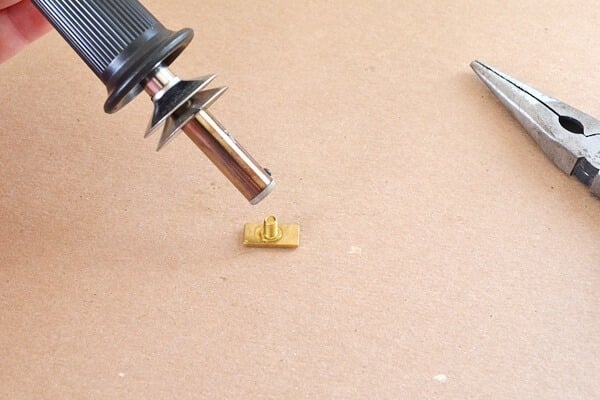
Use a pair of pliers (these aren’t anything fancy, just needle-nose pliers from the garage tool box) to twist the letter into the tool. Take car to grab at the sides only so that you don’t damage the burning area of any of your letters.

The first time you use a letter it’s slippery. I don’t know how to explain it but you set it down and it slides somewhere else causing a smudged up burn. Before using any letter on your real deal, place firmly down onto a piece of scrap wood to prime it. See how areas of it are black? This T is good to go!

Place down onto your wood and allow to sit for a second or two. Now rock the tool up and down and side to side, resetting to the original position between each, to ensure a good burn on all edges and corners.
I’m going to suggest you practice this on scrap wood. But know that plywood and bamboo have different tendencies to take the burn. For example, I practiced for ages on my plywood and had my technique down pat. First letter on bamboo and the burn took so much more quickly that all around the letter the wood discolored terribly. So practice first on the cheapest scrap stuff you have, and if you have the availability, do a little practice on bamboo as well (perhaps an old and tired board from your kitchen?)

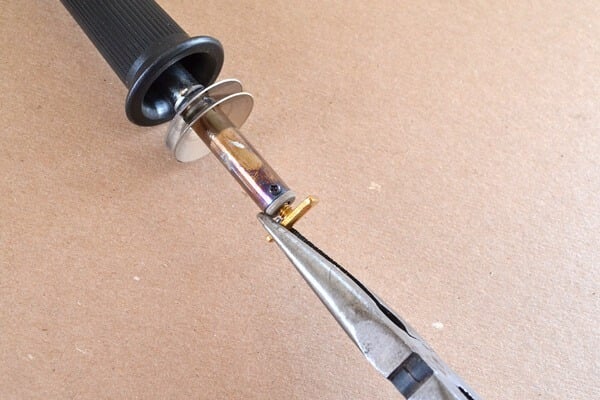
Use your pliers to remove your hot tool and toss into a metal container as the heat will melt plastic and could shatter glass. Here I borrowed one of Aggie’s food bowls.
Find your next letter, set it on your protective surface, turn the tool to just barely get the new letter started and finish tightening with your pliers.
Give a second or two to heat up, burn a piece of scrap wood to prime it if the letter has never been used and get after it.
Oh, and these letters stay hot for a SURPRISING amount of time so use your pliers to sift out our new letter just to be safe. Double oh, I have no idea why I’m rocking the caps lock like crazy. I guess because I have burned myself with this thing before and it took about 6 months before I was willing to be more patient and give it a go again. But I know respect the heck out of this tool and always exercise the amount of caution you should with something like this.

Now I’m not a genius but I’m not a total idiot, either. I wanted to change letters as few times as possible to limit the possibility of burns so I worked from right to left and since meat and fruit both end with a T, did those at the same time and worked inward on my words.
I also wrote those words down because I know myself and if I just went after it I’d wind up having friut or something equally stupid and it would be permanent.
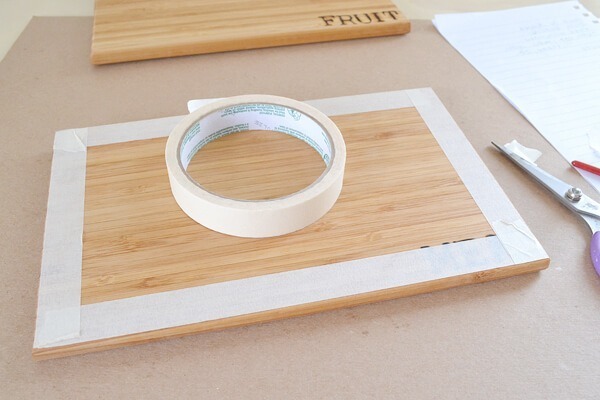
After burning your words in, tape off the front and back sides with masking tape.

Paint your edges bright colors. I have found that I prefer the Martha Stewart satin paints when I want to use as few coats as possible. Plainly put, I tend to get the best coverage from these paints.

Remove your tape when dry and allow a few days for the paint to cure before putting into use.
Unless you have photos to do, in which case just get after a pear or something. By the by, that was one freaking tasty pear, hence the bite taken out.

You could make up a ton of these suckers. I went with Meat, Fruit and Veggies because they’re what I chop most of the time. You could also have a separate board for chicken, fish, cheese and other foods though I don’t know how you’d word that. Candy maybe? But why would you need to cut candy?

I’m really super proud of these guys and so happy with how they turned out. They’re going to be the PERFECT addition to my bright and cheerily kitted out kitchen, just you wait and see!

