Go Back
DIY noodle bead stacking bracelets can be made in any color for any outfit. No fancy jewelry tools or experience required!
Print

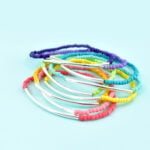
Noodle Bead Stacked Bracelets

It's so easy to use elastic beading cord to make a stack of bracelets in any color!
Course Crafts
Cuisine Jewelry Making
Keyword Bracelet
Cook Time 15 minutes
Total Time 15 minutes
Cost $1 or less apiece

Instructions

  • Cut a length of elastic jewelry cord 8-10". Apply a small piece of masking tape to the end and fold it over itself.
    Cut a length of elastic jewelry cord 8-10". Apply a small piece of masking tape to the end and fold it over itself. This will stop the beads from sliding off of the cord as you work.
  • Begin stringing your beads onto the elastic cord.
    Begin stringing your beads onto the elastic cord. Notice how my beads are wonky and misshapen? At this point it is more noticeable than when the bracelet is actually worn.
  • Once you've gotten some length string on the noodle bead try it around your wrist. Remove or add seed beads until you get your perfect fit.
    Once you've gotten some length string on the noodle bead try it around your wrist. You want the fit to be kind of snug so the noodle beads stay in the right position on your wrist. But don't make it so snug that if your arms/hands swell throughout the day (mine are awful) that it will be an uncomfortable fit. Remove seed beads until you get your perfect fit.
  • Take note of the length of seed beads to make a uniform stack of bracelets.
    Take note of the length so you can make all of your bracelets the same size. For my bracelets I decided to go with a length of 5.25" of seed beads per bracelet. I kept track of the length with a small ruler.
  • With all of the beads on your cord, cut off the masking tape. Match up both ends of the elastic and create a loop close to the beads. Pull both ends through the loop and pull tight. Hold onto the knot and pull both ends. Then take the ends and pull them apart to put more pressure on the knot. Pull on bracelet to make sure the knot holds.
    With all of the beads on your cord, cut off the masking tape. Match up both ends of the elastic and create a loop close to the beads. Pull both ends through the loop and pull tight. Hold onto the knot and pull both ends. Then take the ends and pull them apart to put more pressure on the knot. Pull on bracelet to make sure the knot holds.
  • Pull the beads apart so that you can easily access the knot. Apply a small amount of glue to the knot to give it extra hold. Allow the glue to dry before releasing the elastic to prevent gluing your beads to the knot.
    Pull the beads apart so that you can easily access the knot. Apply a small amount of glue to the knot to give it extra hold. Allow the glue to dry before releasing the elastic to prevent gluing your beads to the knot.
  • Once the glue has dried, trim the excess cord from the knot. If you're also using the noodle beads you can leave a bit of length on the ends of the cords and pull the knot and ends inside to hide it.
    Once the glue has dried, trim the excess cord from the knot. If you're also using the noodle beads you can leave a bit of length on the ends of the cords and pull the knot and ends into the noodle bead.